Navajo Tacos

Mr. Blue Eyes tells a story about how one of his history teachers was teaching them about the Sioux Native American Tribe. The teacher got up and wrote “Sew” on the black board (this was before white boards–when did I get so old?). No kidding. The man should have been fired on the spot. I know a regular Joe could have made that same mistake, but this guy was TEACHING the class. Fired.

What does this have to do with cooking? Absolutely nothing. But if you’re going to make Navajo Tacos, you have to know how to say it. The “j” says the “H” sound. Don’t let it tell you otherwise. Nava-hoe. Say it with me, now. Nava-hoe. Let’s try it with the correct spelling. Navajo. Good.

Also, before we begin: I am not using native Navajo Fry Bread. It’s fairly easy to do and maybe someday I’ll make a post of it, but today is not that day. I am not an experienced Fry Bread maker and so I stick to what I know–regular old yeast-risen dough.

Let’s begin, shall we?

Meat Mixture Ingredients*:
1 Medium Onion
1 lb Ground Beef
2.5 – 3 cups Chicken Broth
1 Tbsp Chili Powder
2 cloves Garlic, chopped (or use powdered)
2 tsp ground cumin
2 tsp dry oregano
2 tsp dry basil
2 cans Pinto Beans

1. In a Large pot, saute the onion in a Tbsp butter or oil, about 3 minutes, until limp.
2. Add ground beef and brown. Drain off any fat.
3. Add the chicken broth and all the herbs. Stir until combined. Add beans.
4. Set to simmer and stir occasionally. (I also do this in the morning and put it in my crock pot on Warm for dinner in the evening.)

Fried Scones Ingredients**:
Bread Dough: I use this recipe. You can also use Frozen Rolls–thawed, or whip up some fry bread yourself.
2 – 4 cups Vegetable Oil

1. In a Large Skillet, pour oil in until there’s about 1/2″+ in the bottom. Heat the oil over med/high heat.
2. While the oil is heating, roll out a portion of bread dough on a slightly floured surface. Using a pizza cutter or knife, cut into sections. OR take a large handful of dough and work it flat into a disc shape (if you are using frozen rolls, for example).

3. When the oil is hot (and not until then!), gently place a section of bread into the oil. Let it cook about 1 minute or until lightly browned. It will puff up–and it’s supposed to! Using tongs or two forks, gently turn it over. Be CAREFUL! Oil burns are NO FUN.

4. Remove onto a paper towel and keep warm in the oven, if needed.

Don’t be fooled! I used paper towels between each layer, but that wouldn’t look very good in a picture, would it?

Topping Ingredients:
1-2 Large ripe tomatoes, chopped
3/4 lb cheese, shredded (we use Cheddar)
1 sm bag (or 1/2 head) Lettuce, shredded
1 C sliced green onions
1 C sour cream
Salsa (if preferred. I like it. Mr. Blue Eyes does not.) 🙂

Layer a Scone, a ladle full of meat sauce, and the toppings you want onto a plate. Cut into it with a fork, or eat it by hand.

*I have found that sometimes the chicken broth needs a little thickening. It tastes great without the thickening, but it can be a little runny. This leads to soggy scones. Gross! Use a little corn starch and cold water (maybe 1/3 C corn starch to 1/4 C water).

**Scones are DELICIOUS lathered in a layer of honey/butter, too! We always leave some room for this delectable dessert!

Source: Modified from a good family friend, Janet

~Kara

Cinnamon Rolls

These are one of my weaknesses. I don’t know why I don’t make them more often since they really aren’t  hard. Most times I just throw my bread dough ingredients in the bread maker and push a button. Then, an hour and a half later (you know, when the bread machine beeps telling me the dough is done), I roll the dough out and voila! I’m on my way to gaining 100 pounds. 🙂 Just kidding. Moderation in all things, right? That’s why I have to give them away. Makes you look like an AWESOME neighbor. Except when I’m greedy and keep them all to myself. Then I make my family happy because they get some, too. It’s win/win, really.

Ingredients*:
Your favorite bread dough–from scratch or a thawed, frozen loaf of dough works too.
1/4 Cup (1/2 stick) Butter
Several Tbsp Ground Cinnamon
1/2 Cup Brown Sugar
Chopped Walnuts, Pecans, and/or Raisins (optional)
18″ piece of thread

1. Preheat oven to 400 degrees F.
2. On a lightly floured surface, roll out the dough into a Large Rectangle, about 1/4 inch thick.
3. Using a rubber spatula, paint the butter over the dough. Leave 1/2 inch unbuttered on one of the long sides of the rectangle.
4. Sprinkle cinnamon all over the butter. Keep it fairly light and remember to leave that unbuttered portion “clean”.
5. Sprinkle Brown Sugar all over the cinnamon. I don’t know if 1/2 Cup will do it. I just grab handfuls out of the bag and have learned how much I like. Experiment until you find how you like it. Just remember all your neighbors will love you for it.
6. If you want, now is the time to add the nuts and raisins. We do it both ways at our house.
7. Beginning on one long side, begin to roll the dough toward the unbuttered 1/2 inch seam. Once you reach the seam, fold it up and pinch along the roll so you close all the cinnamon-sugar in.
8. Take the thread and slide it under one end of the roll–about 2-3 inches. Cross the string over the top of the roll (like the very first step to tying your shoe) and pull the ends until the string cuts through the roll completely. Repeat till you have the whole roll cut into cinnamon rolls. I don’t know why, but this is my very favorite step. Don’t judge.
9. Lay the Cinnamon Rolls in a 9×13″ pan about 1 – 2 ” apart. (I actually use an 11×15 glass pan, but you don’t have to). Cover and let raise for 1/2 hour.
10. Bake for 15 – 20 minutes.

Glaze*:

2 Tbsp Butter, softened
2 Cups Powdered Sugar
1/2 tsp Vanilla
1/4 – 1/3 Cup Milk

1. In a small bowl, cut together the butter and the powdered sugar until the sugar takes on a slightly yellow hue.
2. Add the vanilla.
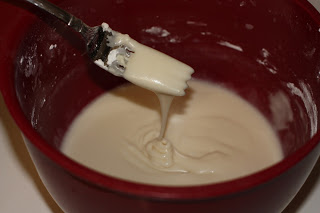
3. Gradually add milk and stir with a fork until you get a runny consistency. If the glaze is “gritty” add more powdered sugar and mix till smooth.
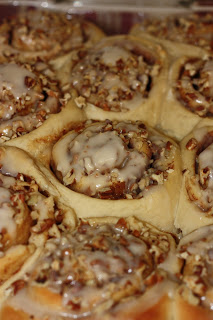
4. Drop spoonfuls of the glaze on each cinnamon roll right after they come out of the oven.

*You should know that I really just eyeball most of this stuff. Once you’ve made the recipe a few times, you’ll know how each step should look according to your taste. And don’t be afraid to play around a little. One friend told me she uses white sugar and orange peel zest instead of brown sugar and cinnamon. I’ve never tried it, but it sounds great!

Source: Adapted from a good family friend

~Kara

All Purpose Bread Dough

I love making bread. Maybe it’s my mom’s blood coursing through my veins, but making bread just makes me feel so…so…ACCOMPLISHED! If I do nothing else in a day but make a loaf of bread, I have been successful. The end.

We use this recipe for many things. That’s why it’s ALL PURPOSE! Rolls, Cinnamon Rolls, a regular loaf, etc. I have even used it to make Navajo Tacos and fried it for the scones. All these things will be posted on the blog eventually, but we have to have the basics first. Right?

Ingredients:
4 Cups Warm Water, divided
4 Tbsp Yeast
2/3 C + 1-2 Tbsp Sugar
4 Eggs
1/2 C Butter (or margarine)
4 tsp Salt
10 – 12 Cups Flour

1. In a mixing bowl combine 1.5 C warm water, yeast and 1-2 Tbsp Sugar. Wait approximately 5 minutes for it to activate (get bubbly).
2. Add the rest of the water, 2/3 C sugar, the eggs, the butter and the salt and mix together. It won’t fully incorporate, just kind of mix it all around.
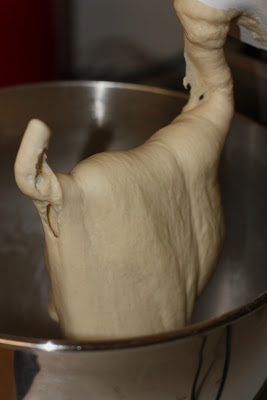
3. Mix the flour in, one cup at a time, until a slightly sticky dough forms. Knead for 200 turns on a floured board–or, if you’re lazy like “yours truly,” let the stand mixer go for 10 – 15 minutes.
4. Cover with a towel and let raise till doubled in size.
5. Punch Down and make something YUMMY!

~Recipe halves easily!
~Can be refrigerated for up to 1 week for later use.

Source: My friend, Stasha P.

~Kara

Turkey Avocado Panini Sandwich

This time of year always brings out cabin-fever in my house. I get itchy for “summer food.” And since our local grocery store had avocados at reduced prices (nice of them to comply to my mood, don’t you think?), I thought, “What better way to kick winter in the bum?” (That’s right. Bum.)

Ingredients:
2 slices Country White or Sour Dough Bread (or your favorite thick bread)
Turkey Breast, sliced thick*
2 slices Provolone Cheese
1/2 Avocado, mashed
squirt of lime
5 – 8 Cherry Tomatoes, halved

1. Add the squirt of lime to the avocado and stir until thoroughly incorporated.
2. Layer in the following order: 1 slice of bread, 1 slice of cheese, turkey breast, avocado, tomatoes, 1 slice of cheese, and top with the other slice of bread.
3. Smash them onto a Panini Maker until the cheese is melted and gooey. Mmm-MMMM!!

If you don’t have a panini maker, don’t sweat it! Toast your bread for a little added crunch and warmth.

*Left overs are great. We have also used deli slices, and Oscar Meyer Cutting Board turkey breast.

Serves 1

~Kara

Orange Creme French Toast

 
We went to Utah’s State Fair several years ago and watched a nice woman make this. It’s so simple and so delicious that we can never go back to the “old flip-flip-fry” way of baking french toast. Take a look, give it a try, and let me know what you think!
 
Ingredients:
6 Slices Thick Bread*
6 Eggs
3/4 Cup Milk
1/2 tsp Orange Flavor
1/2 tsp Mexican Vanilla**
6 Tbsp Sugar
Squirt of fresh orange juice or a few teaspoons of orange juice (optional)
6 Tbsp Butter


1. Preheat a griddle to 300 – 325 degrees F. (Or a frying pan on your stove to Medium – Med/High heat.)
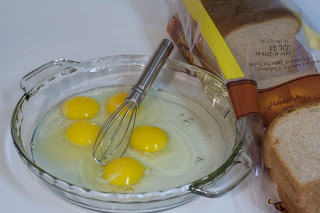
2. In a shallow dish whisk together eggs, milk, both flavorings, sugar and orange juice.
3. Dip one side of the bread into egg mixture and flip over (as you would normally).
4. Prick the egged side all over with a fork. Flip the slice back over in the egg mixture.
5. Prick the other side all over with a fork.
6. Carefully lift the bread onto a medium-hot griddle, frying pan, etc. Don’t worry if the bread falls apart a little. Just put it all together on the griddle and it’ll cook back together.
7. Cook for 3 – 5 minutes. Flip over. Lather with 1 Tbsp Butter. Cook for another 3 – 5 minutes or until puffy and done. The toast will be soft, but not gooey.

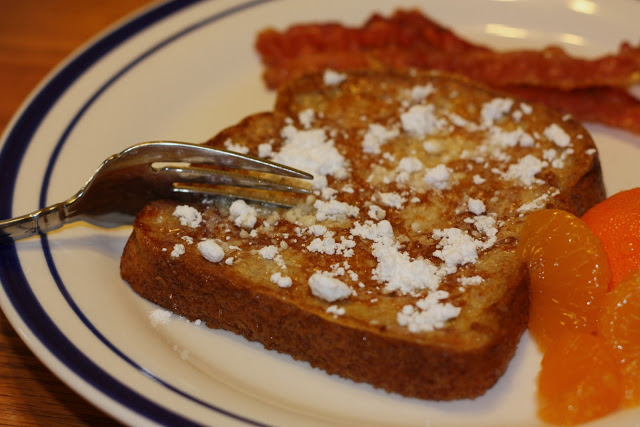
Serve Hot with POWDERED SUGAR.  Please, please, I BEG YOU, do not ruin this with syrup! (Ok, you can if you want. Just don’t tell me, ok?)

*Texas Toast is too thick, Wonder Bread too thin. We use Nature’s Own 100% Wheat Bread, but my FAVORITE when I’m not worrying about calories and fiber and all is Grandma Sycamore’s White Bread (found in Western U.S.). I think Pepperidge Farm’s Country White is excellent, too. Just use a good hearty bread.

**The lady who did the cooking show insisted that imitation vanilla would ruin this recipe, and while I’m not arguing that Mexican Vanilla is DIVINE, imitation is fine.

Source: Utah State Fair–Owner of The 1887 Hansen House Bed and Breakfast Inn, Sandy, UT

~Kara

German Chocolate Caramel Brownies

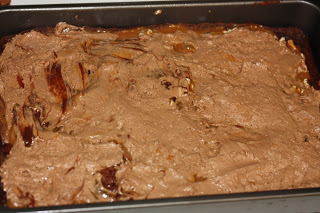
Do you see that ooey-gooey, nutty goodness amidst the chocolate? Oh yeah, baby. THAT’S why I LOVE these brownies. THAT’S why they’re my all time FAVORITE. Mmm-MMM! And don’t let the steps (or the margarine) fool you, either. They’re pretty easy and most definitely worth it.
Ingredients:
50 Kraft caramels (1 pkg)
1 Cup Evaporated Milk, divided
1 German Chocolate Cake Mix
3/4 Cup (1.5 sticks) Margarine, melted (as much as I LOATH to say it, butter does an ok job, but margarine does it better. Please tell me I never have to say those words again…)
1.5 Cups Chocolate Chips (your favorite–we use semi-sweet)
1 Cup Chopped Walnuts or Pecans–pecans are shown here, optional
1. Preheat oven to 350 degress F, and unwrap all the caramels into a medium-small microwavable bowl.
2. Add 1/2 Cup Evaporated Milk to the caramels and microwave for 1 minute increments (about 5 increments), stirring between each minute until smooth and creamy (or melt in a double broiler). Set aside.
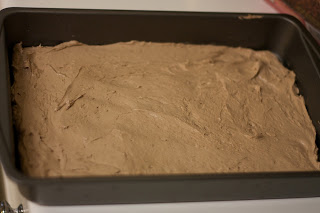
3. Mix the cake mix, the last half cup of evaporated milk, and melted margarine with a mixer for 3-4 minutes until everything is well incorporated, smooth, and light brown in color. The batter should be fairly stiff.
4. Pour 1/2 of the cake batter into a greased 9×13″ cake pan and smooth to the edges.
5. Bake for 6 minutes.
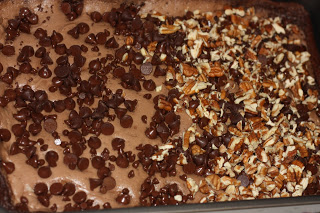
6. Sprinkle chocolate chips and nuts over the cake, immediately after removing it from the oven. They may sink a little and that’s ok.

I was trying to appease the nut-lovers (myself and Mr. Blue Eyes) and the nut-haters (the kids) and did half and half. What we won’t do for love? (notice they’re equal halves…muahahahaha!)

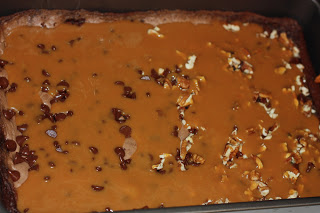
7. Pour creamy caramel mixture over the chips and nuts.

8. Using the unused portion of the cake batter, drop spoonfuls over the caramel. Try to smooth it out over the top as best you can. Sometimes it seems like it doesn’t work too well, but don’t give up! Even if you can still see mostly caramel, it’s ok. (That has happened to me.) The cake batter seems to have a mind of its own and knows to bake up over the caramel.

9. Pop it into the still-hot oven and bake again for 18 minutes. Voila! The yummiest brownies you’ll ever eat!
10. Cool completely and dive in!

A Few Notes:
~Kraft caramels melt the best. 
~German Chocolate Cake mix tastes and bakes the best, although I have used Devil’s Food and Swiss Chocolate and they turned out fine, too. The German Chocolate seems to hold the chips and nuts up best.
~I have seen recipes that use caramel ice cream topping–the kind in the microwavable jar–in place of the caramel/milk mixture. I have never tried it, but it seems like a good idea if you’re in a pinch.
~There is really no way (that I know of) to test to see if these are done. Because of the caramel, they will always be slightly “jell-o-ish” (is that even a word?!) right after you get them out of the oven. There’s no harm in leaving them in for a few extra minutes just in case, but be careful not to overcook them. Hard brownies/hard caramel = No Bueno!
~I don’t know why, but I have never made a batch that didn’t “fall” a little. If you know why this is and how to prevent it, PLEASE let me in on your secret!
~And this is the most important! These are a taste-melding brownie. As much as I love hot, fresh-from-the-oven brownies, these taste the best when they are made the day before (or the morning of at the latest). Trust me.
Source: The best mama in the world, Karri H!
~Kara

Spinach Dip

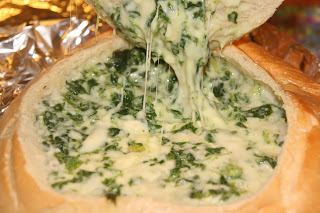
BEWARE: Once you take this dip to a party, it’s the only thing your friends will ask for in the future. It is THAT GOOD! And I’m not even a Swiss Cheese fan. I mean, LOOK at all that cheesey goodness!

Ingredients:
2 (9 oz) packages of Creamed Spinach*, thawed (found in the frozen veggie section)
3 2/3 Cups Shredded Swiss Cheese
3 Tbsp Parmesan Cheese
1/2 Cups Sour Cream
1/2 tsp Salt
1/2 tsp Pepper
1 Loaf Sour Dough Bread

1. Mix all ingredients, except for the bread bowl, in a large bowl and set aside.
2. Using a knife (we use a steak knife), cut into the bread bowl diagonally, making a circle–much the same as a jack-o-lantern top– and remove the top. Trim off extra bread to make the underside flat, and set both aside.
3. Cut all the way around the inside of the bread bowl, leaving 1/2″ wall. Carefully remove the bread from inside the bowl. We try to leave fairly big chunks of bread. Store all the extra bread pieces in an air tight ziplock bag for later.
4. Empty the cheesey contents from the mixing bowl into the bread bowl.
5. Put the “lid” back on the bread bowl.
6. Wrap the entire thing in tin foil (we use 2 sheets. One wrapped one way, the other for the other way) and bake at 450 degrees F for 45 minutes.

Serve immediately with extra chunks of bread or your favorite crackers. Our favorites are Club and Multigrain Toppers, although really, ANY cracker will do! Refrigerate and reheat leftovers…if there are any.

*One time I couldn’t find creamed spinach anywhere–honestly, what is WRONG with grocery stores these days?  I used 1 10 oz. (or less) bag of frozen chopped spinach instead and it still turned out deliciously. Thaw the spinach and dab away any excess water with a paper towel. Kind of eyeball the amount you put in. There should be more cheese than spinach. Add a few Tbsp cream, evaporated milk, or regular milk to help with consistency.

When the dip is gone, rip into the bowl!  Go ahead. Say, “Ahhh…” and take a bite!

Source: I can’t remember, but Mr. Blue Eyes actually made this round of dip. So the credit is all his!
~Kara

Creamy Chicken

My fabulous sister-in-law introduced me to this recipe and I would classify it as a comfort food.

Ingredients:
5 – 6 Frozen Boneless/Skinless Chicken Breasts (or the equivalent of tenders)
2 (10 oz) cans of Cream of Chicken Soup (or, if you’re like me, make your own here)
1 packet of Italian Dressing Seasoning
1 (8 oz) package of Cream Cheese

1. Place chicken in your crockpot.
2. Dump soup and dressing packet on top. When I make soup base, I mix the Dressing seasoning into the soup and then add it to the crockpot.
3. Cube the cream cheese, and throw it in on top of the chicken.
4. Cook on low, 4 – 6 hours*.

Serve over rice. Brown rice is pictured here, but my kids like white rice.

*I imagine you can cook this in your oven for not as much time. Try thawed chicken at 350 for 45 mins to an hour and let me know how it turns out! 🙂

Source: My Fabuloso Sister-in-Law, Debbi

~Kara

Cream of Chicken Soup

I don’t know when it happened, but I have become a “Cream of…Soup Snob.” I promise I didn’t mean for it to happen–and truth be told, I’d still use canned if I were in a pinch–but homemade is just SO MUCH BETTER. Plus, it’s fairly quick and it’s easy. What can be bad about that?

This recipe can be used as pretty much any kind of soup base. Use different bouillon for a different flavor.

Ingredients:
1/2 Cup (1 stick) Butter
6 Tbsp Flour
2 cups Milk, room temperature
2 tsp Chicken Bouillon (or two cubes)
salt/pepper to taste.

1. Measure milk into a 2 cup measuring cup and sit it on the counter.
2. Over Medium heat, melt butter. Add flour and stir constantly until a paste forms (aka: roux).
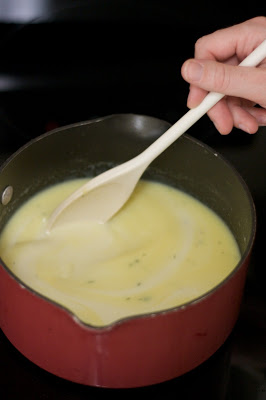
3. Add milk, bouillon, salt, and pepper, and stir until thickened–about 10 minutes.
4. This is now ready to use. Add more ingredients (cheese, potatoes, onions, etc) to make a soup or use as-is in a recipe.

Yeild: equivalent of 2 cans Cream of Chicken Soup

Source: allrecipes.com (Nell Marsh)

~Kara

Butterfly Crescent Rolls

Nothing takes me back “home” more than the smell of freshly baked bread permeating the air. Grandma and Mom are the best bread bakers I know and, with Grandma’s permission, I share this delicious recipe. Big holiday dinners just would not be the same without these rolls!

Ingredients:

1 Cup Boiling Water
1/4 Cup Sugar
1/2  Cup (1 stick) BUTTER
1 Egg
1 Tbsp Yeast
4 Cups Flour (divided)
1/2 tsp Salt
1/2 tsp Baking Powder
1. Preheat the oven to 350 degrees.
2. In your favorite mixer* (I own a Kitchen Aide, which I LOVE–but I’d prefer a Bosch for bread…here’s to someday!), mix the water, sugar and butter until the butter is melted.
3. Add the eggs and the yeast. (Test the temperature before dumping in your yeast. If it’s too hot, the water will kill it.) Mix well.
4. Add half of the flour, and all of the salt and baking powder. Mix until fully incorporated.
5. Add the remaining flour. The dough should be slightly stiff.
6. Let your machine knead the dough for 10 minutes.
7. Move your dough to a Large Bowl (optional) and cover with a towel. Let rise until doubled in size.
8. Punch the dough down.
9. On a lightly floured surface, roll 1/2 of the dough out in a circle (pizza shaped) until 1/2 an inch thick.
10. With a sharp knife (I use a pizza cutter), cut the dough like you would a pizza into several slices. The number of slices depends on what you’re making the rolls for. The fewer the slices, the bigger the rolls–good for sandwiches. The more slices, the smaller the rolls–good for a dinner side!

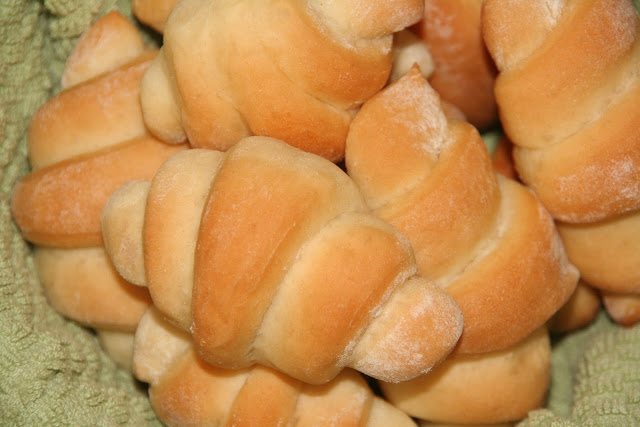
11. Take a slice by the fat end and roll it up to the point.
12. Place on a slightly greased cookie sheet, point down so it doesn’t come unrolled while baking and make bird shaped bread–NOT that I’m speaking from experience! *ahem*. Place them about 2 inches apart.
13. Continue until all the slices are shaped into rolls and on cookie sheets.
14. Cover with a towel and let rise until doubled.
15. Repeat steps 9 – 14 for the other 1/2 of the dough.
16. Bake rolls for 15 – 20 minutes, or until the rolls are a nice golden brown color.
Doubles easily.

*If you don’t have a mixer, that’s fine! I used to make these by hand. When you get the kneading part, turn the dough out onto a floured surface and knead by hand, turning about 200 times or for 10 minutes.

Source: My wonderful grandma, KaraLyn Taylor

ENJOY!
~Kara