Easy-Peezy Chicken Salad

This recipe is here for you if you ever need to make an appetizer in a flash!

Ingredients (all to taste):

canned chicken breast, drained
dill salad cubes
mayonnaise
kosher salt (or regular)
pepper
1. Mix all ingredients together! You can serve with crackers but it’s also good as a sandwich.
Note–careful not to add too much salt as there is already salt in the pickles.
Source: my old boss, Lynn Burleson, had her husband make this at our request for several work events. It’s so good that I was disappointed when it didn’t show at one!

Hungry Jack Casserole

I made this hearty dish for a “Girls Night In” I hosted a few weeks ago and everyone seemed to like it (because a few actually said so). I recommend sides that go well with BBQ–like broccoli slaw and potato salad.

Ingredients:

1 lb. ground beef

1 t salt

16-oz. can pork and beans

3/4 C Kraft BBQ sauce

2 T brown sugar

1 T instant minced onion (I used dehydrated)

1 can flaky biscuits

1 C grated cheese (I used cheddar)

1. Preheat oven to 375. Brown beef; drain. (Remember not to pour the grease down your sink!)

2. Stir in salt, beans, BBQ sauce, sugar, and onion. Heat until bubbly; pour into a 2-quart casserole dish.

3. Cut biscuits in half. Place cut side down around edge of casserole.

4. Sprinkle with cheese. Bake until biscuits are golden (20-30 minutes).

Source: my mom

Pasta Pomodoro


This makes a lot, so if you want to make less than 8 servings, I suggest halving the ingredient amounts. The original recipe doesn’t include a meat but you can add one; I added Italian turkey sausage so I’ve included it here.

Ingredients:

2 (8 oz.) packages angel hair pasta
Italian turkey sausage, to taste (I used 1 package which is 5 links but won’t use as much next time)
1/4 C olive oil
1/2 onion, chopped
4 cloves garlic, minced (I used 4 t bottled minced garlic)
2 C diced Roma tomatoes (I used 2 cans of Italian-style diced tomatoes)
2 T balsamic vinegar (I thought I had this and didn’t so I substituted balsamic vinaigrette dressing–it worked!)
1 (10.75 oz) can low-sodium chicken broth
crushed red pepper to taste
freshly ground black pepper to taste
2 T chopped fresh basil
1/4 C grated parmesan cheese
1. Bring a large pot of lightly salted water to a boil. Add pasta and cook until al dente (about 8 minutes); drain.
2. Cook Italian turkey sausage. I did mine in the skillet. I had never worked with Italian turkey sausage until then and found it kind of hard to work with b/c the casing starts to peel–I removed the casing once the sausage was cooked and before cutting it up. It was tasty, though!
3. Pour olive oil in a large, deep skillet over high heat. Saute onions and garlic until lightly browned. Reduce heat to medium-high and add tomatoes, vinegar, chicken broth, and sausage; simmer about 8 minutes.
4. Stir in red pepper, black pepper, basil, and cooked pasta, tossing thoroughly with sauce. Simmer for about 5 more minutes and serve topped with grated cheese. (I prefer mine without cheese.)
I included this in freezer friendly because I assume the sauce freezes well.
Source: Slightly adapted from recipe submitted to Allrecipes.com by DEBNJAMES

Best Liz-agna Ever

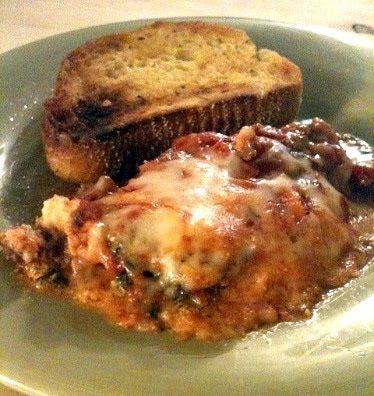
I first had this lasagna when the Activity Day girls of our ward had a daddy/daughter dinner. It was the best lasagna I had ever tasted in my whole entire life and I wasn’t the only one raving about it. (Don’t let the picture scare you. Unfortunately, I forgot to take a picture of the finished product in the dish before digging in for dinner with family and the missionaries, so this is a reheated portion that I had later. And the flavors are even better the second time around!)
Ingredients:
2 lbs. ground Italian sausage
1 clove garlic, minced
1 T = 1 t crushed (preferably fresh) basil
2 t anise seed – anise seed is the flavoring used for black licorice. I found it at Food Lion but not at our Wal-Mart. (Don’t worry, the lasagna won’t taste like black licorice!)
2 1-lb. cans stewed tomatoes
2 6-oz. cans tomato paste
9 oz. water (fill one of the 6-oz. tomato paste cans 1-and-a-half times)
olive oil, to taste
9 oven-ready lasagna noodles
3 eggs
4 C cottage cheese
3/4 C grated Italian blend or Parmesan cheese
3 T parsley flakes
1/2 t salt
1 t pepper
2 lbs. grated mozzarella cheese
fresh spinach (opt.)
1. Brown meat and drain grease. Add next 6 ingredients. Add a little olive oil to this tomato sauce for extra flavor. As you stir to combine, break up the large tomato pieces with a wooden spoon. Simmer uncovered 1-2 hours.
2. In a separate bowl, beat eggs, add cottage cheese, Parmesan cheese (or Italian cheese blend), parsley flakes, salt, and pepper.
3. Preheat oven to 375.
4. Brush the lasagna noodles generously with olive oil (otherwise they don’t soften properly).
5. In a 9×13 glass casserole dish {actually I would use a larger one if you have it, like I did, because it will be full to the brim and could boil over} greased with olive oil, layer ingredients–beginning with half the cottage cheese filling, noodles, half the meat/tomato sauce, spinach, and mozzarella cheese. Repeat. Use the spatula that you probably used for spreading the ingredients to tuck the top edges in a bit (to help avoid boiling over). If made in advance this is easily frozen.
6. In case the lasagna still boils over (like mine, despite the tucking and using a larger dish), put a cookie sheet lined with foil under the dish in the stove. Bake at 365 for 30 minutes, 45 if cold. Let stand before serving. Serves 10-12.
The original recipe does the layering differently. It has you put the noodles down first, then, “half the cottage cheese filling, add layer of fresh spinach, add layer of mozzarella cheese, and half the meat sauce. Repeat.” I did follow the instructions of the original recipe (besides adding the extra mozzarella on top), but it gave me some noodles that didn’t cook all the way (despite following its instruction to generously grease the noodles with olive oil). I figure the layering I’ve provided should help with that. Who knows, maybe you won’t even need to add olive oil to the noodles. Let me know how it works for you!
Source: my friend Liz. C. (hence the name “Liz-agna”) made this for the afore-mentioned activity; she got the recipe from her mother

Absolute Mexican Cornbread

I once found a recipe for Mexican cornbread in the very first “real” cookbook I ever received: “The I Don’t Know How to Cook Book” my mother gave me before going off to college. It was delicious. For some reason when I wanted it again I couldn’t find the book (even though I had the recipe marked just a few days ago) so I looked it up online; this recipe, I dare say, may be the exact same…

Ingredients:
1 C butter, melted
1 C white sugar
4 eggs
1 (15-oz) can cream-style corn
1/2 (4-oz) can chopped green chile peppers, drained {I used the whole can. And it is my personal opinion that Old El Paso is the best brand for this product.}
1/2 C shredded Monterey Jack cheese
1/2 C shredded cheddar cheese
1 C all-purpose flour
1 C yellow cornmeal
4 t baking powder
1/4 t salt
1. Preheat oven to 300 degrees. Lightly grease a 9×13 inch baking dish.
2. In a large bowl, beat together butter and sugar. Beat in eggs one at a time. Blend in cream corn, chilies, Monterey Jack and Cheddar cheese. {I wasn’t able to find shredded Monterey Jack cheese in its own bag but thankfully Borden has a mixture of cheddar and Monterey Jack, which makes this recipe that much easier!}
3. In a separate bowl, stir together flour, cornmeal, baking powder, and salt. Add flour mixture to corn mixture; stir until smooth. Pour batter into prepared pan.
4. Bake in preheated oven for 1 hour, until a toothpick inserted into center of the pan comes out clean.
Yields however many servings you can get according to how you cut it–out of a 9×13 baking dish.
This cornbread is a great side dish for Mexican Chicken Stew!
Source: Submitted to Allrecipes.com by Judy Spence

Mexican Chicken Stew

We once served this stew when we had the missionaries over for dinner. Apparently one of the elders liked it so much that he told another elder coming to our ward about it, and it has been requested!

Ingredients:
1 pound boneless skinless chicken breasts, cubed
1 T canola oil
2 cans (14 1/2 ounces each) diced tomatoes, undrained
2 C frozen corn
1 can (15 oz) black beans, rinsed and drained
1 can (14 1/2 oz) reduced-sodium chicken broth {I made my own in this amount}
1 can (4 oz) chopped green chilies {I used 2 cans of Old El Paso brand; I think their chilies are the best.}
2 T chili powder
1 T ground cumin {I used a bit less b/c I don’t really like cumin)
1/2 t salt
1/4 t cayenne pepper
Whatever you might want to add to your individual serving(s), such as shredded cheese, sour cream, chopped green onions and/or cilantro, etc.
1. In a small skillet, brown chicken in oil.
2. Transfer chicken to a 5-quart slow cooker.
3. Stir in the remaining ingredients. {I just combined them all and then stirred.}
4. Cover and cook on low for 5-6 hours or until chicken is no longer pink.
5. Personalize your servings and enjoy!
Yields 6 servings.
Source: Renamed by me, recipe used was submitted to Taste of Home by Stephanie Rabbitt-Schappacher of West Chester, Ohio

Hearty Italian Sausage & Spinach Soup

To quote my husband, “I don’t want this to go to your head or anything, but this is so good, I don’t even want to eat it with crackers.” Hahaha! And even my 19-month-old liked it. He picked out the sausage (and ate it), dipped crackers in the soup, then sucked the soup off the cracker.

Ingredients:
4 Italian sausages or 1 pkg ground Italian sausage
2 cans (14 oz each) reduced-sodium chicken broth
3/4 C chopped onion (or dehydrated onion)
2 garlic cloves
olive oil (I used EVOO)
1 14.5 oz can diced tomatoes, undrained
1 10-oz. package frozen chopped spinach, thawed and well drained (Or you can use frozen bagged chopped spinach like me–then you don’t have to drain it. The bags are usually 16 oz. instead of 10 but I still use the whole thing and add water to the soup if needed.)
1 1/2 t dried oregano leaves
1/2 t salt (varies according to the amount of sodium in your broth)
1/4 t ground black pepper
1/4 t dried basil
1. Gather all your ingredients so that the spinach can begin to thaw while you form the Italian sausage into balls. Remove sausage from casing and form into balls about the size of a nickel (or whatever size you’d prefer). If you’re using ground Italian sausage, begin browning it over medium heat.
2. Start your chicken broth if you’re using bullion. (I like to add 28 oz. of water and then 2 packets of Herb-Ox chicken bullion powder. I think these packets have great flavor and they’re sodium free.)
3. Chop the onion and garlic.
4. Cook and stir onion and garlic in hot oil in Dutch oven or large stock-pot on med-high heat for 3-5 minutes or until onion is tender. (If using dehydrated onion, wait to add until after broth.)
5. Add broth, tomatoes with their liquid, spinach, oregano, salt, pepper, and basil; bring to a boil.
6. Add sausage.
7. Reduce heat to low; cover.
8. Simmer until sausage is cooked through, about 15 minutes. Makes 4-6 servings.
Source: Adapted from “Hearty Meatball Spinach Soup” recipe found on the back of an old Premium crackers box; that recipe can be found here.

Egg Sandwich–To Go, Please

I’m sure many families have their own version of an egg sandwich, and we have more than one. This particular version is more truly a sandwich. I adapted it a bit from our English muffin version with an egg over easy so it could be eaten “on the go.” It can be made in less than 10 minutes.

Ingredients:
Cooking spray
2 eggs
Salt and pepper, to taste
1 slice American cheese
2 slices bread (I use Arnold whole wheat)
Butter, to taste (we love Brummel and Brown)
1. Spray small skillet with cooking spray, even if it’s a non-stick skillet. Crack eggs into skillet (they should touch) and begin cooking between medium & medium-high heat (the higher the heat the closer you will need to watch to avoid burning). Add salt and pepper.
2. When you notice some bubbling in the egg whites and browning around the edge, add cooking spray to the top of the eggs and see if your non-draining spatula will allow you to CAREFULLY flip the eggs over, picking up the skillet and tipping it a bit so the yolks don’t have as far to “flop” and are less likely to break. (If the egg’s not ready, try again in a bit.)
3. Add salt and pepper to this side. Put the slice of cheese on top (eventually melting it).
4. Put the bread slices in the toaster. (My toaster toasts plenty on its lowest setting; you may need to adjust the time at which you toast according to how toasty you like your bread.)
5. Break the egg yolks so that you don’t have to worry about them dripping while you’re eating on the go (they will get a chance to cook just long enough during the next step…). Why bother not breaking them until now? –I guess I prefer the slightly different taste, so I avoid “overcooking” the yolk.
6. Add butter to one side of each bread slice (butter sides in once the sandwich is made so you don’t get it on your hands).
7. Add the eggs and cheese (maybe doubled over to fit the bread) to one bread slice, flip the other bread slice on top, and voila! Grab a paper towel and go! [I mean, enjoy your lovely protein-packed sandwich?… 😉 ]
Source: adapted from joint effort by the hubs and me (Ok, mostly the hubs. And then I adapted it to make this version.)

Pasta de Teague

My husband and I made up this recipe one night and it’s been a favorite ever since. It’s kind of a “make-your-own” pasta like you see in Italian restaurant menus because you can put as much or as little of what you like with just a few basic ingredients. Feel free to add other things you think would be great additions!

Ingredients:
3/4 – 1 package non-long-noodle pasta (bowtie, penne, cartoon shapes…something fairly bite-size)
2-3 Italian sausages (we typically use mild, I don’t think the brand matters)
2-3 tsp minced garlic
Olive oil (3 T or more)
Roma tomatoes, to taste
1-2 red bell peppers
Basil, thyme, and oregano–preferably fresh–to taste
Salt, pepper, and whatever spices your tastebuds desire–to taste
1 1/2 – 2 C shredded parmesan cheese (opt.)
1. Cook the pasta according to package directions.
2. While the water for the pasta is cooking, remove sausage from skins (I think it’s easiest to slice lengthwise down the middle then pull the skin from the top…) and begin cooking in skillet on medium – medium-high heat (…with the flat part down first).
3. While the pasta and Italian sausage is cooking, slice and chop your vegetables.
4. Once the Italian sausage is cooked enough to cut with a wooden spoon, add the vegetables to the skillet and continue cooking.
5. When pasta is cooked, strain and return to pot. Toss with olive oil, add skillet contents and all remaining ingredients, toss again.
6. At this point you can serve as is OR transfer to a baking dish, cover with parmesan cheese, and broil in oven until cheese is melted. Makes approximately 4 servings as a main dish.
Source: brainpower

Chicken Pie

These chicken pies aren’t as “deep” as I consider chicken pot pies to be. They are very simple and easy to put together when the chicken is cooked and shredded in advance.


Ingredients (for one pie)
2-3 chicken breasts, cooked and shredded
1 can cream of chicken soup
1/2 – 1 bag of frozen mixed vegetables
2 frozen deep-dish pie crusts, or 1 deep-dish and 1 roll-out crust (found in refrigerated section)
Butter, optional
Salt and pepper, optional

1. Preheat your oven to 350 degrees if you’re planning to bake the pies after assembly.
2. I prefer poaching the chicken with herbs ahead of time or using leftovers from Our Best Bites’ Fauxtisserie chicken, which works out nicely because the chicken is flavorful and already around. I have also found it’s easier to shred chicken when it’s warm. If you’re short on time you can always use your food processor for all or part of the chicken instead of having to take the extra time to shred it. (You could also use canned chicken but “IMHO” doing so makes the pie less flavorful…) Mix the chicken with the cream of chicken soup.
3. Add mixed vegetables as desired and incorporate into the chicken mixture. It may look something like this, depending on your personal preference and how much of each ingredient you’d like to use:
4. Put the chicken mixture in the deep-dish pie pan.
5. Add the other crust or roll-out crust and then slice off extra & pinch together (I pinch using my thumbs). Freeze at this point if you’d like (they do fit in a gallon-size Ziploc bag).
6. Add butter to the top (opt.) and bake at 350 degrees for 20-30 minutes–really you just want the top to brown and the pie to be heated through because everything else is cooked. (Cooking time is longer from frozen, in which case leave more time for cooking…I usually eyeball it.) I always add salt and pepper to taste before digging into my own portion, but of course if you’d prefer you can just add some to the mixture itself during step number three.

Notes
This recipe is easily doubled. I like to eat this with biscuits; then if I have extra filling I just eat it with the extra biscuits later!

The two pies you see in the picture were done a bit differently for the sake of experimentation. Another deep-dish pie crust was used for each (vs. refrigerated roll-out pie crust). The left pie, as you may be able to tell from the ridge, had the top “flipped” onto it; the right pie had the top “set on top” of it. The left pie cooked for 5 minutes before the top was buttered. For the pie on the right, I used a wet paper towel to wipe/even out the flour that came on it, then added butter and put it in the oven (it also cooked 5 minutes less, technically).

Source: I got this recipe from my sister-in-law, Myra, and have customized it with my commentary.