German Pancakes

Ingredients:
2 eggs
1/2 cup milk (we used 2%)
1/2 cup flour
3 tablespoon butter

1.  Preheat oven to 425 degrees.
2.  Crack eggs into medium bowl and add milk.  Whisk to combine.
3.  Add flour and use a whisk or hand blender to mix until batter is smooth.
4.  Put butter in pie plate and melt in oven.  When butter is melted pour pancake batter slowly in the center of your pie plate.
5.  Bake 15-20 minutes or until puffed up and golden brown.  Serve with fruit, powdered sugar, or syrup!

Source:  Somewhere online

Broccoli Soup with Homemade Croutons

Ingredients:
4 tablespoons butter
1 1/2 pounds fresh broccoli
1 large onion, chopped
1 carrot, chopped (I used a handful of large baby carrots)
salt and freshly ground black pepper
3 tablespoons AP flour
4 cups chicken broth
1/2 cup cream

1.  Melt butter in a large pot over medium-high heat.  Add broccoli, onion, carrot, salt, and pepper and saute until onion is translucent.

2.  Add flour, cook for a few minutes or until flour has changed to a light brown.  Add chicken broth and bring to a boil.

3.  Simmer uncovered until broccoli and veggies are tender (about 15 minutes).  Add cream.  Use an immersion or countertop blender to puree soup.  If using a countertop blender you’ll have to puree soup in small batches. 

4.  Return soup to pot and add additional salt and pepper (if needed).  Serve hot with homemade croutons.

Croutons:
day old french bread (I used ciabatta)
olive oil
salt and freshly ground black pepper

1.  Preheat oven to 400 degrees.
2.  Cut bread into cubes and drizzle with olive oil, salt, and pepper.
3.  Spread seasoned cubes onto a jelly roll pan and bake for about 15 minutes, turning once.

*This soup makes only 3-4 servings.  I would double or triple the recipe for a family.
*If you don’t have french bread you can use any bread you have on hand for the croutons.  I’ve used regular white, wheat, and multi-grain sandwhich bread as well as french and ciabatta.  ALL of them taste good!  
Source:  FoodNetwork.com

Pesto Pasta Bake

This recipe comes from the gd kitchen.  A while back my sister-in-law’s sister blogged about the website and showcased some amazing looking casseroles.  From the pictures alone, I was hooked (I love me some step-by-step pictures!).  The recipes are easy to follow and taste delicious.  I served this pesto bake with a veggie salad and crusty bread.  Mmmmmmm 🙂

Ingredients:
1 pound of small pasta (I used radiatore pasta)
1 cup basil pesto (I can’t remember what brand I used.  I purchased it at Sam’s club)
7.5 ounces of ricotta cheese
24 ounces marinara sauce (store-bought or homemade)
1 to 1 1/2 cups mozzarella cheese

1.  Preheat oven to 350 degrees.
2.  Cook pasta until al dente.  Drain and return to pot.

 3.  Add pesto.

 4.  Add ricotta cheese.

5.  Pour pasta into 9×13 baking dish.
6.  Spread marinara sauce over top and sprinkle with mozzarella cheese.

7.  Cover with foil and bake for 30 minutes.  Remove foil and continue baking until cheese is slightly brown and bubbly. 

*  The pesto flavor was surprisingly mild.  I think I might add more next time!
*  This recipe can easily be doubled and freezes well.

Source:  the gd kitchen

Homemade Kettle Corn

I used to make this for movie night when I lived at home with my parents.  It’s very easy to make and is ready in about 6 minutes! 

Ingredients:
1/4 cup oil (I’ve used vegetable and light olive oil.  Both work fine)
1/2 cup corn kernels
1/4 white sugar

1.  Have everything ready before you begin. Measure your corn and sugar and put into a bowl.  Pull out a large pot with a lid (I always use my 8 quart.  Do not use a dutch oven), two oven mitts, a wooden spoon, a large bowl to pour popped corn into, and salt.

2.  Pour your oil into your pot, add 3 corn kernels, cover, and heat over medium-high heat.

3.  Once the 3 kernels have popped, add the rest of your corn kernels and sugar.  Mix well and cover.

As soon as I put the lid on I rinse the sugar off my spoon.  It hardens quickly so I like to rinse it so I can use it later to mix the kettle corn with salt. 

4. After about 15-20 seconds, grip the handles of your pot and shake it.  Continue to shake your pot every 15-20 seconds until your kernels start popping.  Once they do, alternate between shaking and allowing pot to sit on burner a few moments.  When the popping slows down to 1 pop every few seconds, turn off the heat.  Give pot another shake, just for fun.

4.  Immediately pour kettle corn into your bowl and sprinkle with salt.  Stir, sprinkle more salt, then stir.

Enjoy!

*Please do not add extra sugar when making this.  After your kitchen fills with smoke and your pot is filled with burnt sugar…you will not like me anymore.  Just don’t do it.

*This recipe takes practice to get the hang of when to shake your pot and when to let it sit.  Just listen to your kernels and judge by how quickly they’re popping.

*After I’ve salted my kettle corn I like to fill my pot with soapy suds.  It makes clean up a breeze!

Source:  My memories…  Actually, I don’t know.  Probably somewhere online.

Balsamic Potatoes and Onions

Everytime I’ve roasted potatoes (or any other vegetable) I’ve kept it very simple: olive oil, sea salt and fresh ground pepper.  While that combination never fails, this is a fantastic alternative if you’re wanting to try something different.  I made these for the first time this week and they were FABulous!  I did make a few changes, though, and will list them at the bottom.  Also, this dish takes 2 hours to bake.  I know that sounds long, but the end result is totally worth it!

Serves: 4

Ingredients:
12 small red potatoes
8 small whole onions
2 tablespoons butter
4 tablespoons balsamic vinegar
1 teaspoon fresh thyme leaves
sea salt and fresh ground pepper

1.  Preheat oven to 375 degrees.
2.  Wash potaoes thouroughly, but do not remove skin.
3.  Clean and peels onions, but leave whole.
4.  Place potatoes and onions in a roasting or deep dish pan.
5.  Sprinkle vinegar over vegetables.
6.  Dot with butter and sprinkle thyme leaves on top.
7.  Season liberally with sea salt and fresh ground pepper.
8.  Cover baking dish tightly with foil and bake for 2 hours, stirring every half hour.

*I did not have small red potatoes or small onions on hand.  I quartered 5 medium-large Yukon potatoes and 1 1/2 large onions.
*I added a little extra balsamic and butter.  I wanted a nice glaze on my veggies!
*During the last hour of baking I left the foil off.  If your onions or glaze start to burn, turn down the oven temperature.

Source:  Food.com recipe

Bacon Wrap Dates

During the summer I met Matt, I was an administrative assistant at VPPS.  I had barely been hired when one of my co-workers came to me selling cook books for her daughter.  I didn’t know this woman (or her daughter) and did not want to spend $15.  However, since I was new and wanted to be “nice”,  I did it.  I bought the book.

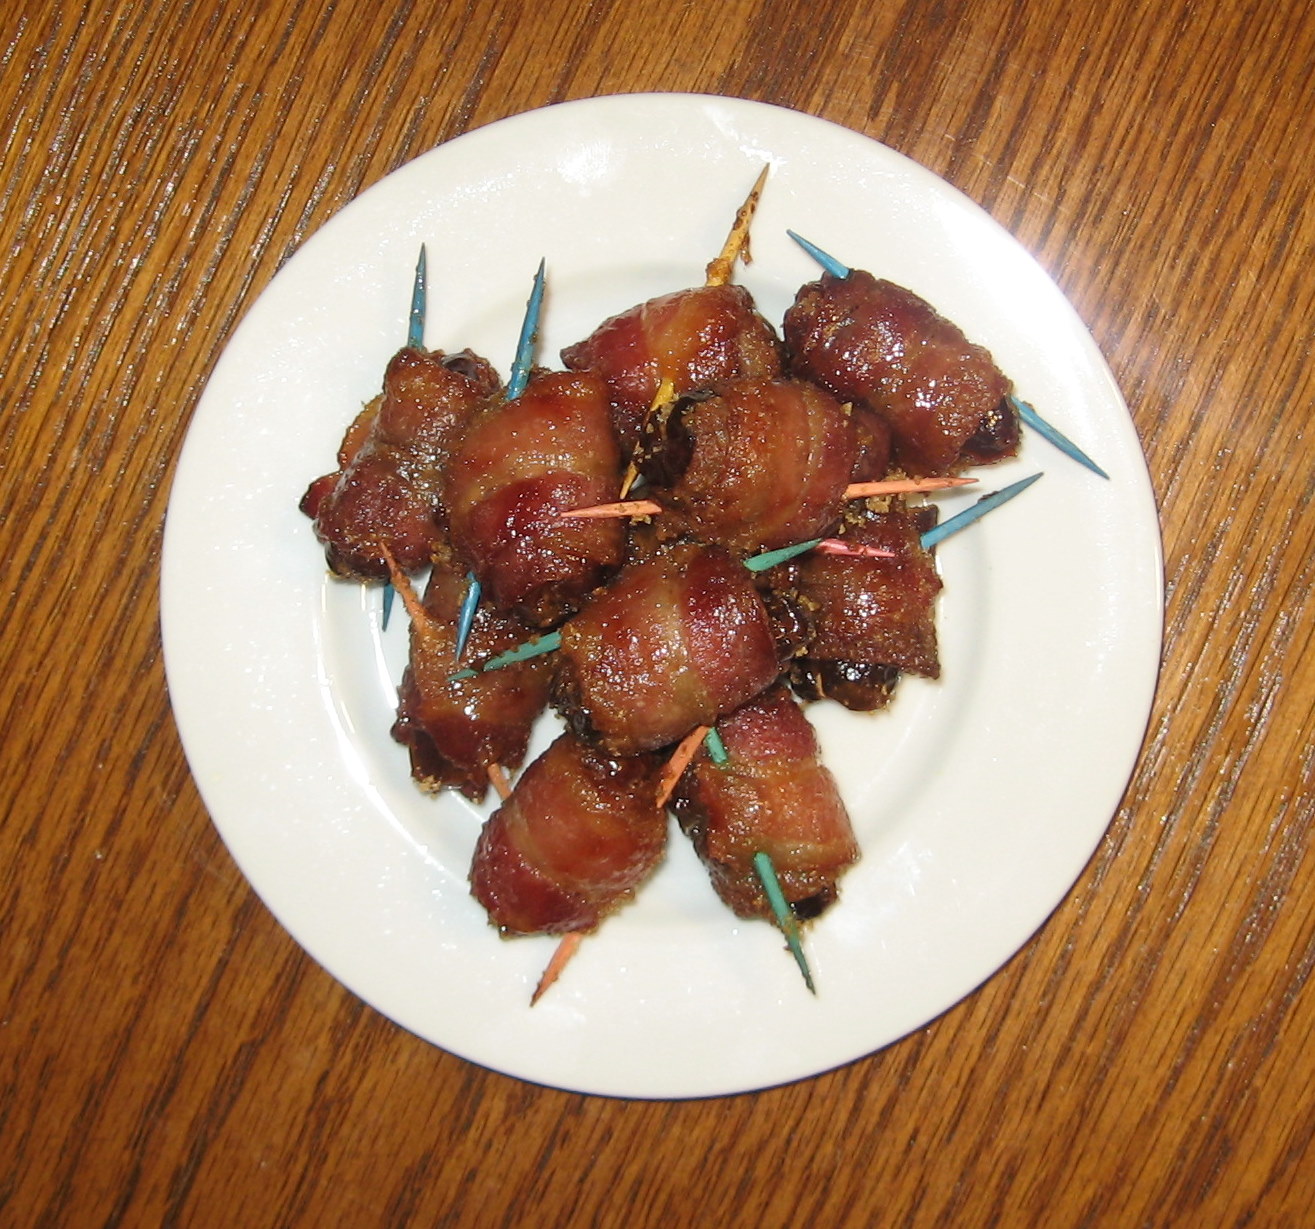
Since receiving this cook book, I’ve only used one recipe out of it; this one.  This appetizer is super easy to make and is always a hit.  Is it a $15-worth appetizer?  That’s for you to decide…

Ingredients:
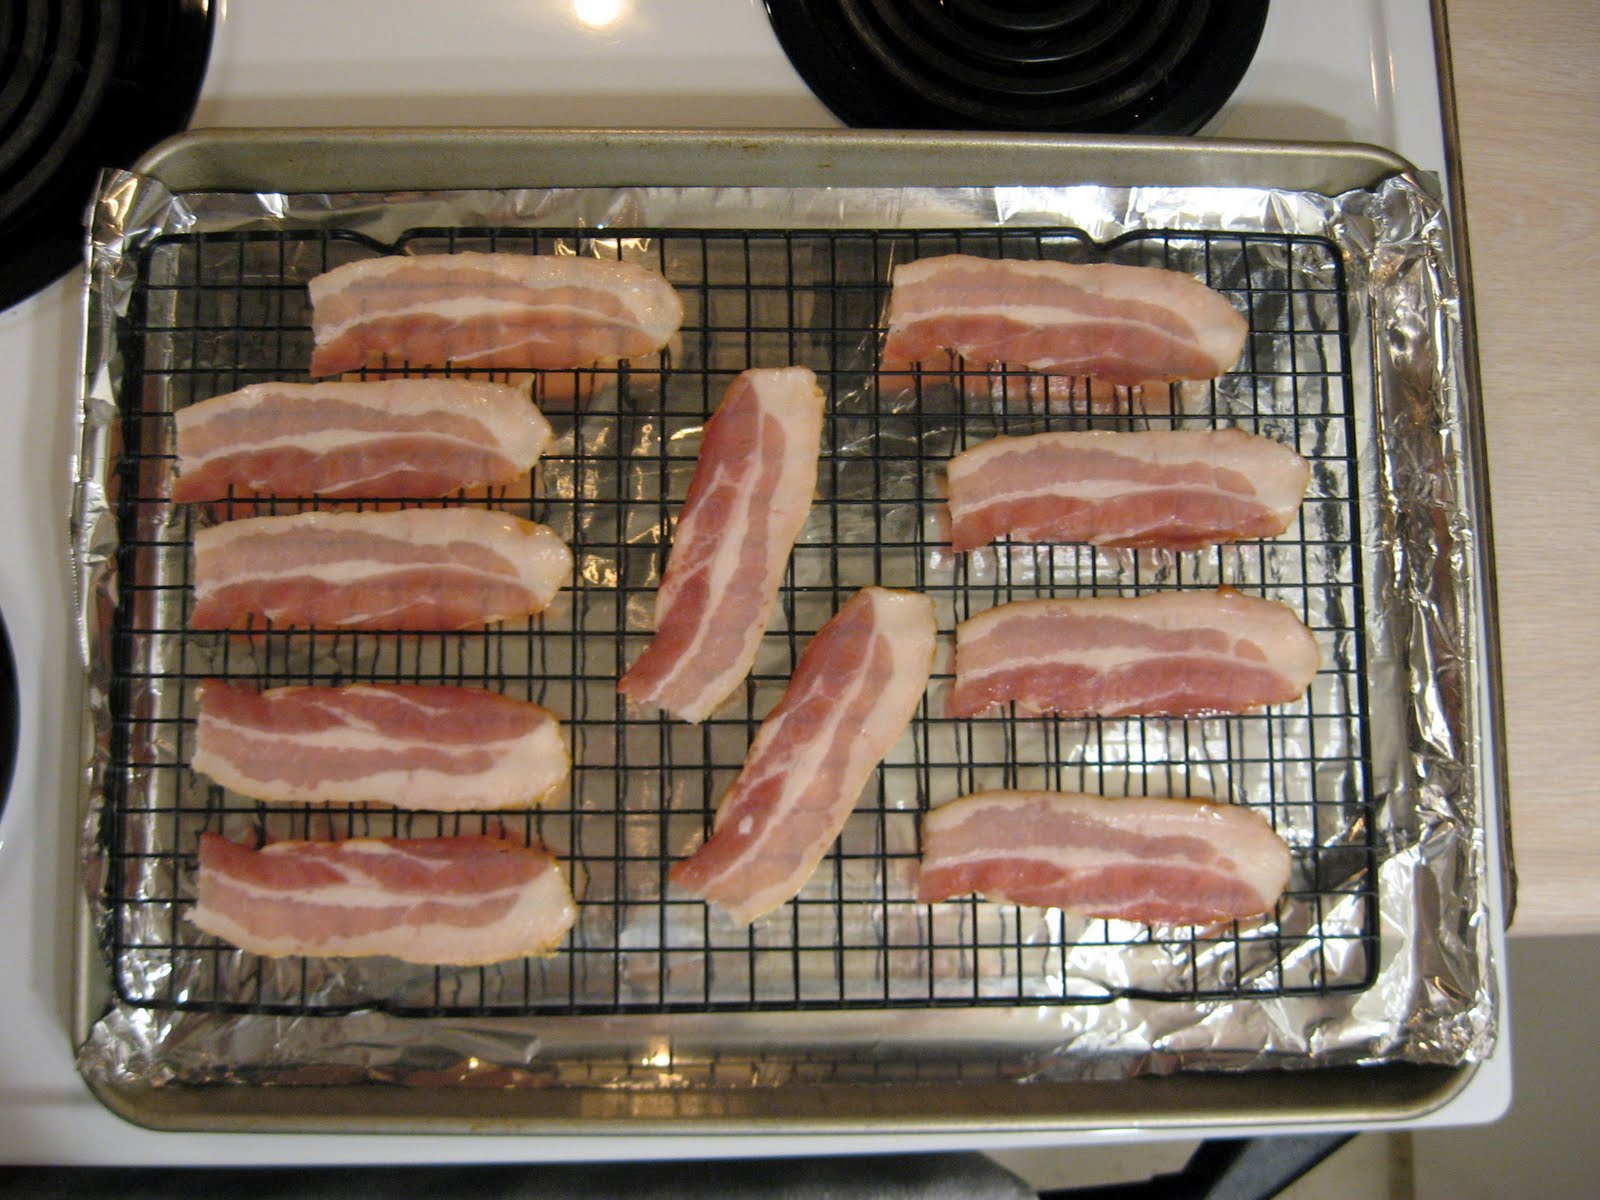
1 package of bacon ( I use regular, not thick-cut)
32- 40 pitted dates (You’ll need 2 dates and 2 almonds per slice of bacon, so this number will vary depending on which brand of bacon you buy.  For the dates, I used Mariani Premium pitted dates from Sam’s Club)
32- 40 plain whole almonds
brown sugar (Optional, enough to coat)
toothpicks

1.  Preheat oven to 350 degrees.

2.  Cut your bacon in half; I find it easier to cut the bacon with kitchen shears while it’s in the package.  Line a jelly roll pan with foil and place a wire rack on top.  Lay your bacon halves on the rack and bake until bacon is half cooked (about 8-10 minutes).  If you’re cooking a whole package of bacon, you should be able to fit all of the bacon onto one pan, with some slices slightly overlapping.  

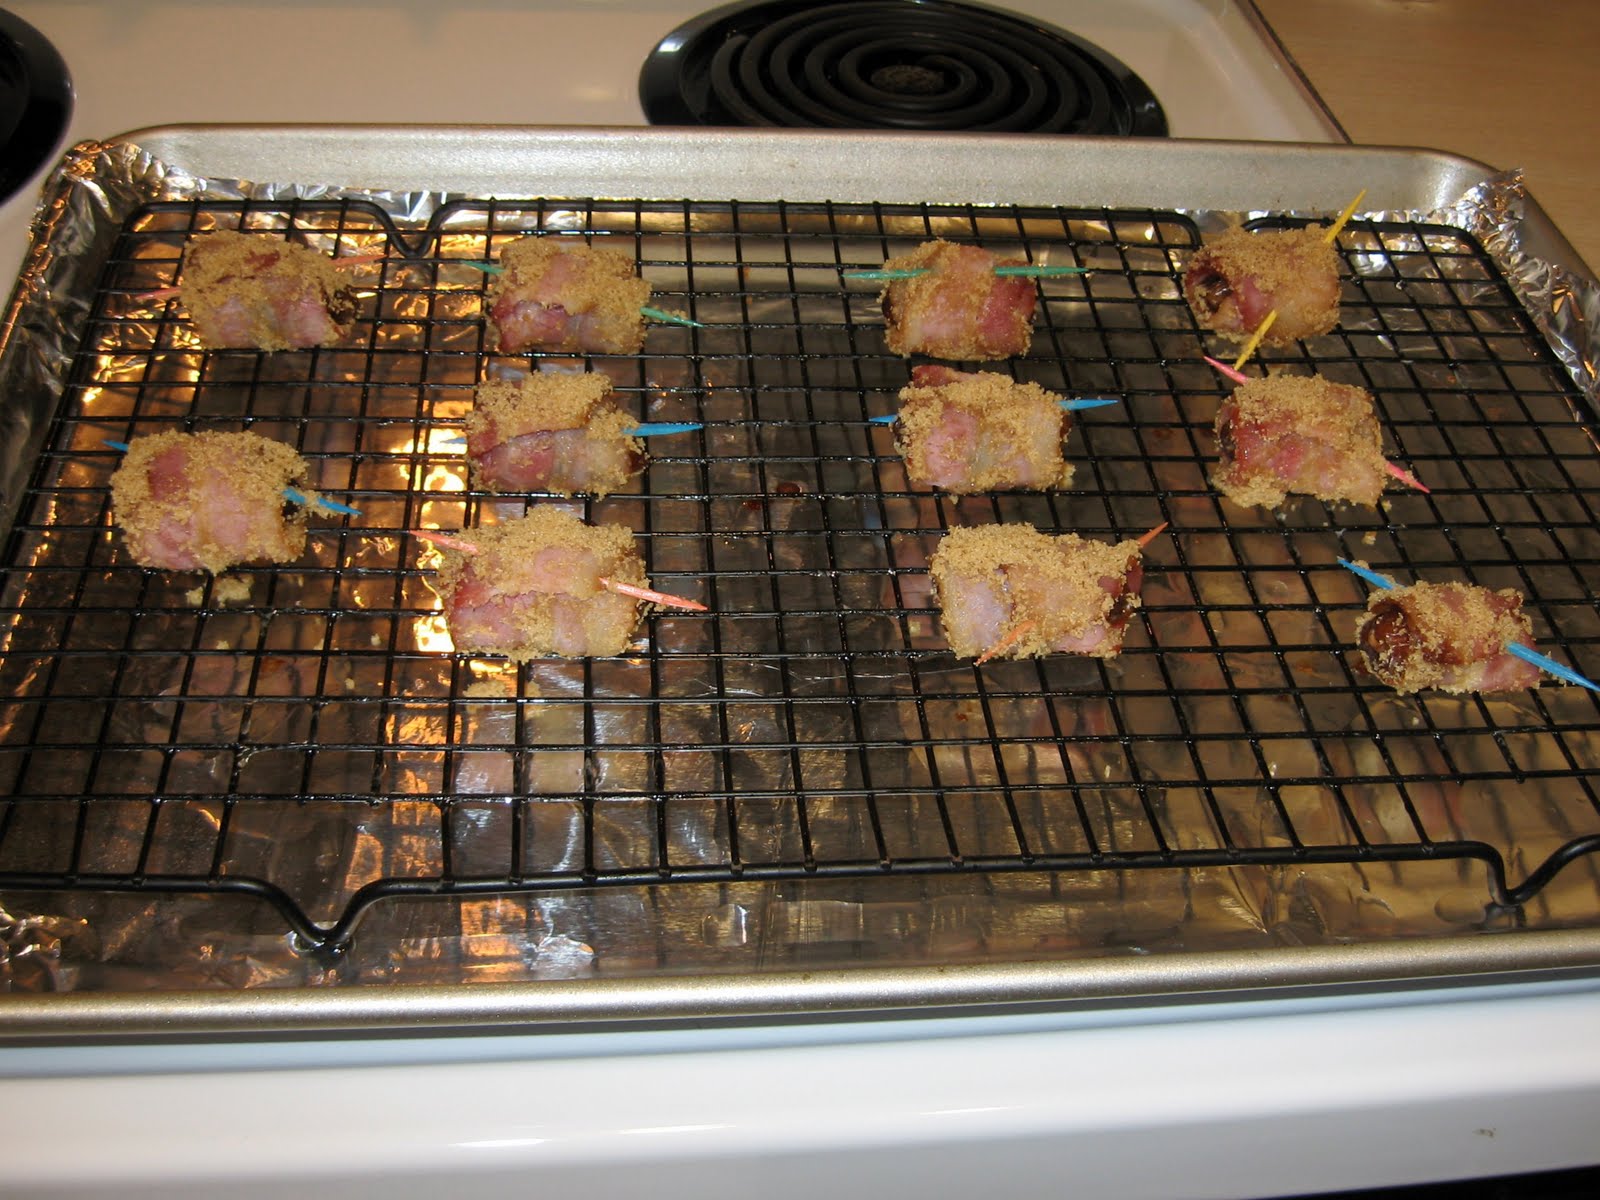
3.  While bacon is cooking, prepare your dates.  If you bought pitted dates, all you have to do is slip an almond into the center.  If you decided to buy regular dates, cut a small slit down the center to remove the pit before inserting almond.

4.  Count out the amount of toothpicks you need and have them ready.  Your hands will get dirty so it’s best to have exactly what you need before you assemble.  If you decide to use brown sugar, put enough into a bowl that will lightly coat each bacon-date. 

5.  After bacon has cooked halfway, remove from oven and allow to cool until cool enough to handle.  Usually at this point I’ll use paper towels to blot the bacon and absorb some of the grease.

6.  Roll each date in half slice of bacon and secure with a toothpick.  Then, if you desire, coat each date in brown sugar before placing back onto the wire rack. 

7.  Bake until bacon is cooked through, turning once (about 15-20 minutes).

*The dates I used were on the small side.  If you purchase dates that still have the pit, they are usually bigger.

Source:  Easy Recipes by Home Economics (FACS) Teachers 2007

Heinzen Rigatoni

When I was still in Primary, the Priests and Laurels had a cook-off as one of their mutual activities. The girls cooked Chicken Cordon Bleu, the boys (my oldest brother, Ammon, included) cooked this. The verdict? The Priests won!

This is a delicious “lite” version of your regular rigatoni. If you prefer a heavier, creamier sauce, this may not be for you.

Ingredients:
1 1 lb. package of Rigatoni (I used Penne because that’s what I had on hand.)

1 Tablespoon olive oil
1 lb. Lite Jimmy Dean Sausage (33% less fat)

1 Tablespoon olive oil
1 large onion chopped
1 lb. sliced mushrooms
2-3 garlic cloves pressed
1 Tablespoon Italian Seasoning
Ground Black Pepper to taste

1 cup heavy cream
1 cup shredded parmesan cheese (use fresh parmesan if you can!)

1. Cook rigatoni in boiling water til aldente.

2. Meanwhile, in a separate pot, heat 1 Tbls. olive oil and brown the sausage. (Jimmy Dean Lite sausage has almost no fat so you’ll definitely need a little olive oil. As a result, you won’t need to drain the sausage after you brown it). When sausage is cooked through, remove and set aside in a bowl.

3. Heat 1 Tbls. olive oil in the same pot you cooked the sausage. Add onion, mushrooms and garlic. Saute until onion is transparent and mushrooms are tender but not mushy. Once vegetables are cooked, add sausage back to the pot and add 1 Tbls. Italian seasoning, salt and pepper.

4. Drain pasta. Return it to the pot and add the meat mixture, heavy cream and parmesan cheese. Mix well and keep warm.

*If you desire a creamier sauce, just add more cream.

*To make this recipe even lighter, use whole wheat rigatoni and half n’ half in place of the cream.

Source: My mother, Alexandria Heinzen

Mexican Rice

This recipe has been passed down from my feisty, 5’2″ Mexican grandmother, “Grama DeeDee”.  I “heart” this rice so much!  It always brings back fond memories of my grandmother and my mother when I make it.  

Ingredients:
3 cups water
8 oz can tomato sauce
1/2 teaspoon ground cumin
1/8 teaspoon ground oregano
4 teaspoons Caldo De Pollo chicken bouillon (Usually can be found at Walmart in the Mexi section.  If that’s not available, use your choice of chicken bouillon)
2 tablespoons light olive oil
2 cups long grain rice (Must be long grain!)
1/2 small onion minced
4 cloves garlic pressed

1.  Have all ingredients prepared before starting to cook.

2.  Blend water, tomato sauce, cumin, oregano and chicken bouillon in a bowl.  Set near stove. 

3.  Heat oil in a 3-4 quart pan on Medium.  Add rice and stir to coat rice with oil.  Continuously stir to evenly brown.  Be careful not to burn the rice!  Add onions and garlic and stir constantly until onion is transparent.
4.  Shift pan to a cold burner and carefully add the liquid mixture.  Watch out, it will steam!
5.  Stir well and bring to a boil, stirring for about 2 minutes.  Reduce heat to a simmer.  Cover and continue to cook for about 20 minutes or until rice is tender.
*Avoid lifting the lid too soon!  There have been a few instances where I’ve done this and released all the steam.  If you do this just add a little water before putting the lid back on.
*Sometimes I’ll add about a tablespoon of tomato paste to the liquid mixture (It brings out more tomato flavor) or chopped tomatoes for texture.
*When I make this, I always use my Magnalite dutch oven.  It is the same pot my grandmother and mother use to cook Mexican rice.  My rice comes out perfect every time!

*For a healthier version, use long grain brown rice, add 1/2 cup more water and cook for 30-40 minutes.

Source:  Grama DeeDee

Coconut Cake

This recipe comes from Matt’s grandma, Martha, and is his dad’s favorite cake.  During our move to NH, we stopped in PA to have lunch with the G-parents (as Matt likes to call them) and Grandma Martha served this for dessert!  It’s light, super moist and oh, so yummy.  I asked Martha if the recipe was something passed down in the family.  She told me she actually got it from a magazine!  Originally, the recipe was more detailed (i.e. called for fresh coconut, a cake from scratch, etc…), but over the (many) years has been simplified to this.

1 box moist yellow cake mix
1 cup coconut milk
1/2 cup chopped coconut (I used the sweetened)
1/4 cup white sugar
fat free dream whip (I used a whole 12oz tub of cool whip)
chopped coconut

1.  Prepare cake mix as called for on the box in a 9×13 pan.  After the cake is done, remove from oven and pierce all over with a fork. 

 2.  When the cake has a few minutes left to bake, prepare topping.  Mix coconut milk, measured chopped coconut and white sugar in a small saucepan and bring to a boil.  Immediately spread (slowly) over the cake.  

3.  Allow cake to cool completely.

6.  Frost cake with dream whip and sprinkle (generously) with enough chopped coconut to cover. 

7.  Store in refrigerator until ready to eat.

 *When finished, the cake is ready to eat!  However, Matt and I prefer the texture of the cake after it has chilled in the fridge for a bit.  Either way, it’s all good!

Source:  Grandma Martha