A recipe so weird, I just had to try it.
There I sat, thumbing through who-knows-what outdated magazine at the salon, color setting in my hair. And I almost didn’t read it. I almost passed right by it. But when I read the ingredients I couldn’t help myself. I snapped a pic of it with my cell phone and made a mental note to try it soon.
The family was up for it. (They are adventurous with anything that involves Nutella.) And when we bravely tried it for the first time, they were not disappointed. It as a big hit! And though this dish is a rich, not-every-day kind of food, it gets requested more often than I can tell you (especially from one kid in particular).
So tonight, when we had the missionaries over for dinner and served these for dessert (at the request of that one kid in particular), I remembered….”Oh yeah, I never put this on the blog, did I?”
It only took me a year and a half to remember to share it. Once you try it, you may not forgive me for waiting so long! My apologies…..but honestly, you’ll be so transported by the unique flavor, you’ll forget all about being mad at me. 🙂
p.s…..comment below if you get why it’s called an Italian Elvis.

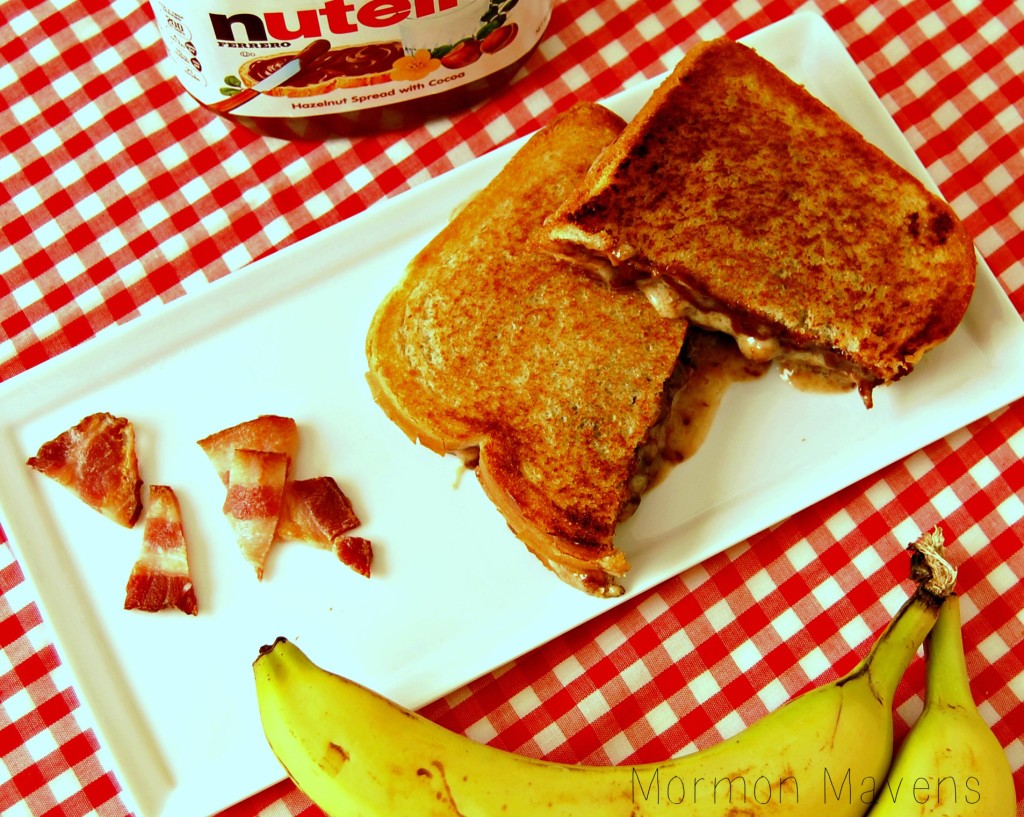
Italian Elvis Sandwiches
2016-03-08 01:23:10
Yields 4
A wonderfully weird sandwich that you can even serve as a dessert!
Ingredients
- 8 slices sturdy white bread*
- 6 strips of crispy bacon, in bit sized pieces
- Nutella
- 1 ripe banana
- 8 ounce tub of mascarpone cheese
- softened butter
- lots of napkins
Instructions
- Heat a griddle or skillet to medium-low heat (like you are making a grilled cheese sandwich, cuz well, you are!).
- Place the banana on a dinner plate and mash it well with a fork. Empty the tub of cheese on top of the mashed banana and use the fork to incorporate the two together. Set aside.
- Butter one side of a slice of bread. Place this butter-side down on another slice of bread. Then carefully spread Nutella on top of the slice that's face down with butter. About 1/8" thick is fine--it's up to you how much you want. Now place the bacon pieces on top of the Nutella. (Each sandwich has about 1 1/2 strips of bacon.)
- Carefully lift just the Nutella slice of bread and place it butter side down on your griddle or skillet. Immediately drop some scoops of your banana/cheese mixture on top of the Nutella/bacon and carefully spread it out (it will be about twice as thick as the Nutella).
- Place the other slice of bread on top (you know, the one you used earlier). Using your flipper/turner/spatula device, gently press down on that top piece. Then carefully spread some butter on it.
- When the bottom slice is golden brown, VERY carefully lift and turn it over to cook on the other side. All that gooey goodness might make this step a little challenging, but stick with me....it's worth it.
- Once the other side is done, lift it out carefully and place it on a flat surface to cool for a minute or two before slicing and eating.
Notes
- Regarding the bread*--super soft white bread will not hold up well to the spreading of Nutella and tends to flatten too much during cooking. I recommend something like Pepperidge Farm breads, which are delicious and stand up well to this recipe.
- How many sandwiches this recipe makes will depend a lot on how thick you spread the ingredients on the bread slices. The amounts listed above reflect my family's preferences and you may need to adjust the recipe based on your own preferences.
- Where to find mascarpone cheese? In my grocery store, it's found in the deli department, but if you can't find it, just ask someone at the store.
- Yes, you do need to have the bacon in pieces. If you just lay 3 half-strips on bacon down, those suckers will slide right out of the sandwich when you take a bite. Also, my family prefers it crispy; yours may like it chewier (in which case it's even more important that the bacon be in pieces).
- Why lots of napkins? You obviously haven't tried to eat one yet. Go make one, eat it, and then we'll talk.
Mormon Mavens https://www.mormonmavens.com/