Peanut Butter Chocolate Squares

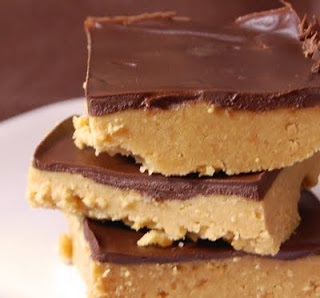
We love, love, love the classic combination of chocolate and peanut butter at my house.  This particular recipe is probably the most requested treat in our family.

Ingredients:
1 cup butter, melted
1 cup peanut butter
1 (16 oz.) pkg. powdered sugar
1 1/2 cups graham cracker crumbs
1 (12 oz.) pkg. semisweet chocolate chips, melted

1.  Combine butter, peanut butter, powdered sugar, and graham cracker crumbs in a mixing bowl.  Stir together until well blended.  Press into ungreased 9″x13″ pan.
2.  Pour melted chocolate over top, spreading evenly.  Cut into bars when chocolate is set.

Notes:

  • You can speed the process of the chocolate setting by putting the pan in the fridge.  Just remember to take it out at least a half hour before you want to cut it.  When it’s cold the chocolate will crack.
  • We have often wanted to make these bars but not had the graham cracker crumbs.  We’ve experimented with substitute ingredients with pretty good results (All Bran cereal and Honeycomb cereal to name two; pulse in the blender).
  • One of our latest variations on this has been to add coconut into the peanut butter mixture.  SO GOOD!  
Source:  My Mom

FABULOUS Peanut Butter Chocolate Bars

These things are so delicious, they’re DEADLY.
Bar Ingredients:
1.5 C (3 sticks) Butter
1.5 C White Sugar
1.5 C Brown Sugar
1.5 C Peanut Butter
(you’re already seeing the DEADLY part, aren’t you?!)
3 eggs
1.5 tsp Baking Soda
3/4 tsp salt
1 Tbsp Vanilla
3 C Flour
3 C Rolled Oats (we use instant)
1 bag chocolate chips
1. Preheat oven to 350 degrees F.
2. Cream together butter, sugars, peanut butter, and eggs.
3. Add Soda, salt, and vanilla.
4. Alternate adding flour and the rolled oats by the full 1 cup.
5. Spread in a Jelly Roll Pan and bake for 15 mins.
6. When you remove the bars from the oven, immediately sprinkle the chocolate chips over the top. Let them sit until they get wet looking and are melty to the touch. (That’s a technical term: Melty.) Then, spread the chocolate over the entire surface of the bars.
7. While this is cooling, make your frosting:
Frosting Ingredients:
2 C Powdered Sugar
3 Tbsp Peanut Butter
4-8 Tbsp Evaporated Milk
1 drop Vanilla
8. Spread the frosting over the chocolate. You can do it carefully so all you see is the frosting, or you can marble them together. (This is a source of conflict between Mr. Blue Eyes and myself. I like it marbled. It’s pretty that way.) Either way these are FABULOUS and DEADLY!!
Source: My FABULOUS sister-in-law, Debbi

~Kara

No Bake Cookies


These are great for people who aren’t a huge fan of peanut butter. They are so easy and it’s nice not to have to heat your kitchen up with an oven in order to get a sweet treat sometimes! Children love to get in on the “dropping” step of making these.

2 cup sugar

1/2 cup fat-free milk

1/2 cup butter or margarine (I usually stick with butter)

3 cups quick-cooking oats

1 cup flaked coconut

6 tbs. baking cocoa

1/2 tsp. vanilla extract

1-In a saucepan combine the sugar, milk and butter.

2-Bring to a boil, stirring constantly.

3-Boil for 2 minutes. Remove from heat.

4-Stir in the oats, coconut, cocoa, and vanilla.

5-Drop by rounded spoonfuls onto waxed paper (I also use parchment paper if that’s what I have on hand-it works fine).

6-Let stand until set.

*You can also freeze these.

Source: allrecipes.com

Fudgy Bonbons

I can’t really remember the year that I got this recipe.  I think maybe the first Christmas that we flew home from El Paso, Texas–maybe 1996 or 1997.  Anyway, we were at my mother-in-law’s house and I was trying to find something sweet to eat.  There were some holiday cookies and stuff over on top of her chest freezer and so I picked up something chocolate.  I thought it tasted pretty good, although it was dry from sitting out a long time. I asked Verna where they came from and she said her sister, Gertie Sutton, had brought them over.  So I contacted Gertie and she sent me the recipe.  The first time I made them I thought I was in Chocolate Heaven!  These have wowed my friends and family for years.  This recipe, from Mary Anne Tyndall of North Carolina, won $50,000 in the 1994 Pillsbury Bake-Off.
WARNING: Side effects of this product include addiction and sheer pleasure!

Ingredients:
60 milk chocolate Hershey’s Kisses or Hershey’s Hugs, unwrapped
1 (12-oz.) pkg. semi-sweet chocolate chips
1/4 cup butter or margarine
1 (14-oz.) can sweetened condensed milk
2 cups all-purpose flour
1 tsp. vanilla extract
1/3 cup white chocolate chips

1.  Heat oven to 350.  In medium saucepan combine Hugs and butter.  Cook and stir over very low heat until chips are melted and smooth.
2.  Add sweetened condensed milk to chocolate mixture and mix well.  Remove from heat.
3.  Lightly spoon flour into measuring cup and level off before putting in stand mixer bowl.  Add chocolate mixture and vanilla.  Mix well on medium speed.
4.  Shape 1 tablespoon of dough around each Hug, covering completely.  Place bonbons 1 inch apart on UNGREASED cookie sheet (I use parchment for ease of release from pan for cooling).
5.  Bake for 6-8 minutes.  DO NOT OVER BAKE.  Cookies will be soft and shiny but will become firm as they cool.  
6.  Cool bonbons completely on cooling racks.
7.  Melt the white chocolate chips in the microwave according to package directions.  You can add a little shortening to thin, if necessary.
8.  Dip the tip of each bonbon into the white chocolate or drizzle over .  Get creative.  You can even color the white chocolate to go with your event. 
SECRETS TO SUCCESS:
  • This is an easy recipe, but time-consuming.  
  • Try to work quickly as the dough will become harder to form around the Hugs toward the end of the batch.  
  • I just pinch off about a tablespoon of dough, roll it into a ball and then flatten in the palm of my hand, then place the Hug in the middle and fold the dough up and over the Hug.
  • The parchment I use is actually a reusable sheet and “shimmies” easily off of the cookie sheet.
  • The original recipe included nuts and used white baking bar/white candy coating melted in a saucepan with the shortening or oil.  I find using the chips and microwave more efficient and just as good.
  • Store the bonbons in an air-tight container to prevent drying out.
  • When I first tasted the bonbons, Hugs were used so they are my preference.  I did try Hershey’s Kisses with Almonds and those were really good.  Experiment with your candies.  I bet caramel would be interesting…
Source:  Mary Anne Tyndall, Pillsbury Bake-Off Winner, 1994.

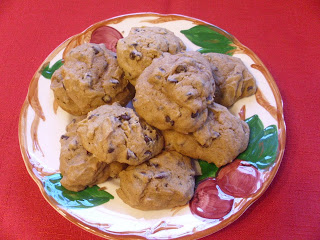
Pumpkin Chocolate Chip Cookies

These cookies are nummy and nostalgic.

They remind me of many fall things – raking leaves and jumping in them, hay rides, the crunch of a fresh picked apple, football games, the harvest, the way the air smells in the late afternoon, and of course, watching – It’s the Great Pumpkin Charlie Brown. Families stopped what they were doing to watch this. Friends came over because this was something to enjoy. It only came on once. There was no such thing as a DVD or a DVR. If you missed it you missed it.

In honor of The Great Pumpkin – Enjoy.

If your not a fan of pumpkin this works well with pureed Sweet Potatoes or Carrots.

Ingredients:

1 cup butter

2 cups packed brown sugar

2 eggs

2 cups canned pumpkin

1 teaspoon vanilla

2 tsp baking powder

2 tsp ground cinnamon

1 tsp baking soda

1 tsp ground nutmeg

4 cups all purpose or whole wheat flour (if you grind your own wheat, soft white works best)

2 cups mini semi sweet chocolate chips

1 cup chopped walnuts or pecans (optional)

1. Pre-heat oven to 375

2. In a mixing bowl beat butter for 30 seconds.

3. Add brown sugar and beat until fluffy.

4. Add eggs, pumpkin, and vanilla; beat well.

5. Add dry ingredients and chocolate chips beating until well combined.

6. Stir in nuts if using them (Dough will be soft.)

7. Drop dough from a teaspoon 2 inches apart onto a greased cookie sheet.

8. Bake in a 375 oven for 8-10 minutes.

9. Cool on wire rack

Source: Adapted from Better Homes and Gardens

Cake Mix Cookies


Ingredients:
1 pkg. cake mix of your choice* (I like to use Betty Crocker b/c the “pudding in the mix” makes for gooey-ness and I like gooey cookies.)
1/2 C melted margarine or butter (Which is 1 stick–I pop it in the microwave for 30 seconds, wait a bit, then another 30 seconds in a tall-ish glass tumbler so I don’t have to cut the butter to fit a smaller container. And I use salted sweet cream butter.)
2 eggs
1/2 C oats (quick oats are fine)
1 C (or more!!!) chocolate chips*
1/2 C raisins (optional, as always)
Whatever other things you think would be good
Baking spray (I use the one with flour in it)


1. Preheat oven to 350 deg. (best to do this first because things come together quickly).
2. Start melting the butter in the microwave and while it’s melting move to step number three.
3. Add all the remaining ingredients together in a large mixing bowl (I use the Sunbeam mixer I got for Christmas one year from my mother-in-law).
4. Finish melting the butter and add it to the cake mix mixture.
5. Mix it all together until you can’t see any more cake mix (my spatula helps me with this).
6. To form the cake mix into balls (because I don’t have a cookie scooper anymore), I like to spray the cookie sheet(s) with the baking spray, spray my hands with it, then use an ice cream scoop to get the dough out (for some portion control) and roll it with my hands. This makes about 17 “good-sized” (medium-large) cookies. {What?! No, I didn’t eat 2 whole cookies worth of dough… 😉 }


7. Bake at 350 for 8-10 minutes, or longer depending on your oven.**


Source: Julie the Coolie gave it to my mom, who gave it to me, who gave it to you, who gave it to your hairdresser’s best friend’s dog-groomer…


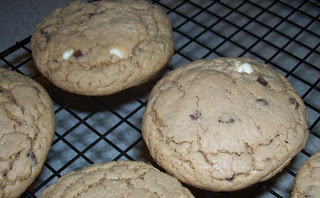
*As this is a versatile recipe, many combinations can take place. I like to use yellow cake mix and white chocolate chips; the batch you see in the pictures includes both white chocolate and mini milk chocolate chips. It’s up to you! Yay for cooking things yourself and putting whatever you want in it!
**The cookies may seem too gooey at first. Keep in mind that you can leave them in the oven longer but not too long because they will also set up more once they are out of the oven, especially if you leave them on the baking sheet. Also remember that if you don’t want the bottoms to brown, it may be best to put the cookies on a cooling rack or something of the sort–you can always pop them back in if they’re not done the way you like.

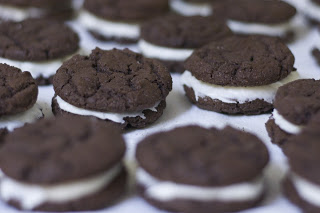
Oreo Cookies

My mom has made these cookies for years and years. I think I’m addicted to them. I blame her. 🙂
1 box Devils Food Cake Mix
1/2 tsp vanilla
1/3 Cup Vegetable Oil
2 eggs
1. Preheat oven to 350 degrees F.
2. In a stand mixer mix all ingredients till well combined and a stiff dough forms.
3. Roll into 1″ balls (I use a cookie scoop, but my mom just eyeballs it with a dinner spoon) and place on a cookie sheet 2″ apart.
4. Flatten slightly.
5. Bake for 7 – 9 minutes (I actually bake mine for 10, but that’s because my oven is…silly. And by “silly” I mean I-can’t-wait-till-I-can-pick-out-my-own-stinkin’-oven! Oops! Forgive the rant. It’s the simple things in life, right?)
Don’t over bake. The cookies will be soft and look moist when you pull them out.
6. Cool for 5 minutes or until firm, then remove from cookie sheet. Cool completely.
7. Make your Frosting.
4 oz Cream Cheese, softened
1/2 Stick (1/4 Cup) Butter or Margarine, softened
1/2 tsp Vanilla
2 – 2.5 Cups Powdered Sugar
8. Beat the Cream Cheese and Butter together until creamy and smooth.
9. Add vanilla and mix thoroughly.
10. Gradually beat in Powdered Sugar until your frosting is a good thick consistency.
11. Make an Oreo by selecting two cookies that are the same size. Spread some frosting on the underside of one cookie and sandwich it with an other.
Voila!
12. Now you must decide: Should you share? Or should you stash them away for a hidden moment during the day? (I say, moderation in all things–do both!)
Source: Modified from Heidi Brady and Angella Workman, Duchesne 2nd Ward’s 2nd Cookbook.


~Kara

Kris Kringles

This is a staple at Brew Family gatherings, especially at Christmas.  A batch disappears quickly, so be warned! Mom got this recipe from a Relief Society sister in the old Falls Church Ward in Virginia–Emily Packer.

1 cup sugar
1 cup light corn syrup
1 cup peanut butter
6 cups Rice Krispies
6-oz. pkg semi-sweet chocolate chips
6-oz. pkg butterscotch morsels
Candy sprinkles

1.  Stir sugar and syrup together in a large pot. Heat until mixture just begins to boil around the edges (30 seconds to a minute).  Remove from heat and stir in peanut butter.

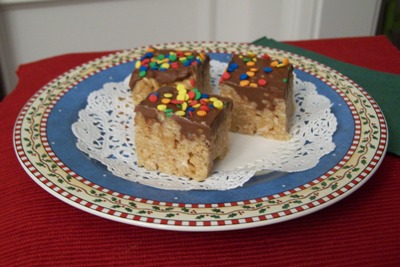
2.  Add cereal to peanut butter mixture and stir until well-blended.  Press into a 9×13 pan or dish.

3.  Melt chocolate and butterscotch in the microwave according to package directions. Stir until smooth. Spread over cereal mixture using the back of a spoon. Decorate with sprinkles.

4.  Chill until firm.  Cut into bars.  MAKES 4 DOZEN.

Source:  Brew Family Cookbook 

Chocolate Chip Cookies

I am sure that this will not be the last chocolate chip cookie recipe posted on this site, considering how much how we all love chocolate! I have tried cookie recipe after cookie recipe and this one is my families favorites. It is similar to the Toll House recipe give or take an ingredient…but better!

1 c. Butter Flavored Crisco
3/4 c. Granulated Sugar
3/4 c. Brown Sugar
1 tsp. Vanilla Extract
2 Eggs
*Blend these ingredients until smooth.

2 1/2 c. All-Purpose Flour
1 tsp. Baking Soda
1 tsp. Salt
*Add these ingredients to the first mixture.

1/2 c. Semi-Sweet Chocolate Chips
*Add chips to mixture.

Drop by rounded tablespoons on a greased cookie sheet. Bake in preheated oven at 375 degrees for 9-12 minutes or until barely golden brown! Let rest on cookie sheet for about 3 -5 minutes. Using a spatula, place cookies onto a wire rack to cool for another 3-5 minutes. *You can add any kind of chocolate chips, or nuts, candies..anything to these!
*recipe courtesy of Georgia Hancock

Royal Icing Sugar Cookies

For years I have wanted to decorate fancy sugar cookies, but really did not know how to get that porcelain look.  In rummaging through one of my favorite recipe sites, Annie’s Eats, I came across this wonderful recipe along with a royal icing tutorial for the whole “fancy” process.  This cookie is sturdy enough to keep its shape while cooking, but has a tender texture when eaten.  And the icing process, while a little time consuming (waiting for the different steps to set), is much easier than I thought it would be.  The results are so worth the time you put in.  I found the teapot and teacup cookie cutters here and the oven mitt (ahem, actually, it’s a mitten) here.

The Cookies
Ingredients:
1 cup butter
1 cup powdered sugar
1 egg, beaten
1 ½ t. almond extract
1 t. vanilla
1 t. salt
2 ½ c. sifted flour

1.  Cream butter in a mixing bowl.  Add in powdered sugar and mix well.
2.  Blend in remaining ingredients.
3.  Place dough between two layers of plastic wrap.  Press dough to flatten it some, cover up any exposed dough, and place on a plate or small cookie sheet.  Chill until firm, about 30-45 minutes.
4.  Roll out dough to no thinner than 1/4″ on a well-floured surface.  Cut out cookies and place on a greased baking sheet.
5.  Bake at 375 for 8-10 minutes.  Cookies should not brown.  Frost and decorate when cooled.

Yield:  depends on size of your cookie cutters.  I got 50+ cookies out of a double batch.
Source:  Annie’s Eats

The Royal Icing
Ingredients:
4 cups powdered sugar, sifted
2 tbsp. meringue powder
5 tbsp. water

1.  Combine all ingredients in the bowl of a stand mixer fitted with the paddle attachment. Mix on low speed until the sheen has disappeared and the icing has a matte appearance (about 7-10 minutes).
2.  Transfer the contents of the mixing bowl to an air-tight container. This will be the stiffest consistency of the icing, and at this point it is still too stiff to use for decorating. Add water a very small amount at a time and stir by hand until fully incorporated. Continue until the icing has reached a consistency appropriate for piping. (Remember, if you are having any difficulty piping, it is still too thick. Add a little more liquid and try again.)
3.  Using a pastry bag, pipe around the edges of each cookie. Let stand so the icing will set. Make sure to keep the leftover icing covered at all times when not in use so that it does not begin to harden.
4.  Once all the cookies have been edged, transfer some of the remaining icing to a separate air-tight container. Thin out by incorporating a small amount of water at a time, until the icing drips off the spoon easily when lifted and then smooths in with what is still in the bowl. If you go too far and the icing is too thin, add more sifted powdered sugar to thicken it again.
5. Once the icing has reached the desired consistency, transfer it to a squeeze bottle (or a plastic bag with a hole in one corner), and flood the area surrounded by the piping on each cookie. If it does not completely spread to the edges, use a toothpick to help it along. Allow to set.
6.  Use the remaining thicker icing for piping decoration as desired. Gel icing color is best as it does not add a significant amount of liquid. Liquid food coloring can be used as well – add powdered sugar as needed to compensate for any thinning that occurs.

Yield:  Makes enough to decorate at least one batch of the above sugar cookies, using 4-5 colors.

Source:  Annie’s Eats (Her photos and tutorial are in this link as well…..great step by step photos!)