Mud Balls

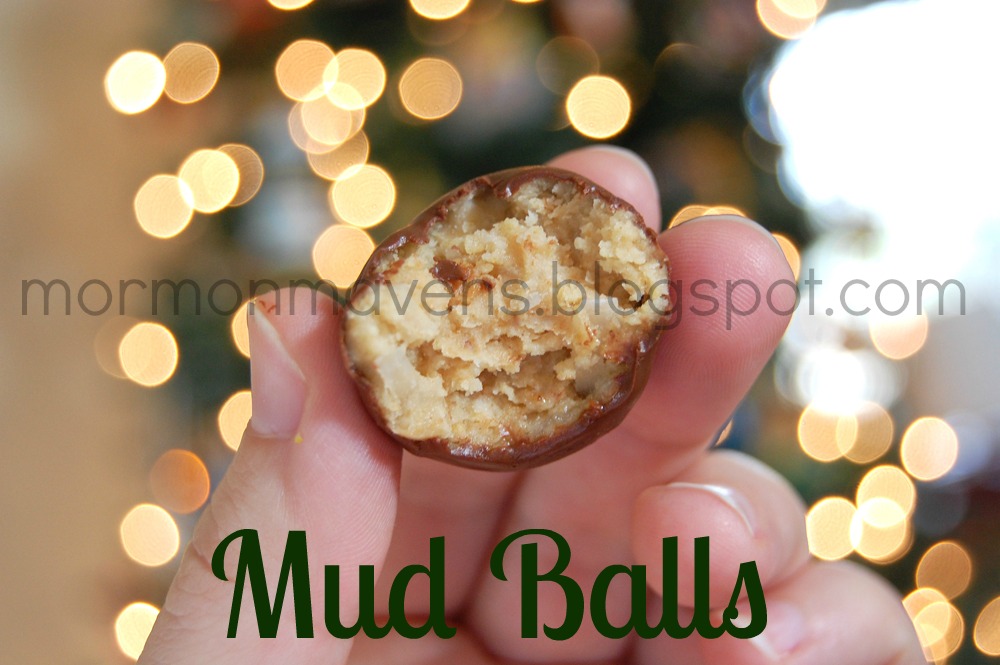
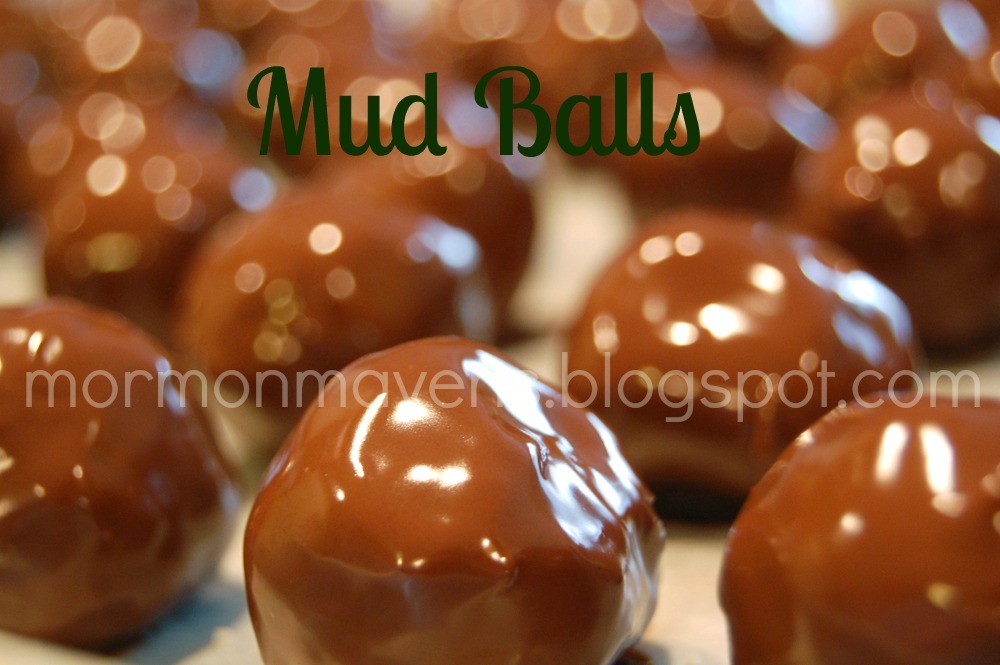
Of all holiday treats, Mud Balls are hands down my favorite.  Ever since I was a kid, I just can’t resist them.  So I don’t make them very often, but I just have to have them at Christmas.  And this past Christmas was no exception.

I mean, how can you resist such yumminess?
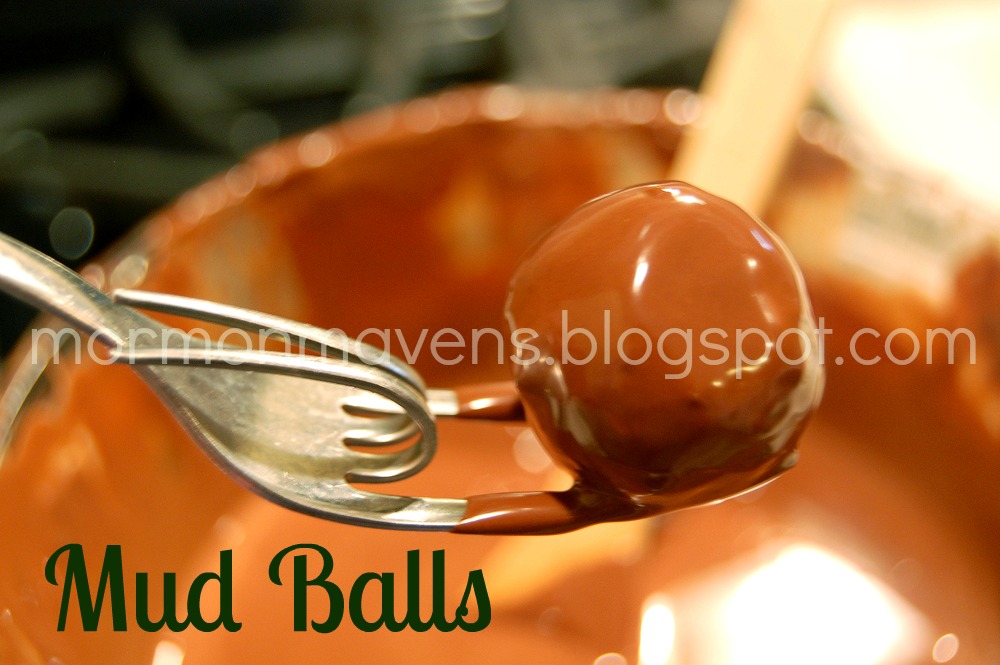
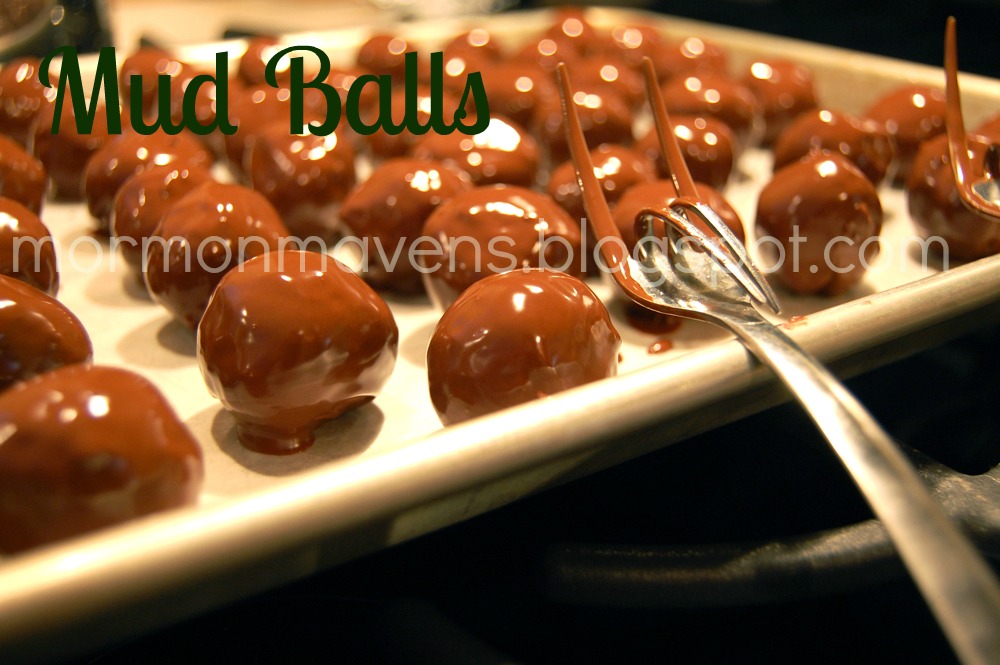
My chocolate dipping tools:  two inexpensive forks with the middle tines bent backwards with pliers.  

I use both forks for dipping but I had to hold the camera with one hand!  I use both forks to roll the ball around gently in the chocolate to cover it completely, then I use the fork in my dominant hand to cradle the ball while gently tapping the bottom of the ball on the other fork.


The final product displayed on plastic Target dishware made into a tiered server using Lucite candlesticks and glass/bead glue.

Ingredients:
2 sticks butter, melted 
1 cup graham cracker crumbs
1 cup coconut
1 cup chopped nuts (optional)
1/2 cup peanut butter (creamy or crunchy)
1 pound powdered sugar
1 Tbsp. vanilla
1/4 bar household wax*
8-10 ounces semisweet chocolate chips
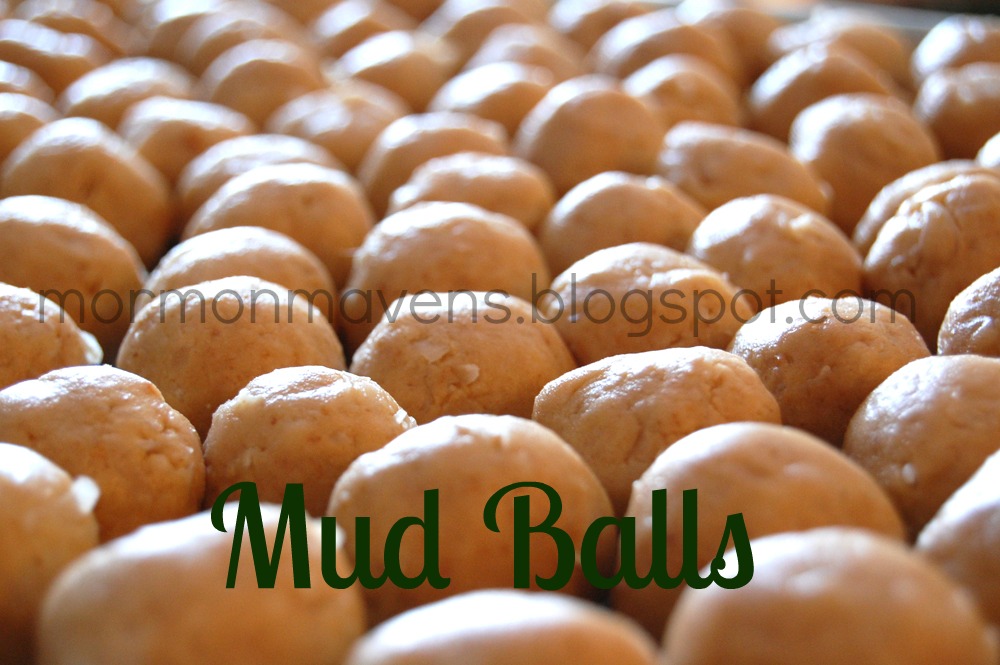
1.  In a large bowl, mix all ingredients except the wax and chocolate.  Shape into balls.  (I use a small cookie scoop for this to portion the balls, then I roll them in my hands to make them smooth).
2.  In a double boiler, melt the wax and chocolate chips completely.  Keep on very low or remove from heat altogether (but keep the double boiler sitting over the hot water).
3.  Dip balls one at a time, allowing excess chocolate to drop off before setting each ball on waxed paper to set.
Makes about 60. 
Source:  my Mom
Notes:
  • Please use butter.  Please, please, please!
  • The original recipe calls for 12 ounces of chocolate but that always leaves a LOT leftover.
  • *Don’t freak out about eating wax.  I have checked on this and it’s fine.  It’s completely edible.  I promise.  Plus the amount per ball is so tiny.  It will make the Mud Balls shiny and smooth and they will dry better with it than without.  (I use GULF brand…it comes in a small box and has 4 rectangular bricks in it…you can find it in the canning aisle usually.)
  • If you want the taste of Mud Balls without the work, make Mud Bars.  Instead of making the “dough” into balls, press the mixture into a 9×13-inch pan.  Then melt the chocolate chips (without the wax) and pour over the top, spreading evenly.  Allow to set before cutting into bars.

Enjoy!

Butterfly Crescent Rolls

Nothing takes me back “home” more than the smell of freshly baked bread permeating the air. Grandma and Mom are the best bread bakers I know and, with Grandma’s permission, I share this delicious recipe. Big holiday dinners just would not be the same without these rolls!

Ingredients:

1 Cup Boiling Water
1/4 Cup Sugar
1/2  Cup (1 stick) BUTTER
1 Egg
1 Tbsp Yeast
4 Cups Flour (divided)
1/2 tsp Salt
1/2 tsp Baking Powder
1. Preheat the oven to 350 degrees.
2. In your favorite mixer* (I own a Kitchen Aide, which I LOVE–but I’d prefer a Bosch for bread…here’s to someday!), mix the water, sugar and butter until the butter is melted.
3. Add the eggs and the yeast. (Test the temperature before dumping in your yeast. If it’s too hot, the water will kill it.) Mix well.
4. Add half of the flour, and all of the salt and baking powder. Mix until fully incorporated.
5. Add the remaining flour. The dough should be slightly stiff.
6. Let your machine knead the dough for 10 minutes.
7. Move your dough to a Large Bowl (optional) and cover with a towel. Let rise until doubled in size.
8. Punch the dough down.
9. On a lightly floured surface, roll 1/2 of the dough out in a circle (pizza shaped) until 1/2 an inch thick.
10. With a sharp knife (I use a pizza cutter), cut the dough like you would a pizza into several slices. The number of slices depends on what you’re making the rolls for. The fewer the slices, the bigger the rolls–good for sandwiches. The more slices, the smaller the rolls–good for a dinner side!

11. Take a slice by the fat end and roll it up to the point.
12. Place on a slightly greased cookie sheet, point down so it doesn’t come unrolled while baking and make bird shaped bread–NOT that I’m speaking from experience! *ahem*. Place them about 2 inches apart.
13. Continue until all the slices are shaped into rolls and on cookie sheets.
14. Cover with a towel and let rise until doubled.
15. Repeat steps 9 – 14 for the other 1/2 of the dough.
16. Bake rolls for 15 – 20 minutes, or until the rolls are a nice golden brown color.
Doubles easily.

*If you don’t have a mixer, that’s fine! I used to make these by hand. When you get the kneading part, turn the dough out onto a floured surface and knead by hand, turning about 200 times or for 10 minutes.

Source: My wonderful grandma, KaraLyn Taylor

ENJOY!
~Kara

Homemade Pumpkin Butter

This is one of my favorite fall flavors!  Pumpkin with all of the spices.  It’s pretty much pumpkin pie that you can spread on toast or pancakes and stir into your oatmeal.  This is for a large batch that will fill about 15 freezer jam jars (which is the recommended jarring method). Check out THIS link for more info.  
Ingredients:  
2- 29oz cans pumpkin puree
4 c apple juice or cider
3 c white sugar
4tsp ground ginger
1tsp ground cloves
1tsp ground nutmeg
4tsp cinnamon
  1. Combine all ingredients in a large sauce pan.  Stir well. 
  2. Bring the mixture to a boil. Keep stirring.  Constantly.  Or it will bubble and spit pumpkin at you!
  3. Lower heat and simmer (while stirring) for about 30 min or until it reaches the desired consistency. 
  4. Cool for about 10 minutes before transferring to freezer jam jars.  Then cool another 10-20 minutes before you put the lids on.  
  5. Refrigerate or freeze.  Tie a cute ribbon or something crafty to it and give it as a gift!  
HAPPY HOLIDAYS!

Hungry Jack Casserole

I made this hearty dish for a “Girls Night In” I hosted a few weeks ago and everyone seemed to like it (because a few actually said so). I recommend sides that go well with BBQ–like broccoli slaw and potato salad.

Ingredients:

1 lb. ground beef

1 t salt

16-oz. can pork and beans

3/4 C Kraft BBQ sauce

2 T brown sugar

1 T instant minced onion (I used dehydrated)

1 can flaky biscuits

1 C grated cheese (I used cheddar)

1. Preheat oven to 375. Brown beef; drain. (Remember not to pour the grease down your sink!)

2. Stir in salt, beans, BBQ sauce, sugar, and onion. Heat until bubbly; pour into a 2-quart casserole dish.

3. Cut biscuits in half. Place cut side down around edge of casserole.

4. Sprinkle with cheese. Bake until biscuits are golden (20-30 minutes).

Source: my mom

Creamy Italian Tomato Sauce

Here’s another new recipe from the Worldwide Ward Cookbook that I reviewed here a little while back.  I’m not a big fan of red sauces, in general, so when I saw a creamy version I was very interested.  It’s got a nice flavor and is a perfect replacement for marinara or spaghetti sauce.  It also made a LOT.  I served my family a generous portion of rotini pasta and still had two quarts to spare.  Those went straight to the freezer for future meals.  My next adventure with this sauce will be to try it on pizza in place of traditional pizza sauce!

Ingredients:
2 Tbsp. olive oil
1 Tbsp. butter
1 Tbsp. dried basil
pinch of red pepper flakes
3 medium onions, chopped
1 tsp. minced garlic
dash salt
3 (29 ounce) cans tomato sauce
7 ounces Gouda cheese
1 pint heavy cream

1.  Heat olive oil and butter in large pot over medium to medium-high heat.  Add basil, red pepper flakes, onion, garlic, and salt and cook until onion is tender.
2.  Add tomato sauce and simmer over medium heat for at least 20 minutes.
3.  Cut Gouda cheese into chunks and add to sauce, stirring until melted.  Add heavy cream and remove from heat, stirring until well combined.
4.  Serve over pasta and top with grated Parmesan cheese.

Source:  adapted from Worldwide Ward Cookbook

Meatball Subs

Mr. Blue Eyes and I love these sandwiches! The meatballs are pretty run of the mill, but I love something that can be used in many recipes and stores or freezes easily. Sometimes I make the meatballs and freeze them for later use. SO great!
Ingredients for the Meatballs:
1 lb Ground Beef
1/4 C Bread Crumbs (we use Italian Seasoned)
1 egg
2 Tbsp finely chopped onion
1 clove garlic, minced
1/2 tsp salt
1/8 tsp ground pepper
Additions for the Sandwiches:
1 (32 oz) Jar of your favorite Spaghetti Sauce (We use Classico, Tomato and Basil)
3-6 Hoagie Rolls (We slice three, and eat them open)
Shredded Cheddar Cheese (Mozzarella is great, too!)
1. Preheat the oven to 400 degrees F.
2. In a Medium sized mixing bowl, mix all the Meatball ingredients together by hand.
3. Roll into balls. I make mine with a cookie scoop–heaping.
4. Place about 1″ apart on a cookie sheet. (We use lean meat. If you use higher fat content, you may want to put these in a cake pan.)
5. Bake for 10 – 13 minutes.
6. After removing the meatballs from the oven, turn it to Broil–500 degrees–and move your rack up to the highest setting.
7. After letting them cool a bit (or not–depending how rushed you are. Just be aware that they may break a little if you handle them too much when they’re hot.), add them with your spaghetti sauce in a sauce pan. Warm them up over Medium heat, about 3 – 5 minutes, stirring gently.
8. Halve your hoagie rolls lengthwise, place them on a cookie sheet, and spoon some meatballs over the bread BOTTOMS (if you’re going to Sandwich it. We do tops and bottoms because we eat them open)–enough to get a bite of meat when you chomp into it.
9. Sprinkle some cheese over each sandwich half and place on the top rack under the broiler until the cheese is nice and melted, about 3 minutes. (Don’t over bake!!) Serve hot.

Source: A family recipe

~Kara

Chicken Cordon Bleu – Super Easy


We love the flavor of Chicken Cordon Bleu, however, it can be time consuming. This recipe combines the yummy flavors of the dish. Omits the gravy making it less work and calories!

Ingredients:
12 boneless skinless chicken tenders
Lemon Pepper
Dried chopped onions
12 slices of deli style ham – I use honey ham
6 slices Swiss Cheese
1 1/2 cups Corn Flake Crumbs (crushed Corn Flakes)

1. Spray a 13 x 9 inch pan with non-stick spray
2. Arrange chicken pieces in pan and sprinkle lightly with Lemon Pepper and Dried Onions
3. Place ham slices on top of each other and cut in half – place two half pieces on each chicken tender
4. Cut cheese slices in half to make 12 pieces – place one piece on each chicken tender
5. Sprinkle corn flake crumbs on top. Cover with aluminum foil
6. Bake in 400 degree oven for 30 min. Removing foil the last 10 minutes.

This can be frozen for up to 2 months. Freeze before baking.


Source: A Jennie Original

Pasta Pomodoro


This makes a lot, so if you want to make less than 8 servings, I suggest halving the ingredient amounts. The original recipe doesn’t include a meat but you can add one; I added Italian turkey sausage so I’ve included it here.

Ingredients:

2 (8 oz.) packages angel hair pasta
Italian turkey sausage, to taste (I used 1 package which is 5 links but won’t use as much next time)
1/4 C olive oil
1/2 onion, chopped
4 cloves garlic, minced (I used 4 t bottled minced garlic)
2 C diced Roma tomatoes (I used 2 cans of Italian-style diced tomatoes)
2 T balsamic vinegar (I thought I had this and didn’t so I substituted balsamic vinaigrette dressing–it worked!)
1 (10.75 oz) can low-sodium chicken broth
crushed red pepper to taste
freshly ground black pepper to taste
2 T chopped fresh basil
1/4 C grated parmesan cheese
1. Bring a large pot of lightly salted water to a boil. Add pasta and cook until al dente (about 8 minutes); drain.
2. Cook Italian turkey sausage. I did mine in the skillet. I had never worked with Italian turkey sausage until then and found it kind of hard to work with b/c the casing starts to peel–I removed the casing once the sausage was cooked and before cutting it up. It was tasty, though!
3. Pour olive oil in a large, deep skillet over high heat. Saute onions and garlic until lightly browned. Reduce heat to medium-high and add tomatoes, vinegar, chicken broth, and sausage; simmer about 8 minutes.
4. Stir in red pepper, black pepper, basil, and cooked pasta, tossing thoroughly with sauce. Simmer for about 5 more minutes and serve topped with grated cheese. (I prefer mine without cheese.)
I included this in freezer friendly because I assume the sauce freezes well.
Source: Slightly adapted from recipe submitted to Allrecipes.com by DEBNJAMES

Sunday Pot Roast With or Without Gravy

They say that necessity is the mother of invention. Time constraints also bring about “invention”. The browning of the meat step was omitted by accident while trying to get young ones dressed and out the door a number of years ago. The end result… the meat was more tender than when browned. I love it when an oops works out to your advantage.

This is our favorite Pot Roast and works well with beef or Pork.

To my friends who have asked for a good pot roast recipe. This one is for you.

Ingredients:
3# Sirloin Tip Roast or 3# of meat of your choice
Canadian Steak Seasoning
1 1/2# mini carrots – rinsed
5 medium red potatoes scrubbed and cut into 6Th’s – I use Red Skin Golden Potatoes
Garlic Powder
1 medium onion chopped or equivalent in dried onions
1 1/2 cups water

1. Spray roasting pan with non-stick spray
2. Place roast in pan and sprinkle lightly with Canadian Steak Seasoning
3. Place carrots around roast in pan and sprinkle lightly with garlic powder and half of the chopped onions.
4. Place potatoes around roast in pan and sprinkle lightly with garlic powder and rest of onions
5. Add water
6. Cover and bake at 350 for 4-5 hours.

Crock pot directions:
1. Do the same as above through number 5
2. Cook on high for 7 hours or on low for 9-10 hours

Beef Gravy:
2 cups water
1 1/2 tsp Beef Soup Base
1/3 cup flour
1/2 tsp black pepper

1. Place all ingredients in small sauce pan and turn heat to med high
2. Whisk all ingredients together until smooth while liquid is heating up.
3. Whisk as needed until liquid becomes thick and bubbly.

The gravy can be used two ways. Either add it to the pot roast and it will cook in the gravy – this works best in the crock pot and gravy will be a thinner sauce or use as traditional gravy.

This freezes well after it is cooked. Just place all ingredients together in a zippy bag or freezer safe container. Store for 6 weeks.

Source: A Jennie Original

Pesto Pasta Bake

This recipe comes from the gd kitchen.  A while back my sister-in-law’s sister blogged about the website and showcased some amazing looking casseroles.  From the pictures alone, I was hooked (I love me some step-by-step pictures!).  The recipes are easy to follow and taste delicious.  I served this pesto bake with a veggie salad and crusty bread.  Mmmmmmm 🙂

Ingredients:
1 pound of small pasta (I used radiatore pasta)
1 cup basil pesto (I can’t remember what brand I used.  I purchased it at Sam’s club)
7.5 ounces of ricotta cheese
24 ounces marinara sauce (store-bought or homemade)
1 to 1 1/2 cups mozzarella cheese

1.  Preheat oven to 350 degrees.
2.  Cook pasta until al dente.  Drain and return to pot.

 3.  Add pesto.

 4.  Add ricotta cheese.

5.  Pour pasta into 9×13 baking dish.
6.  Spread marinara sauce over top and sprinkle with mozzarella cheese.

7.  Cover with foil and bake for 30 minutes.  Remove foil and continue baking until cheese is slightly brown and bubbly. 

*  The pesto flavor was surprisingly mild.  I think I might add more next time!
*  This recipe can easily be doubled and freezes well.

Source:  the gd kitchen