Chocolate Peppermints

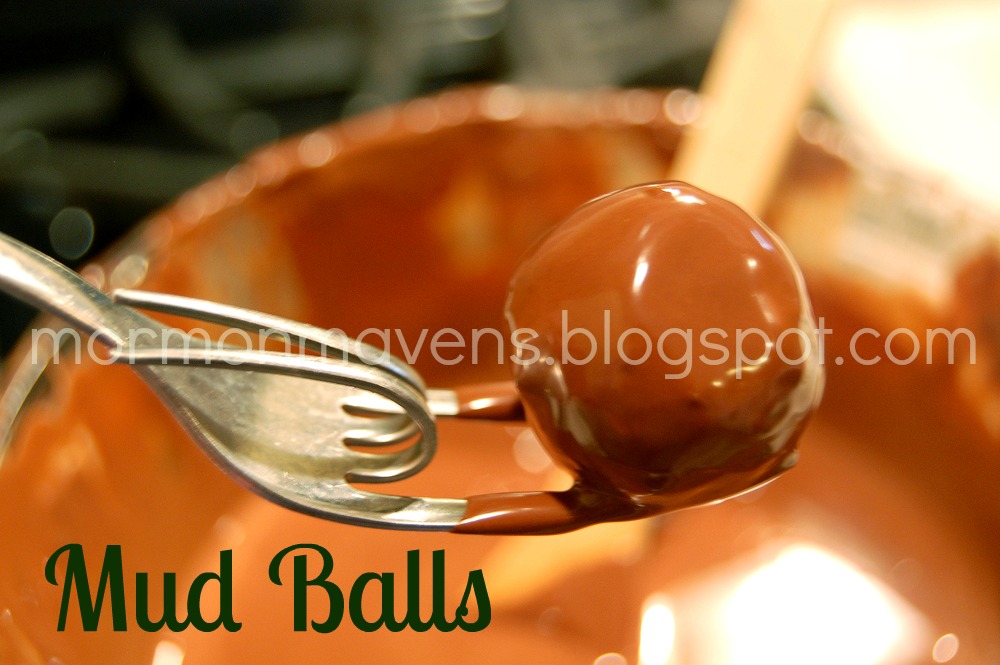
I recently made these little gems for a family gathering and they were quite tasty.  A great recipe for the holidays or for special events….or just because you want ’em!

Ingredients:
1 pound powdered sugar
4 ounces cream cheese, softened
1/4 tsp. peppermint extract
6 ounces semisweet chocolate chips

1.  In a mixer, slowly add the sugar to the cream cheese, working in a little at a time, until well blended.  Add the peppermint extract and mix well.  Cover mixer bowl with a damp cloth.
2.  Line a cookie sheet with wax paper.  Roll your peppermint “dough” into teaspoonful sized balls and place on wax paper.  Make an indentation in each ball, either with your finger or with the back of a 1/4-teaspoon.   Cover and refrigerate while you get the chocolate ready.
3.  Melt the chocolate chips in a disposable decorating bag in the microwave until fully melted.  Snip off the very end and fill each indentation.  (OR, if you don’t have these bags–but you should cuz they’re awesome– melt the chips in a microwave proof bowl and then pour the chocolate into a ziplock bag, seal, snip the end, and fill the indentations).  Refrigerate until set.

Notes:

  • Take them out of the fridge for a half hour to an hour before serving.
  • While making the balls, keep the unused “dough” covered so it won’t dry out. 
  • Make the indentations as you go.  If you wait until you’ve formed all the balls, the dough will crack.
Source:  from Amy at She Wears Many Hats

Red Hot Apple Cider

Image by FreeDigitalPhotos.net/imagerymajestic

Oh my!  It’s my day to post and I totally spaced it!  Husband is out of town on business and I have been cleaning and decorating and just playing, because I can be up late and not wake anyone up.  Looks like I could have remembered to blog a recipe, doesn’t it?  So if you need a little warming up this afernoon/evening, then I have gotten this post up JUST FOR YOU!  We had dinner with some friends one night during the Christmas season and Trini served hot cider that was so yummy.  I asked her for the recipe and she just laughed.  When you see the ingredients you might laugh, as well, but once you taste it you will be like, oh my gosh.


Image by flickr.com/begautrea


Ingredients:
Apple Cider or Apple Juice
Red Hots candies

1.  Pour desired amount of apple cider or juice in a stove top teapot or in a saucepan.
2.  Pour desired amount of Red Hots into pot/pan, according to how spicy you want your cider.
3.  Heat to desired temperature.
4.  Pour into mug or cup and enjoy….you may want to put a cinnamon stick in for garnish.

Here’s another fun hot drink tip:  Another friend, Adrianna, puts cinnamon sticks in her water when she is heating it for instant hot chocolate.  Kind of a quick way to sort of have Mexican Hot Chocolate.  Yummmm…also good when making instant oatmeal.

Source:  Trini Marquez, El Paso, Texas

Pecan Pie

‘Tis the season of PIE! I love pie. Pecan is my favorite. Or maybe Banana Cream. Or maybe Chocolate Cherry. Or maybe…

Ok, you get it. I love pie.

Last year I wanted to make a Pecan Pie. The trouble was I had all the ingredients except Karo Syrup. No opportunity to go to the store was presenting itself and I was desperate for PIE! So I did what we all do when we’re in a pinch. I went to All Recipes to see if, perchance, there was a Pecan Pie recipe without corn syrup in it. Success!!

I know all my Southern friends will be skeptical. I was. But, like I said, I wanted pie, and with over 1300 ratings with 4.5 stars, I thought I’d give it a go. I’m so glad I did! It’s delish and easy–two requirements of mine.

Ingredients:
2 Eggs, room temperature
1/2 Cup (1 stick) Butter, melted
1 Cup light brown sugar
1/4 Cup white sugar
1 Tbsp all-purpose flour
1 Tbsp Milk
1 tsp Vanilla
1 Cup chopped Pecans
1 9-inch unbaked pie crust
A few whole Pecans for garnishing if you wish

1. Preheat the oven to 350 degrees F.
2. In a large bowl, beat eggs until foamy. Stir in the melted butter.
3. Stir in both sugars and flour. Mix well.
4. Add the milk, vanilla, and chopped nuts.
5. Pour into the unbaked pie crust. Garnish the top with pecans (opt).
6. Bake for 15 minutes. Reduce heat to 300 and bake 50 minutes more, or until done.

*As per reviews, I made a slight change to the original baking time which began at 400 degrees and reduced to 350 for lessor times.

Happy Holidays to you!

Source: allrecipes.com, Elaine Helms

Thanksgiving Egg Gravy

This is a family recipe from my Great-Grandmother Nanny past down to her daughter, my Grandmother Josephine, past down to her daughter my mom Jacqueline, past down to her daughter..Me.  My Grandmother Josephine was born and raised on a farm in the countryside of North Carolina.  Her father was a tobacco farmer and her mother tended to the children, the farm and cooked breakfast, lunch and dinner! (from scratch of course!)  This recipe was part of my favorite meal of the year!  I looked forward to this all year long.  I love food and appreciated the work that went into making this. I was allowed to help when I was around the age of 10.  My mom and grandmother would cook all day long.  They had to cook a lot of food because all of my Grandmother Josephine’s siblings and their children and their children’s children would end up at her house to eat every Thanksgiving.  So she fed roughly 30 people at one time. She even had pies, and cakes. Looking back now, I don’t know how she did it.!  We ate in shifts with her best china, silver and crystal.  (I loved that and wasn’t allowed to wash them until I was in high school!)  The men went first, then the kids, then the moms. Funny how I didn’t think about that then.  But, it’s pretty typical for a mom to eat last, huh?  The “shifts” would eat, the dishes were washed and then the next shift began.  The picture above is from this weekend.  My husband can’t travel home with us for Thanksgiving.  So, we cooked an early Thanksgiving meal for him. This was yummy.  In the picture, (not my best china obviously) you can see the Egg Gravy, the Turkey, and the Dressing.  (The dressing is stuffing patted out in a cookie sheet and cut into squares.  Good Stuff.)  But the Egg Gravy is what we are talking about now.  It is really easy and so good. And you know, its taste is not “eggy”. Its just good stuff.  Real comfort food and I love it.  I really do.  I love it.  Not just the taste of it, but my heart loves this treasured memory of my grandmother’s recipe. 

1 32oz carton of Chicken Broth
1 32oz carton of Chicken Stock, OR use your drippings from your turkey!
1 dozen Eggs, hard boiled (you don’t have to use this many eggs. but we like them so we use a dozen)
3-4 Tbs. Flour
salt
pepper

Hard boil the eggs. Peel them and slice them. In a big stock pot add the chicken broth and the chicken stock.  Cook over med-high heat.  Go ahead and add the flour before it gets to hot and you can’t break up the lumps.  Add 3TBS in and whisk until all lumps are dissolved.  If you want the gravy thicker add more flour.  then bring it to a boil lower the heat to med-low and add the eggs.  Cook for about 30 minutes.  Stir frequently so it doesn’t stick to the bottom of the pot.  Then serve over your dressing and turkey.  It’s a southern delicacy!  Happy Thanksgiving!

Ghost Cupcakes

We brought in October by serving these little babies at a lunch date. My four-year-old daughter was SO EXCITED to help me with the eyes. They turned out cute and were a tasty treat for all!

Ingredients:

1 (15.25 oz) box chocolate cake mix with pudding added (I used Betty Crocker’s Devil’s Food Cake)
1 Cup Buttermilk
1/2 Cup Vegetable Oil
3 Eggs
1 Cup Mini Chocolate Chips
4.5 Cups white candy melts or coating wafers
24 Large Marshmallows
48 Mini Chocolate Chips (about 1 Tbsp)

1. Preheat oven to 350 degrees F. Place paper baking cups in 24 regular-sized muffin cups.
2. In a medium bowl, mix cake mix, buttermilk, oil, and eggs on low speed about 30 secs, then increase the speed to Medium for 2 minutes.
3. Stir in 1 cup mini chips. Divide batter evenly between the muffin cups
4. Bake 18 – 20 mins, until toothpick inserted comes out clean. Cool for 10 minutes. Remove muffins from the tins and cool completely on a wire rack.
5. In a large microwavable bowl, microwave the white candy according to package directions until nice and smooth.
6. Place one marshmallow on each cupcake and spoon the white chocolate over to cover letting the excess drip down on the cupcake. Cool slightly. This “cooling slightly” is essential to success. If you put the eyes in too quickly, you’ll end up with LAAA-AAAZZZZY EEEYYYEEES.
7. Press two mini chocolate chips into the side for eyes.
8. Let stand, until set–about 15 minutes.

HAPPY HAUNTING!!

Note: I frosted my cupcakes (as you can see) before I put the mallows on so they would stay in place. It worked well, but the original instructions did not say to do that.

Source: Pillsbury

Cheesecake Berries

I had some friends over a few nights ago and wanted to try some new recipes that were collecting dust in my “Recipes to Try” Pinterest board.  I needed something simple, easy, and tasty.  BINGO!

I think this will be my new go-to treat to bring to parties and showers, or just to eat in the privacy of my closet while my children clean the kitchen.

I can dream can’t I?

Ingredients:
a carton of strawberries (there were about 20 in mine)
8 oz. cream cheese, softened
1/2 cup powdered sugar
1/2 tsp. vanilla
graham cracker crumbs (it doesn’t take much)
chocolate or vanilla melts for decor (optional)

1.  Wash the strawberries, drain completely, and dry completely.   With a pairing knife, begin coring out the middle of each berry down through the stem.  For me this was easiest while holding the pairing knife higher up on the blade with maybe and inch of blade actually exposed beyond my fingers.  Work slowly until you get a feel for it.  You want a nice, roomy area for the yummy cheesecake filling; just don’t go all the way through the berry.

2.  In a mixer blend together the cream cheese, powdered sugar, and vanilla.  Scoop this mixture into a zip-top baggie, seal the bag, and snip off one corner.  You can always snip off more if the hole’s not big enough, so be stingy with your cut.  Holding a berry in one hand, use your other hand to squeeze the cheesecake-baggy mixture into the strawberry holes, allowing the filling to come up out of the berry just a bit.
3.  After filling the berries, either sprinkle on or dunk the tops of the berries with graham cracker crumbs.
4.  Place the berries on a cooling rack with a sheet of wax paper underneath.  Melt your chocolate and drizzle over the berries.  A tip here:  don’t try to “draw” the lines onto the berry.  This will make for a sloppy job.  Just quickly go back and forth over the berry, letting some of the chocolate go past the berry on each side.  I had a lot of melted decor here so I did lines in two directions.

Refrigerate until ready to serve.  YUM!

I think next time I will:

  • double the berries and one-and-a-half the cheesecake mixture.
  • try a chocolate cheesecake filling.
  • not invite people over so I can have more for myself.  (Just kidding.  Sort of.)

Source:  Sugar Derby via Pinterest

Hot Fudge Sundae Sauce

I may have mentioned before that I come from a family of sweet-tooths…sweet-teeth…whatever. You can blame my mother (and her mother before her) for my appreciation of Hot Fudge Sundaes.

A sweet lady in Colorado gave me this recipe for Hot Fudge Sundae Sauce after I begged her for it when I tasted its goodness at a Relief Society meeting. It’s so easy to make and 5,000 times better* than that microwavable junk you can buy at the store (no offense, Microwavable Junk!). Now, that’s what I’m talkin’ about!

Ingredients:

1/2 C Karo Light Corn Syrup
1/2 C Evaporated Milk (not Sweet and Condensed!)
2 Tbsp Water
2 C Semi-Sweet Chocolate Chips
1 tsp Vanilla

1. In a medium-sized sauce pan, combine Karo syrup, evaporated milk, and water. Stir over medium heat until it just comes to a boil.
2. Remove from heat and immediately stir in the chocolate chips until smooth.
3. Stir in vanilla.

Yield: About 1 pint

This picture was taken after we and another family dipped into it for dessert, so the amount you see in the jar is not the full amount that was made.

The sauce stores very well in the fridge for a long time. Warm it up in the microwave or over the stove when you’re ready to use it again.

Source: B. Buss, Greeley, CO

*Have I ever mentioned that I may exaggerate a bit? Yeah, I’m an exaggerator. But in my defense, it is better than store bought! 5,000 times better? That’s for you to decide.

~Kara

Orange Creme French Toast

 
We went to Utah’s State Fair several years ago and watched a nice woman make this. It’s so simple and so delicious that we can never go back to the “old flip-flip-fry” way of baking french toast. Take a look, give it a try, and let me know what you think!
 
Ingredients:
6 Slices Thick Bread*
6 Eggs
3/4 Cup Milk
1/2 tsp Orange Flavor
1/2 tsp Mexican Vanilla**
6 Tbsp Sugar
Squirt of fresh orange juice or a few teaspoons of orange juice (optional)
6 Tbsp Butter


1. Preheat a griddle to 300 – 325 degrees F. (Or a frying pan on your stove to Medium – Med/High heat.)
2. In a shallow dish whisk together eggs, milk, both flavorings, sugar and orange juice.
3. Dip one side of the bread into egg mixture and flip over (as you would normally).
4. Prick the egged side all over with a fork. Flip the slice back over in the egg mixture.
5. Prick the other side all over with a fork.
6. Carefully lift the bread onto a medium-hot griddle, frying pan, etc. Don’t worry if the bread falls apart a little. Just put it all together on the griddle and it’ll cook back together.
7. Cook for 3 – 5 minutes. Flip over. Lather with 1 Tbsp Butter. Cook for another 3 – 5 minutes or until puffy and done. The toast will be soft, but not gooey.

Serve Hot with POWDERED SUGAR.  Please, please, I BEG YOU, do not ruin this with syrup! (Ok, you can if you want. Just don’t tell me, ok?)

*Texas Toast is too thick, Wonder Bread too thin. We use Nature’s Own 100% Wheat Bread, but my FAVORITE when I’m not worrying about calories and fiber and all is Grandma Sycamore’s White Bread (found in Western U.S.). I think Pepperidge Farm’s Country White is excellent, too. Just use a good hearty bread.

**The lady who did the cooking show insisted that imitation vanilla would ruin this recipe, and while I’m not arguing that Mexican Vanilla is DIVINE, imitation is fine.

Source: Utah State Fair–Owner of The 1887 Hansen House Bed and Breakfast Inn, Sandy, UT

~Kara

Spinach Dip

BEWARE: Once you take this dip to a party, it’s the only thing your friends will ask for in the future. It is THAT GOOD! And I’m not even a Swiss Cheese fan. I mean, LOOK at all that cheesey goodness!

Ingredients:
2 (9 oz) packages of Creamed Spinach*, thawed (found in the frozen veggie section)
3 2/3 Cups Shredded Swiss Cheese
3 Tbsp Parmesan Cheese
1/2 Cups Sour Cream
1/2 tsp Salt
1/2 tsp Pepper
1 Loaf Sour Dough Bread

1. Mix all ingredients, except for the bread bowl, in a large bowl and set aside.
2. Using a knife (we use a steak knife), cut into the bread bowl diagonally, making a circle–much the same as a jack-o-lantern top– and remove the top. Trim off extra bread to make the underside flat, and set both aside.
3. Cut all the way around the inside of the bread bowl, leaving 1/2″ wall. Carefully remove the bread from inside the bowl. We try to leave fairly big chunks of bread. Store all the extra bread pieces in an air tight ziplock bag for later.
4. Empty the cheesey contents from the mixing bowl into the bread bowl.
5. Put the “lid” back on the bread bowl.
6. Wrap the entire thing in tin foil (we use 2 sheets. One wrapped one way, the other for the other way) and bake at 450 degrees F for 45 minutes.

Serve immediately with extra chunks of bread or your favorite crackers. Our favorites are Club and Multigrain Toppers, although really, ANY cracker will do! Refrigerate and reheat leftovers…if there are any.

*One time I couldn’t find creamed spinach anywhere–honestly, what is WRONG with grocery stores these days?  I used 1 10 oz. (or less) bag of frozen chopped spinach instead and it still turned out deliciously. Thaw the spinach and dab away any excess water with a paper towel. Kind of eyeball the amount you put in. There should be more cheese than spinach. Add a few Tbsp cream, evaporated milk, or regular milk to help with consistency.

When the dip is gone, rip into the bowl!  Go ahead. Say, “Ahhh…” and take a bite!

Source: I can’t remember, but Mr. Blue Eyes actually made this round of dip. So the credit is all his!
~Kara

Mud Balls

Of all holiday treats, Mud Balls are hands down my favorite.  Ever since I was a kid, I just can’t resist them.  So I don’t make them very often, but I just have to have them at Christmas.  And this past Christmas was no exception.

I mean, how can you resist such yumminess?
My chocolate dipping tools:  two inexpensive forks with the middle tines bent backwards with pliers.  

I use both forks for dipping but I had to hold the camera with one hand!  I use both forks to roll the ball around gently in the chocolate to cover it completely, then I use the fork in my dominant hand to cradle the ball while gently tapping the bottom of the ball on the other fork.


The final product displayed on plastic Target dishware made into a tiered server using Lucite candlesticks and glass/bead glue.

Ingredients:
2 sticks butter, melted 
1 cup graham cracker crumbs
1 cup coconut
1 cup chopped nuts (optional)
1/2 cup peanut butter (creamy or crunchy)
1 pound powdered sugar
1 Tbsp. vanilla
1/4 bar household wax*
8-10 ounces semisweet chocolate chips
1.  In a large bowl, mix all ingredients except the wax and chocolate.  Shape into balls.  (I use a small cookie scoop for this to portion the balls, then I roll them in my hands to make them smooth).
2.  In a double boiler, melt the wax and chocolate chips completely.  Keep on very low or remove from heat altogether (but keep the double boiler sitting over the hot water).
3.  Dip balls one at a time, allowing excess chocolate to drop off before setting each ball on waxed paper to set.
Makes about 60. 
Source:  my Mom
Notes:
  • Please use butter.  Please, please, please!
  • The original recipe calls for 12 ounces of chocolate but that always leaves a LOT leftover.
  • *Don’t freak out about eating wax.  I have checked on this and it’s fine.  It’s completely edible.  I promise.  Plus the amount per ball is so tiny.  It will make the Mud Balls shiny and smooth and they will dry better with it than without.  (I use GULF brand…it comes in a small box and has 4 rectangular bricks in it…you can find it in the canning aisle usually.)
  • If you want the taste of Mud Balls without the work, make Mud Bars.  Instead of making the “dough” into balls, press the mixture into a 9×13-inch pan.  Then melt the chocolate chips (without the wax) and pour over the top, spreading evenly.  Allow to set before cutting into bars.

Enjoy!