Cookies and Cream Oreo Bark

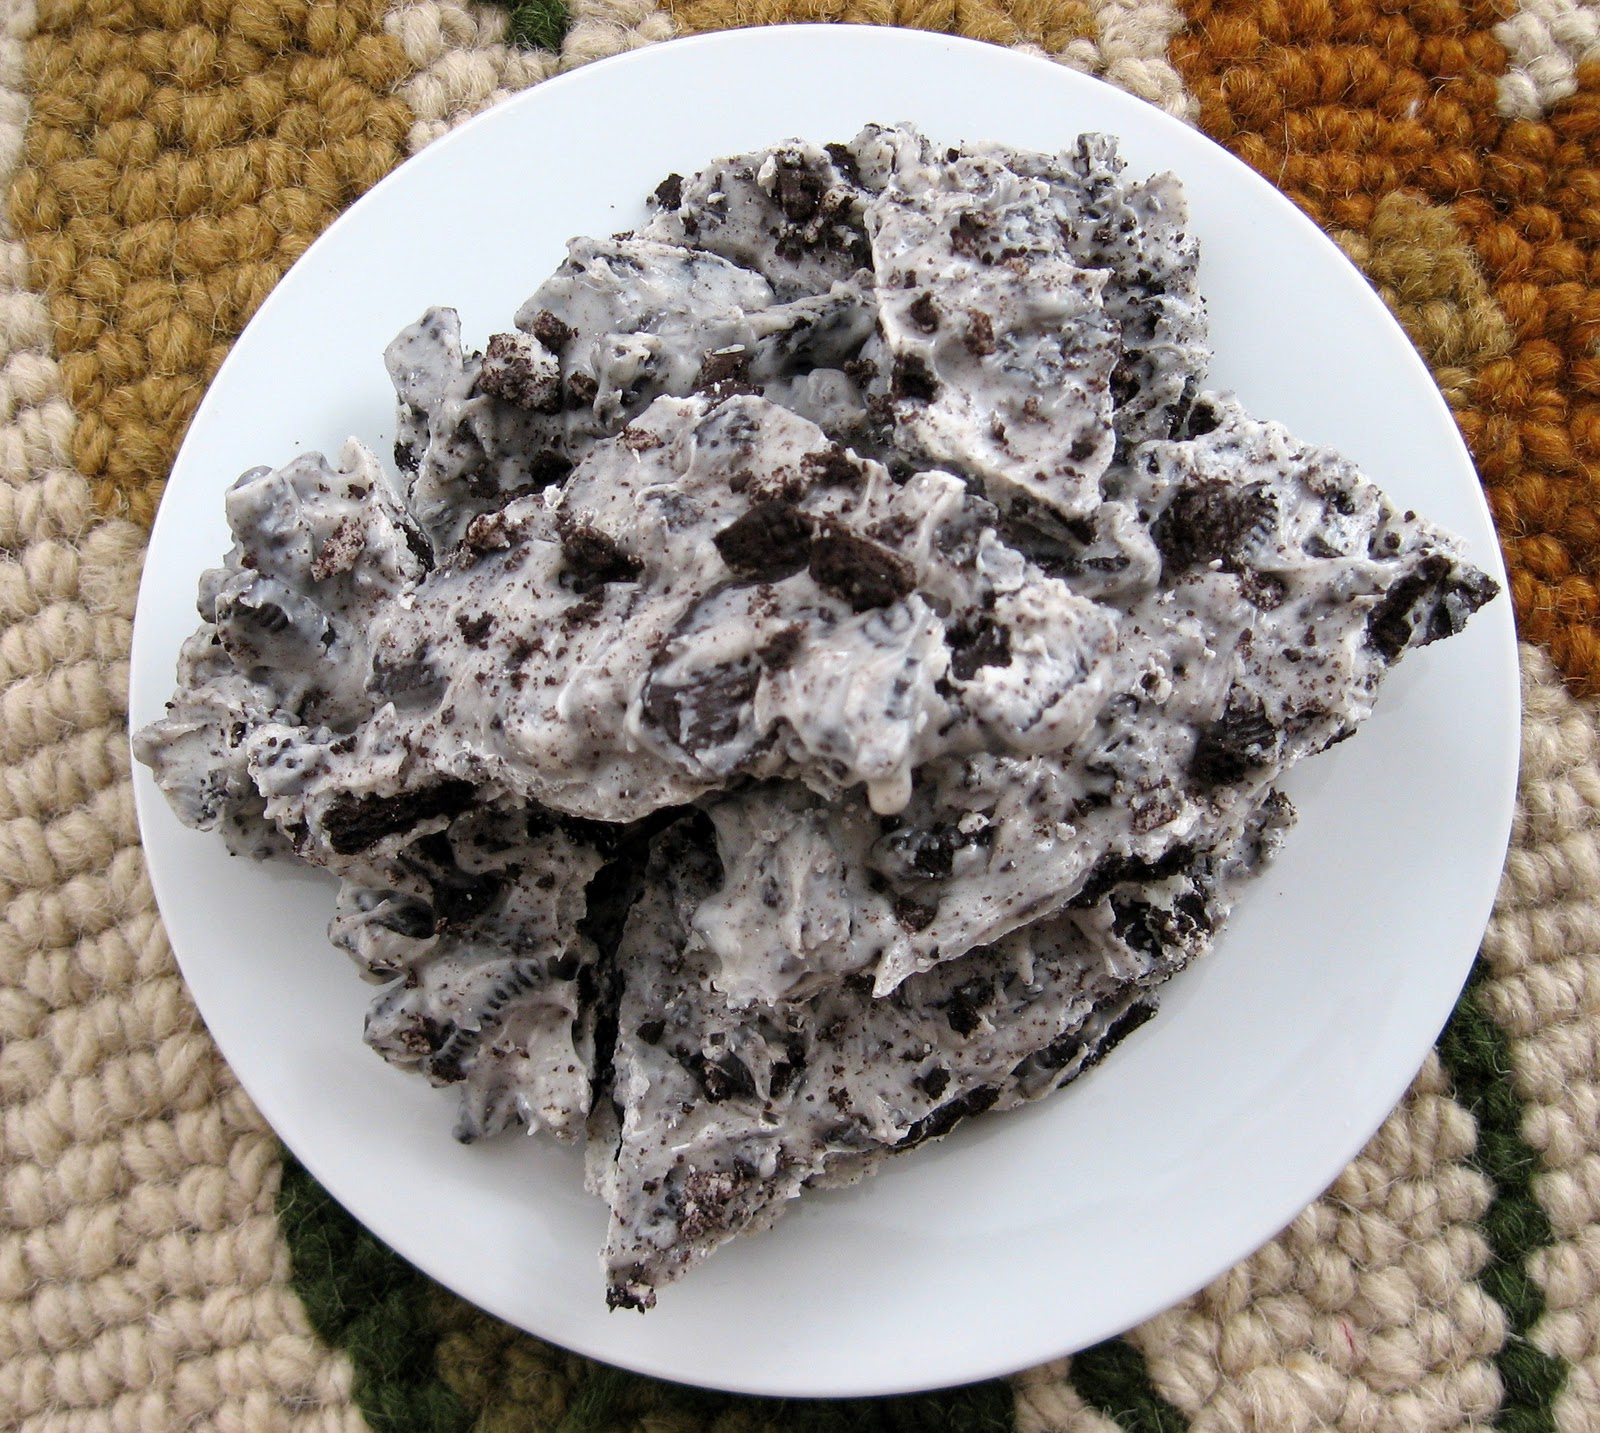
This may be one of the easiest treats I’ve ever made!  Two ingredients = Perfect, stress-free Christmas treat!

Ingredients:
10 oz Ghirardelli white chocolate chips
15 regular size Oreos, chopped
3 regular size Oreos for topping, finely chopped

1.  Place chocolate in a double boiler and melt, stirring continuously, over low heat.  If you don’t have a double boiler (like me) you can melt the chocolate in a small saucepan.  Just be very, VERY careful!  Once chocolate has melted completely, transfer to a heat proof bowl.  Cool for 5 minutes.

2.  While chocolate cools, line an 8×8 pan with parchment paper.  Leave at least a 1″ overhang on each side.

3.  Add chopped Oreos to cooled chocolate and mix.  Pour mixture into prepared pan and smooth out the top using a spatula.  Sprinkle the finely chopped Oreos on top.

4.  Chill the bark in the fridge until chocolate becomes solid.  When ready, hold the overhang pieces of parchment paper and carefully lift the bark out.  Split bark into pieces with a fork.  Enjoy!

Source: Bakers Royal

* To save on time you could easily melt the chocolate in the microwave!
* Next time I make these I won’t chop up my Oreos so much…my bark looks a little too gray.

Pumpkin Pancakes

These delicious pancakes are especially good in the fall, for Christmas breakfast, or a regular day of the week–pretty much ANY TIME! Our nieces stayed with us over Thanksgiving and they gobbled these up! No pun intended…

Ingredients:
2 Cups Flour
2 Tbsp Brown Sugar
2 tsp Cinnamon
3 tsp Baking Powder
2 Eggs
1.5 Cups Evaporated Milk
1/2 Cup Pumpkin (we use canned–refrigerate unused portion for later)
2 Tbsp Vegetable Oil
1 tsp Vanilla

1. Sift together all dry ingredients.
2. Add all wet ingredients and stir until well incorporated.
3. Bake in 6″ diameter rounds in a frying pan or on a griddle over MEDIUM-LOW heat.  We make ours using a griddle and set it to 325.

Serve with apple sauce (pictured above), maple syrup, whipped cream, or whatever seems good to you!

*Halves easily.

Source: My aunt, Eileen

~Kara

Boyd’s Famous Pumpkin Chocolate Chip Cookies

OK, so maybe these cookies aren’t famous. But they should be!  We eat them all year round, but during the fall they especially hit the spot!


Ingredients:
2 C pureed pumpkin (or one 15 oz can–That’s what we use.)
2/3 – 3/4 C Vegetable Oil (I use closer to 2/3 C)
2 tsp Cinnamon
4 tsp Baking Powder
2 tsp Baking Soda (“Baking Powder AND Soda?” you say? Don’t ask me; IT WORKS!)
2 C Sugar
2 Eggs
2 tsp Salt
2 tsp Vanilla
4 Cups Flour
2 Cups Chocolate Chips
1 Cup Walnuts (opt)

1. Preheat oven to 375 degrees F.
2. In a stand mixer, add ALL ingredients, one by one, and mix on Medium speed until fully incorporated. Really. That’s all you do.
3. Drop heaping spoonfuls 1 – 2 Inches apart on a lightly greased cookie sheet.
4. Bake for 12 – 15 minutes or until springy to the touch.
5. Let cool on the sheet for 5 minutes, then remove to a rack or some such device–we use a cheesecloth on our counter.

DELISH!

Source: By AWESOME Father-in-Law, Boyd.

~Kara

Sticky Gooey Monster Jaws

You’d better take a bite before they do!  I adapted this from a cute idea found on Our Best Bites Easy Halloween Party Food, using a few of my kids’ favorite ingredients! But by all means…have fun and make it your own…I DARE you! 
Ingredients:
Apples (1 apples serves 4)
Water with a little lemon juice for dipping 
Peanut Butter
Raisins, chocolate chips, slivered almonds…any of these things could work for teeth
  1. Quarter your apples and remove the seeds.  
  2. Then cut a wedge out of the center of the side with the peel still on it.  
  3. Now, dip the apple quarters in the water/lemon mixture to keep them from browning.
  4. Smother some PB into that monster mouth and give him/her some teeth of your liking.  
  5. Give it some eyes using PB to make ’em stick.  
*The eyes look super cute when they’re buggin’ out on 2 pretzel sticks…too bad I didn’t have any.  =( HAPPY HALLOWEEN!  =)

Sugar Cookies with Marbleized Icing


A good sugar cookie can be hard to come by. Who wants to eat cookies that are to floury, cakey or dry? This is a great basic sugar cookie recipe that is sure to be a hit! Crunchy on the outside and tender in the middle.

Ingredients:
1 C. real butter
1 C. sugar
1 egg
1 1/2 t. vanilla or almond extract
3 C. flour
1 1/2 t. baking powder
1/2 t. salt
Directions:
1. Cream butter and sugar until light and fluffy (about 2 minutes). Add in egg and extract and mix until incorporated.
2. In a separate bowl combine flour, baking powder and salt. Slowly add the flour mixture to the butter mixture and mix until completely combined.
3. Separate the dough into 2 balls and wrap each in waxed paper or plastic wrap. Flatten to speed up chilling time. Place in the fridge to chill about 1-2 hours.
4. When the dough is properly chilled, sprinkle a small amount of flour on a work surface and roll dough out with a rolling pin. Roll to about 1/4 inch thick. (don’t use excessive amounts of flour while rolling. It toughens the dough.)
* lets take a break for some sugary cuteness!
5. Use cookie cutters or a paper pattern and knife to cut out your cookies to desired shapes.
*So easy a toddler can do it!

6. Place on an ungreased baking sheet and bake at 350 degrees F. for 8-12 minutes. The longer you bake, the crunchier your cookies will become. For soft cookies, go for about 7-8 minutes. Remove from pan to cool completely on a wire rack.

Now let’s get to the marbleized icing technique! The icing is a powdered sugar glaze, which stays bright and slightly glossy when it dries. Gorgeous!

Ingredients:
1 lb. powdered sugar
6 T. whole milk
6 T. light corn syrup (gives it that nice gloss)
1 t. vanilla or almond extract.
food coloring of your choice
Directions:
1. Wisk sugar and milk until smooth. Then stir in the corn syrup and extract. Glaze should be slightly thin and slowly run off a spoon.
2. Separate glaze to desired containers before adding different food colorings. If you want to have brown icing, use a spoonful of cocoa powder.
To marbleize the icing, start by spreading a base color all over the cookie.
Lightly drizzle a second color in a random stripes or dots on top of the base color. Then, run a toothpick through the glaze in several stripes diagonally, then again in the opposite direction diagonally. The glazes will run together and make a marbleized effect.
Let the icing dry completely, about 2-3 hours before trying to package them. Have fun and be creative!!
Sources: www.ourbestbites.com and Martha Stewart

Franken-Fingers

I saw something like this last October passing by a Singles Ward Potluck.  “That’s too cool!”  I said to myself.  So here it is:  a simple spooky snack!

Ingredients:
Pretzel Rods
Vanilla Almond Bark
1 T Crisco (vegetable shortening…not oil, butter or margarine.  It says so on the almond bark package =)
Green food coloring
Twizzlers Nibs

  1. Have a piece of wax paper ready on a cookie sheet or such. 
  2. Melt the candy coating and shortening using your preferred method (microwave/double boiler) and stir in a few drops of green food coloring to form a Frankenstein skin tone.
  3. Dip the pretzel rods into the candy coating, leaving about an inch or more for holding onto
  4. Lay the pretzel rod out on the wax paper to dry and immediately press 1 “Twizzlers Nibs” onto the end of the pretzel rod for the red fingernail.  Dry at room temperature or in the refrigerator.  

Enjoy…Mwaaa ha ha ha ha!

      Ghostly Cereal Treats

       This recipe would be great to make with your kids. I’ve made these before, but am excited to get my three year old involved.

      Ghostly Cereal Treats

      Ingredients:
      6 c. Count Chocula Cereal
      1/4 c. butter
      1 (10 1/2 oz.) bag miniature marshmallows
      2 Packages (16 OZ) Vanilla  Candy Coating
      1 tube black decorating icing
      12 (3 oz.) Dixie Cups

      Directions:

      1. Prepare Dixie cups with nonstick cooking spray.
      2. Microwave butter in large mixing bowl on high for 45 seconds or until melted.
      3. Add marshmallows; stir to combine.
      4. Microwave 1 1/2 minutes or until smooth, stirring after 45 seconds.
      5. Add cereal; stir until well coated.
      6. Press mixture into Dixie cups.
      7. Cool for at least one hour.
      8. Use scissors to cut along the sides of the Dixie cups, and peel the cups away to remove the cereal treats.
      9. Place cereal treats on wax paper.
      10. Melt candy coating according to package instructions.
      11. Using a spoon, coat cereal treats until they are fully covered.
      12. Let dry for 1-2 hours.
      13. Use black icing to create eyes and mouths on the ghosts.
      14. Store leftover ghosts in an airtight container.
      15. Enjoy!

      (recipe from bettycrocker.com)

      Scrumptious Apple Pie

      If an apple pie and an apple crisp got married, this would be their baby.  A delicious, mouth-watering “pie” baby!

      Ingredients:
      1 whole pie crust (from scratch or store-bought)

      Filling:
      6-7 cups peeled and sliced Granny Smith apples (I used 5 large apples)
      Juice from half a lemon
      1/2 cup white sugar
      4 tablespoons flour
      1/4 teaspoon salt

      Crumb topping:
      1 1/2 sticks butter
      1/2 cup flour
      1 cup brown sugar
      1/2 cup quick oats (I used rolled oats because that’s all I had)
      1/4 teaspoon salt
      1/2 cup chopped pecans
      1/2 jar caramel topping (or homemade caramel sauce)

      1.  Preheat oven to 375 degrees.

      2.  Peel and slice your apples into a large bowl.  Squeeze juice of lemon over apples and stir to coat.  Add your white sugar, flour, and salt.  Mix.

      3.  For the crumb topping, cut the butter into the flour with a pastry cutter.  If you have a food processor, that would work too.  Add your brown sugar, oats, and salt.

      4.  Pour apples into prepared pie crust.  Spread your crumb topping over apples.

      5.  Cover edges of pie crust with aluminum foil and bake for 25 minutes.  When time is up, remove foil and bake for another 30 minutes.  Before last 5 minutes is up, remove pie from oven and sprinkle top with chopped pecans.  Return to oven and finish baking.

      6.  When pie is done, remove from oven and pour caramel sauce over topping.  Or wait and pour sauce over individual slices.

      *Some of the juices started to bubble out towards the end of baking.  I would recommend placing a cookie sheet lined with foil on the rack below your pie. 

      *There is A LOT of butter in this pie!  I think I’ll try using only 1 1/4 sticks next time I make this.

      Source:  The fabulous Pioneer Woman

      Ghostly Shepherd’s Pie

      Now that Halloween is upon us, I thought it would be timely to share my next recipe for you… Ghostly Shepard’s Pie. I love making holidays fun, and I love making this meal every year. This year will probably be the first time that I’ll have a child who will really enjoy it… so that should be fun. This recipe is perfect for the fall, I hope you enjoy it. 

      Ghostly Shepard’s Pie
      1 lb ground beef
      1/2 C. chopped onion
      1 bag (12 oz) frozen mixed vegetables
      2 C. diced tomatoes with Italian herbs, undrained (from 28-oz can)
      1 jar (12 oz) beef gravy
      1 3/4 C. water
      2 Tbsp. butter/margarine
      1/4 tsp. garlic powder
      1/2 C. milk
      2 1/4 C. Dried Potato Flakes (instant mashed potatoes)
      1/4 C. grated Parmesan cheese
      1 egg, slightly beaten

      1. Heat oven to 375°F. Spray 12-inch skillet with cooking spray. Add beef and onion; cook over medium heat 8 to 10 minutes, stirring occasionally, until thoroughly cooked; drain.

      2. Set 12 peas (from frozen vegetables) aside for garnish. Add remaining frozen vegetables, tomatoes and gravy to beef mixture. Heat to boiling. Reduce heat to medium-low. Cover and cook 8 to 10 minutes, stirring occasionally, until vegetables are crisp-tender.

      3. Meanwhile, in 2-quart saucepan, heat water, butter and garlic powder to boiling. Remove from heat; add milk. Stir in dry potatoes and cheese. Add egg; blend well.

      4. Spoon beef mixture into ungreased 2 – 2 1/2 quart baking dish. With large spoon, make 6 mounds of potato mixture on top of beef mixture to resemble ghosts. Place 2 reserved peas on each mound to resemble eyes.

      5. Bake 20 to 25 minutes or until potatoes are set and mixture is thoroughly heated.

      Enjoy with your little ghosts & goblins!!

      Although this recipe only makes an 8×8 casserole serving – it would be very simple to double… just in case you have a lot of little ghosts and goblins to feed!

      Pumpkin Pie Shake

      I love the fall season and all that comes with it. I especially love the fall food we make! Pumpkin pie spice is one of my favorite spices. So, I tweaked a recipe that I found for milkshakes and came up with the yummiest milkshake ever! The only downside to them is that they are highly addictive. I had one for breakfast this week…. Shh…don’t tell. Hope you like them!

      2 c vanilla ice cream
      1 c milk
      2/3 c canned pumpkin
      1/4 c packed brown sugar
      3/4 tsp. pumpkin-pie spice
      3 Tbsp. frozen whipped topping, thawed

      Combine first 5 ingredients in a blender, process until smooth. Pour 3/4 c ice cream mixture into each of 4 glasses. Top each with about 2 tsp. whipped topping; sprinkle with the addtional pumpkin-pie spice, if desired.

      adapted from Cooking Light