Banana Bread Muffins (Paleo)

banana-bread-muffins-paleo


No, I have not exactly jumped on the Paleo band wagon, but I am kind of running along beside it.  We are trying to eat healthier around here and so I have been checking out recipes from friends, Facebook, Google, Leanne Ely and Jeff Reagan.  So if you have any tried, true and tasty recipes, feel free to share on our Facebook Page .  I will be grateful.

I found this recipe in a packet given to me by a friend who ordered one of those Paleo programs from an infomercial and she never used it–thought she would sell it on eBay, but ended up giving it to me because she was tired of having it around the house.  So I have sifted through each of those cards and found a few that I think are doable.  I thought these muffins were pretty tasty on their own!  And then I found another recipe  I had been wanting to try for a flavored butter spread and made that at the same time.  They were great together, let me tell you.  But you will have to wait until next week for that one.

Banana Bread Muffins (Paleo)
Write a review
Print
Ingredients
  1. 1 1/2 c. almond flour
  2. 2 T. ground flaxseed
  3. 1 t. ground cinnamon
  4. 1/2 t. baking soda
  5. 1/2 t. baking powder
  6. pinch of nutmeg
  7. pinch of salt
  8. 2 very ripe bananas, mashed
  9. 2 eggs, beaten
  10. 1 T. honey
  11. 1 T. olive oil
  12. 1/2 t. vanilla extract
  13. 1/3 c. chopped walnuts, plus extra for garnish
Instructions
  1. Preheat oven to 375 degrees F.
  2. Place muffin cups in muffin tin and set aside.
  3. In large bowl, sift together all the dry ingredients, except the nuts.
  4. In a small bowl, combine all the wet ingredients, including the bananas--mix well. Pour this mixture over the dry ingredients. Add in chopped walnuts, stirring until combined.
  5. Fill the baking cups about 3/4 full--I used a cookie scoop.
  6. Sprinkle a few more chopped walnuts on each muffin before baking.
  7. Bake muffins for 21-23 minutes.
  8. Serve warm with your favorite spread (original recipe suggests coconut oil).
Adapted from PaleoBurn Fat Burning Cookbook
Mormon Mavens https://www.mormonmavens.com/

Autumn Baked Apples

baked-spiced-apples-4So it’s fall.  Yeah, I know.  It’s supposed to be pumpkin everything, right?

Well, for my money, nothings says fall like apples….warm and spiced.  So cozy.

And although my favorite apple dessert is Apple Crisp (my favorite recipe for that coming soon!) I’ll go for just about any baked apple thing.  And since I had a bunch of small apples that were past their prime, I figured this one was a good one to try.

Next time, I’ll try maple syrup in place of the honey.

baked-spiced-apples-1

baked-spiced-apples


Autumn Baked Apples
A cozy dessert for crisp fall days.
Write a review
Print
Prep Time
15 min
Prep Time
15 min
Ingredients
  1. 6 medium or 9 small apples
  2. 1 1/2 cups brown sugar
  3. 2/3 cup old fashioned oats
  4. 2/3 cup all-purpose flour
  5. 8 Tbsp. butter, softened
  6. 1 tsp. cinnamon
  7. 1/4 tsp. allspice (optional)
  8. 1/8 tsp. nutmet (optional)
  9. 1/4 tsp. kosher salt
  10. 4 Tbsp. honey or real maple syrup
Instructions
  1. Preheat the oven to 350 degrees. Grease a skillet and set it aside.
  2. To prep the apples, cut off about 1/2" from the top. You can also cut a tiny amount off the bottom if you want to "level" the apples. Use a spoon to scoop out the middle, including the core. You can discard this part.
  3. Place the apples in the skillet .
  4. In a bowl, mix together the sugar, oats, flour, spices, and salt. Add the softened butter and work the whole mixture together.
  5. Divide the butter mixture between the apples, filling the cores. Drizzle honey or maple syrup over the apples.
  6. Cover the skillet with aluminum foil; bake for 15 minutes. Then uncover the skillet and bake an additional 15-20 minutes or until the apples are cooked through.
  7. Allow to cool. Serve plain or topped with vanilla ice cream or whipped cream.
Adapted from Dishing Delish
Mormon Mavens https://www.mormonmavens.com/

Traditions & Popcorn Balls

traditions-popcorn-balls


Traditions have meant a lot to me for as long as I can remember, but I haven’t always been that great at starting continuing them.  I can sure start one, but it’s the hardest thing for me to continue.  I remember a few from my childhood–oyster stew for Christmas Eve (for years we did this in our family until one day we realized that only one or two of us even liked it that much), opening gifts on Christmas Eve (still do that one!)—Trick or Treating at Halloween in the neighborhood with costumes from Mom’s Costume Box, etc.   This time of year really gets my mind spinning on what traditions my family expects on Christmas Eve–full from scratch Mexican meal, opening gifts. doing stockings, EVEN FOR THE ADULTS–and other things like decorating for Fall (my favorite season).  Hmmm….that’s not very many traditions.  I need some more.  

So a couple of days ago I was at the store picking up some things for dinner and I realized that my grandsons would be at the house that day and I needed to give them their Halloween treats!  I am trying to start that tradition with them, since I am not with them for the Trick or Treating.  So I grabbed a couple of different small bags of candy and I was trying to think of something else I could do that would be slightly healthy and I remembered something my Mom did for us when we were younger–homemade popcorn balls!  I loved those and did them a few times when my girls were little.  I knew it was time for me to start that tradition with my grandkids, so I picked up some microwave popcorn, some orange and green Jell-O and some tiny marshmallows, some Halloween goodie bags and pencils.

It was so much fun to share those popcorn balls with my boys!

Traditions are fun and bonding and build great relationships in your family.  So today, think about some traditions that you are already doing and some new ones that you can add.  And they don’t have to be built around holidays.  Some of the best are things you do together randomly that the kids consider as traditions, because they will certainly remind you to do them again!

I know it’s Mormon Morsel Sunday, but how about I share my Marshmallow Popcorn Ball recipe with you today?  Maybe you can make some for your Trick or Treaters…

Marshmallow Popcorn Balls
Yields 12
Write a review
Print
Ingredients
  1. 6 T. butter
  2. 3 cups tiny marshmallows
  3. 1/2 of a 3-oz. pkg of Jell-O, in flavor of choice (3 T.)
  4. 3 quarts unsalted popped corn
Instructions
  1. Place popped corn in a large bowl and set aside.
  2. In medium pan, melt butter over medium heat. Add marshmallow, stirring until melted.
  3. Blend in Jell-O, and pour over popcorn, mixing well.
  4. With buttered hands, form popcorn into balls.
Notes
  1. Have fun with different colors of Jell-O, depending on the occasion. Hey, let the kids help make the popcorn balls--you shouldn't have ALL the fun!
Mormon Mavens https://www.mormonmavens.com/

Autumn Chopped Salad


We originally posted this salad on October 7, 2012.  I was looking up the ingredients to make it for dinner tonight and thought I would repost it.  One of my all-time favorites and this is the perfect time of year to enjoy it!
 
Oh Pinterest, how we love thee and how we love the world of food that you have brought to us!  I pinned this recipe the other day and my sister and I made it last night.  Oh so good.  It was a big hit with all!  Even the guys.  Just love chopped salads.
 
 
Autumn Chopped Salad
Write a review
Print
Ingredients
  1. 6-8 cups chopped romaine lettuce
  2. 2 medium pears, chopped (we used one green and one red)
  3. 1 cup dried cranberries (love me some Craisins!)
  4. 1 cup chopped pecans
  5. 8 slices thick-cut bacon, crisp and crumbled (we used pre-packaged real bacon pieces, because of time)
  6. 4-6 oz. crumbled feta cheese
  7. Poppy Seed Salad Dressing
  8. Balsamic Vinaigrette (we used Newman's Own, my personal favorite)
Instructions
  1. Combine the lettuce, pears, cranberries, pecans, bacon and feta on a large platter.
  2. Drizzle generously with the poppy seed dressing, followed by the balsamic vinaigrette (you should end up with about a cup of dressing, so adjust the quantities of the two dressings according to your taste bud preferences).
  3. We added chopped, cooked chicken to this recipe when we made it because we were using it as a main dish.  Grilled would be a great option on the chicken, but we were in a hurry so we picked up one of those awesome rotisserie chickens at the grocery store.  Yeah, one of those....
Adapted from Espresso and Cream
Mormon Mavens https://www.mormonmavens.com/
 

DIY Mason Jar Spice Shelf

Have you ever had a project in mind but it was still just in the planning phases when suddenly you just decided that it had to happen now?

That’s how this spice shelf came to be.

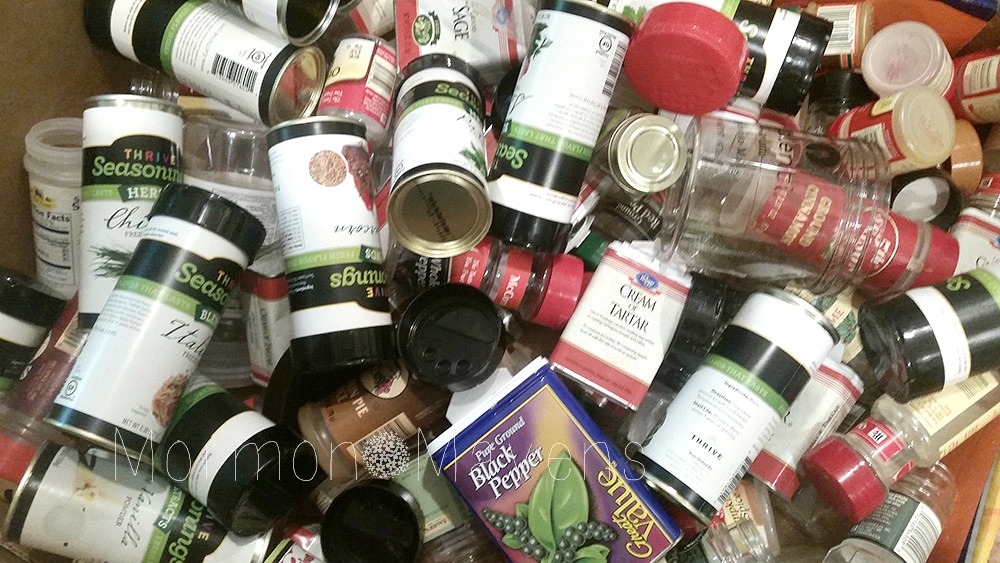
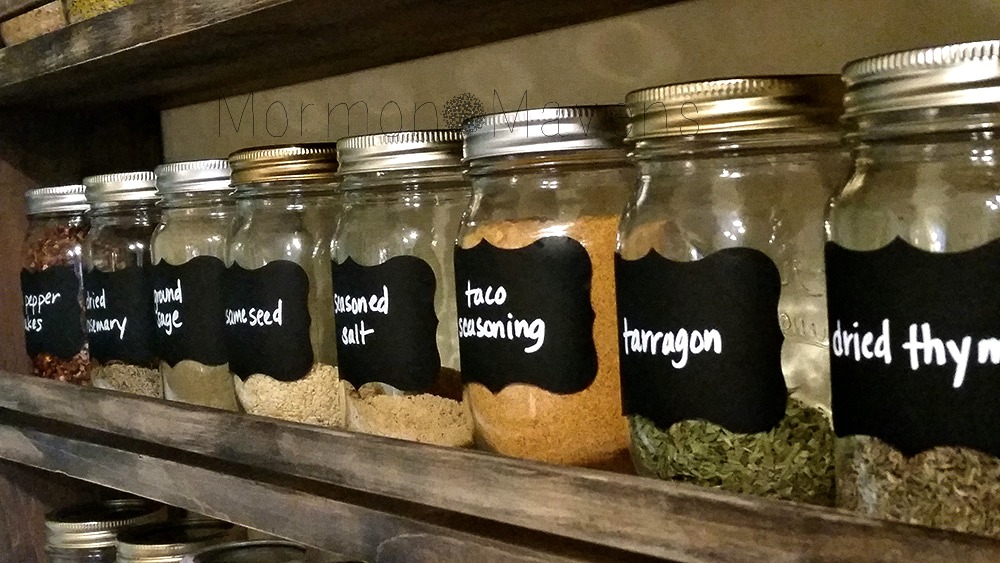
See, I have this drawer.  (And by the way, I’m totally kicking myself for not snapping a pic of it before the project started.)  It was my spice drawer and it was a mess.  Problem was that it had two layers of jars and if you didn’t put each one back just so, you couldn’t close the drawer.  And I could never find all my spices.  And I didn’t even keep the baking spices there.  This was just the savory ones!  I hated that drawer.  I was so ready to change over to canning jars when I heard that my Canadian best buddy had done that.  

And one night I just snapped.

“I’m getting rid of all these stupid bottles right now!”

Never mind that I didn’t have a spice shelf made or even have the supplies purchased for it.  I had the jars (lots and lots of jars that I was able to get from a friend who dejunked them in a move) so I figured…why not?

bottles-to-jars


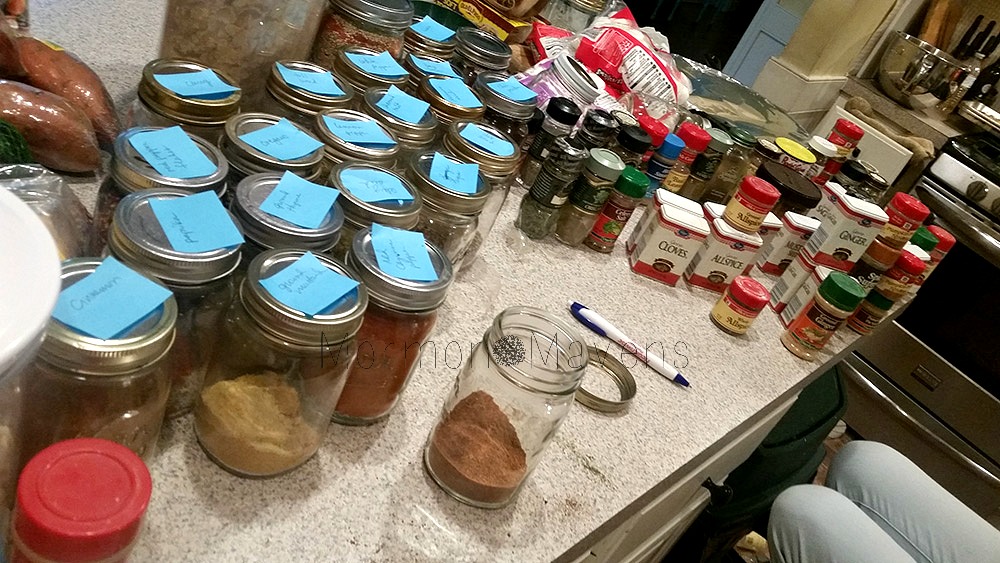
So, I pulled out every single stinkin’ spice and herb that I had in that drawer and hiding in any other cabinet in the kitchen!  I pulled them all out, put them on the counter, and my youngest daughter and I sorted them.  Yep, I had several multiples.  See, this was a good thing?  Now I’ll know exactly what I have.

I felt energized.  Giddy.  

empties

The carcasses of all those annoying little bottles!

Into the jars they went.

But in the absence of any labels, I used Post-It notes to keep track of what was what.  And those spice jars sat on my counter (in my very small kitchen) for two or three days while we worked on the shelves.  jars-with-post-its

But now that it’s all done.  I’m in heaven!  I absolutely adore it.  

on-the-wall

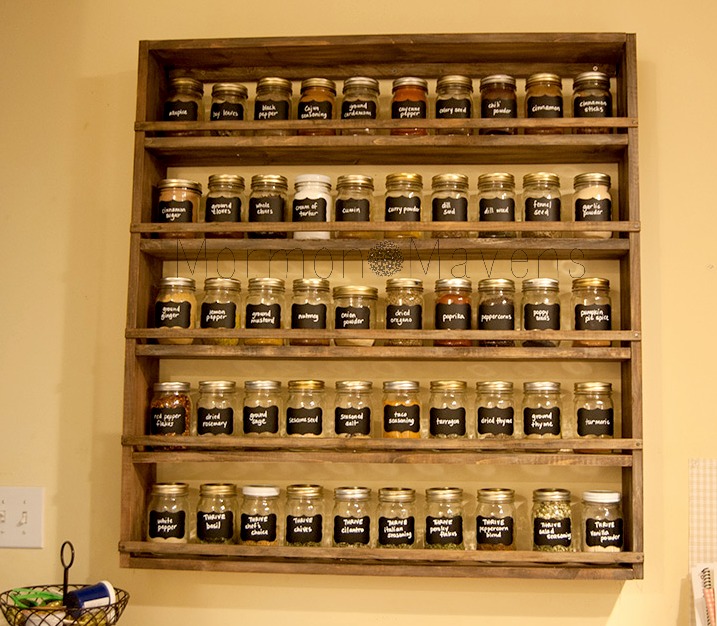
I’ll share with you how we decided the sizes and what we used.  You could totally customize this kind of shelf to whatever size you wanted.  I knew that I had 50 jars to accommodate so I had to base the measurements from that.  I figured 5 shelves was as much as would fit above the chair rail.  So we measured for 10 jars on each shelf with a couple of inches space  above the jars and an inch or so space between jars.  

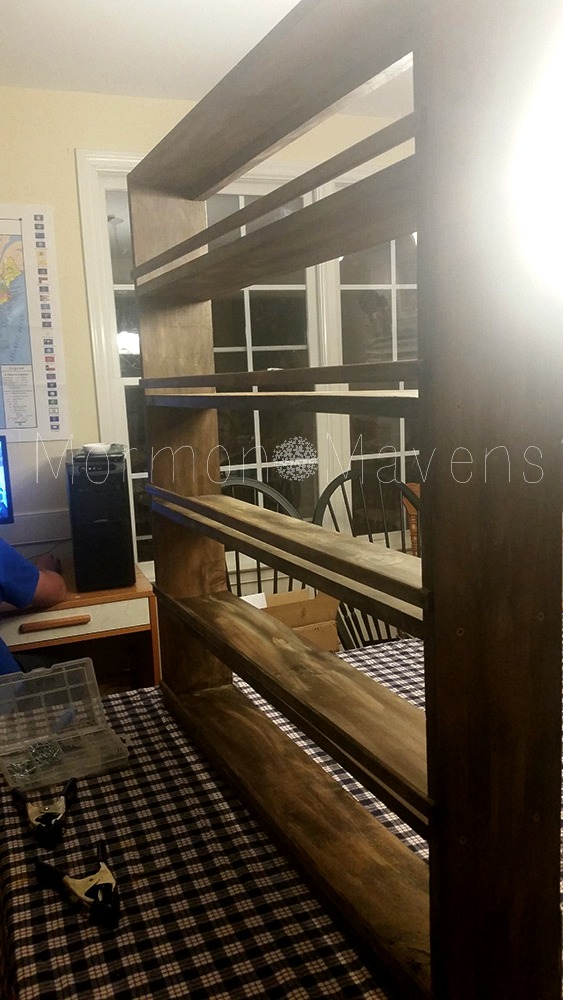
To build the spice shelf, we used 1×6 boards and basically made a box.  Then we placed the 4 boards to make the inner shelves and screwed them into place.  Then we used trim pieces to make the shelf rails and nailed them into place using decorative tacks (they look kind of like miniature railroad spikes).  As you can see at the top there is a narrower board attached to the unit that is used to screw the whole unit into the wall–into studs…this thing is heavy!!

the-shelf

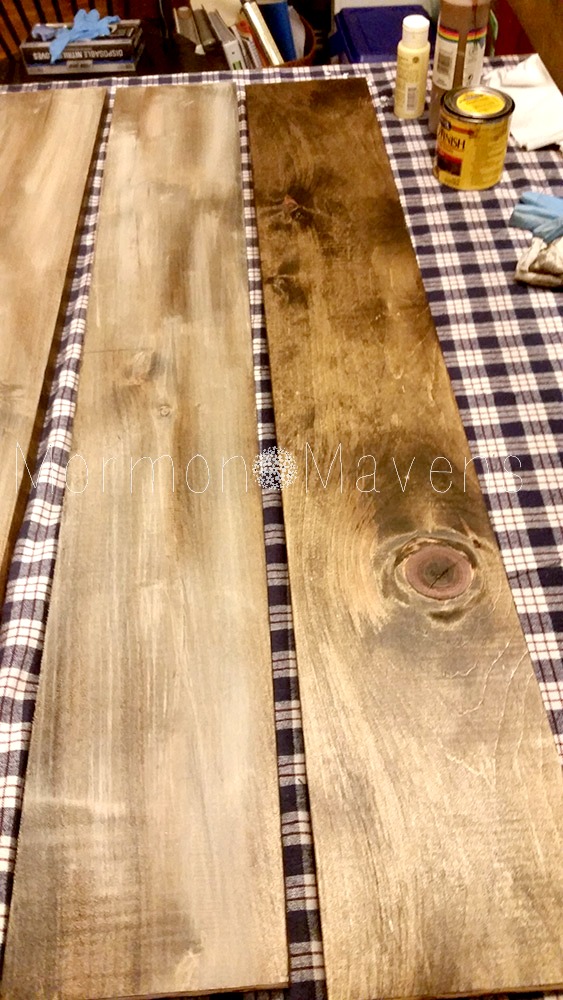
To get the barnwood look, I used a dark stain on the boards.  Then when the stain was dry, I dry brushed with some acrylic craft paints (‘cuz that’s what I had on hand!) and used a cloth to wipe and smooth the paint to get the desired look.  I found this part to be the most enjoyable!  I’d love to dry some green and/or blue on another project to see what kind of look that would give me.  

supplies

You can see below the board on the right has just the stain (applied with a cloth) and the board on the left has had some acrylic paint dry brushed and wiped on.  I didn’t want a perfect look–I wanted it to look worn and aged but not overly distressed.  I recommend prepping all the wood BEFORE assembly; it’s just easier.  

board-side-by-side

I just adore my new spice shelf!!  It was a real collaboration between my husband and myself.  Every time I look at it, I just smile.  It is a beautiful piece of art, in my humble opinion, and makes a real statement in my kitchen.  

I would LOVE to share detailed instructions with you, but honestly….we made it up as we went along.  And that was half the fun!!!  But feel free to ask any clarifying questions!  
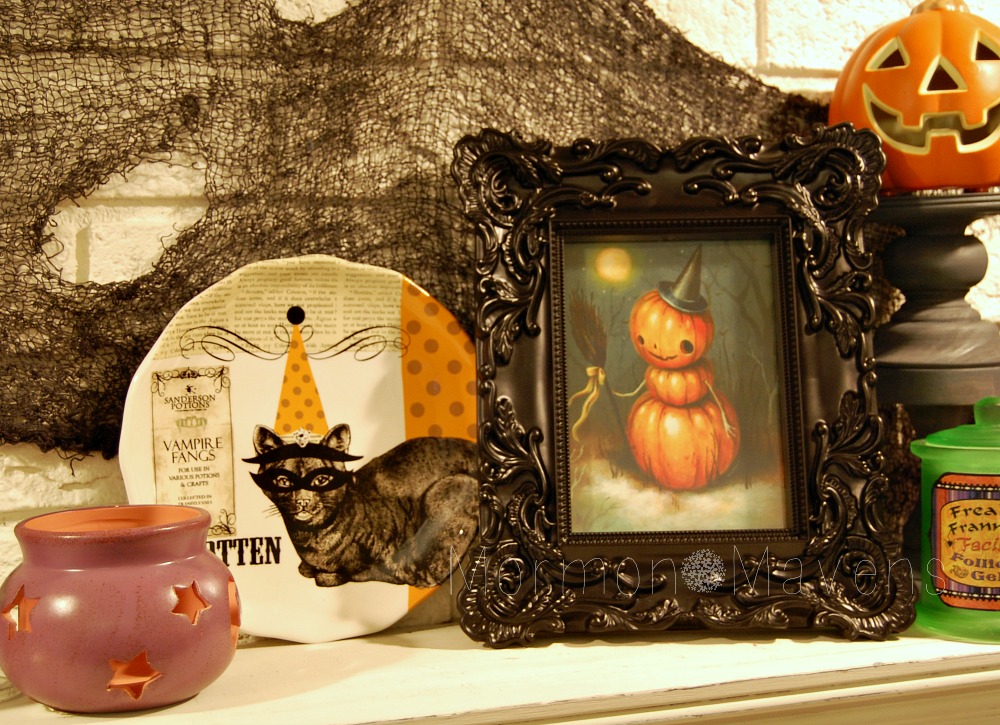
labeled-jars


Chocolate & Coconut Cashew Bars

cashew-bars-2

If you haven’t met me before, allow me to introduce myself.   I’m the girl who wants dessert after every meal.  Every meal.

And also after snacks.

And also after watching TV commercials about meals and snacks.

And that’s a problem.

But luckily I’ve found a way to combat this.  

And I have to be honest.  I really had no faith in this recipe because I am a dessert snob.  If it’s described as a healthy dessert my mind immediately puts it into the “Yeah, right!” category.  And so I wasn’t expecting much.  

I distinctly remember my first bite.  I think I said something like, “Well, it’s okay, I guess.  But I doubt I would make it again.”  Which was followed by multiple bites that impressed me more and more.

A month later and I’m still making them!  

And you know what I love most about this recipe?  The bars taste so rich to me that it only takes one to satisfy!  So they last a long time!  And this has been so helpful for me in my quest to eat healthier and lose weight.  Vegan if you don’t use the honey.

I did tweak the recipe a bit.  It can be gluten free if you make sure that your oats are as well! 

cashew-bars-1


Chocolate & Coconut Cashew Bars
Yields 25
A healthy bar treat that is rich and satisfying! Great combo of a little sweetness and a little salt and a little chocolate and a little nut!
Write a review
Print
Prep Time
15 min
Prep Time
15 min
Ingredients
  1. 1 1/2 cups lightly roasted cashews (I used Planter's)
  2. 1 cup old fashioned oats
  3. 1/4 cup almond butter
  4. 1/4 cup melted coconut oil
  5. 1/4 cup + 2-3 tsp. liquid sweetener*
Topping
  1. 1/4 cup liquid sweetener
  2. 1/4 cup melted coconut oil
  3. 1/2 cup unsweetened cocoa powder
  4. 2-3 Tbsp. unsweetened coconut flakes
  5. sea salt to taste
Instructions
  1. In a food processor, process the cashews for a couple of minutes. Scrape down the sides if you need to. They will start to clump together a little, and that's good.
  2. Add the oats, almond butter, and sweetener and blend for another couple of minutes, scraping the sides down if necessary. This should form a sort of dough.
  3. Line an 8x8 pan with parchment paper and lightly coat it with some non-stick cooking spray. Make sure the edges of the parchment come out over the edge so you can lift out the bars later.
  4. Spread out the dough and press it evenly to the edges.
  5. Make the chocolate topping by whisking together the liquid sweetener, coconut oil, and cocoa powder until smooth. Pour this over the top of the bars.
  6. Sprinkle with coconut and sea salt.
  7. Freeze for an hour or refrigerate for several. Then lift out the bars and cut them carefully into squares. I did 5 slices in each direction which gave me 25 bars.
  8. Store the bars in an airtight container in the fridge.
Notes
  1. *You can use agave nectar (although not actually healthy), honey, brown rice syrup, or maple syrup. I had some agave to use up and that was tasty, but like I said, not really healthy the way it's made today. I was worried that the maple syrup would be too strong, but it was perfect. Gotta be REAL maple syrup though!
Adapted from Dishing Out Health
Mormon Mavens https://www.mormonmavens.com/

Thoughts on General Conference

conference-points


Our Church holds two conferences annually to our worldwide membership and this year I was actually able to attend the Saturday afternoon session in the Conference Center in Salt Lake City, Utah, USA.   While in Salt Lake I was able to take a really cool picture of the spires of the Salt Lake LDS Temple.  As I was preparing a spiritual thought for today, I just really wanted to share the photo I took and also a few thoughts from other conferences that I have watched and taken notes from.  Hope you gain something from what I share today:

  • It is not the work of the Lord that is frustrated, but the work of man.
  • In spite of conditions in the world today, we live in a consecrated time.
  • Your calling isn’t about what you’ve done, but what the Lord can do through you.
  • Simplify your approach to discipleship–start where you are.
  • No matter where we are, we are the Lord’s agents.  We are always on His errand.
  • We are not aware of what the Savior’s sacrifice has done for us.
  • It’s not the trial, it’s the load.  Bearing it is necessary on our path to eternal life.  Don’t expect to carry it alone.
  • Keeping covenants empowers us–stay firmly on the path.
  • We were tutored in the pre-existence and were given trials and challenges unique to us.
  • Learn to recognize the power of the Atonement in your life.  
  • The Lord sees weaknesses differently than he does rebellion.


Okay, that’s it for now.  Time to get ready for church.  Happy Sunday!

Halloween Mantelscape

halloween-mantelscape-5
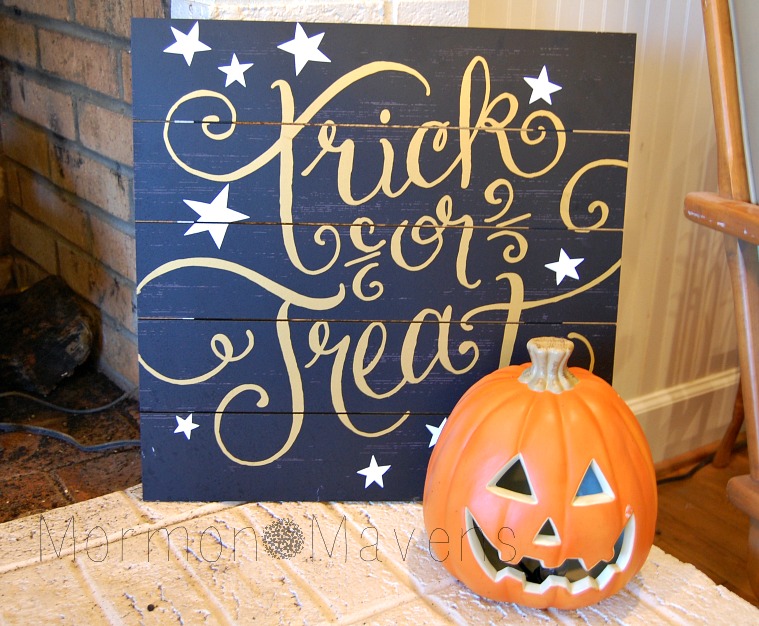
Some people are very gory and graphic with their Halloween decor.  In contrast, some people don’t even like to say the word “Halloween”!

I guess I’m somewhere in between.

I don’t do all the gore and super creepy stuff.  But I enjoy the pumpkins, costumes, candy, and the tame spooky stuff associated with it.

So if you hate Halloween, by all means, keep scrolling.  

If you like it….I think you’re gonna like this!

halloween-mantelscape-1

Over the years, I’ve collected a few fun Halloween items.  Some I love, some are just cheap place fillers.  But together they work pretty well.  At least for me.

I already had the dark open-weave fabric as well as the skull, potion bottles, Spellbook (which is really just a fun candy box), votives, and crow.  I purchased the cat plate, the black frame, the small Jack-o-lantern, and the wooden pillars that it sits on.  I also purchased the “Trick or Treat” sign in the first image (Hobby Lobby for something like $10).  I already had the Jack-o-lantern that sits in front of it.

halloween-mantelscape-6

I needed something with some height and, look as I might, I just had nothin’.  But I found some great rubbery plastic branches at Michael’s and they were on sale for $4.50 each!  I love them and think they balance out the black accents nicely.

halloween-mantelscape-4

Oh yeah, I also purchased that chalkboard bottle at Walmart for a few bucks.  My daughter drew a skull and crossbones on it for me.  One of my favorite accents is the drippy candles, which I posted about earlier this week.  SO incredibly easy!!  And you can do whatever colors you want!

halloween-mantelscape-2

I found the cute cat plate at Hobby Lobby for just a few dollars–I needed something round and a bit brighter for that spot.  The pillars that the pumpkin is on are just two wooden candle pillars from Michael’s that I painted gray.  They aren’t even attached to each other!  I like to keep my options open.

halloween-mantelscape-7

If you ignore the gross, old fake log unit in the fireplace, it makes for a pretty nice package altogether, doesn’t it?

And now, what to do for November……

Iced Herbal Tea

iced-herbal-tea


You probably think I’m crazy for posting an iced beverage recipe when, in most places, it is CLEARLY an Autumn day.  But here in the south, Summer is still trying to hold on. Heck, it was 84 degrees here at 7:00 last night.  I found this recipe online while searching for soft drink substitutes.  Seriously, Coke is my drink of choice right now and I know that is not healthy.  Working on it.  It’s a process.  

Anyway, this is my 2nd or 3rd attempt at finding something that actually tastes good and, face it, herbal tea can take some getting used to, especially if you are used to soft drinks and all that sugar–because I will NOT drink diet soda.  Don’t even get me started on that one.

Hope you enjoy this recipe.  It’s really simple and cheap in case you don’t end up liking the combination of teas that you use.  I couldn’t find the Red Zinger at the 2 grocery stores I went to, so I substituted a Zinger that was red, but probably wasn’t the intended flavor in the original recipe.  It’s still good though!  I know it will grow on me.  Try this recipe after an invigorating leaf-raking session!

Iced Herbal Tea
Write a review
Print
Ingredients
  1. 4 Celestial Seasonings Lemon Zinger tea bags
  2. 4 Celestial Seasonings Raspberry Zinger tea bags (Red Zinger was the original flavor)
  3. 4 cups pure apple juice
Instructions
  1. Steep the 8 tea bags in 4 cups of boiling water for 10-12 minutes.
  2. Discard tea bags; combine the tea with the apple juice.
  3. Refrigerate until cold. Serve over ice
Notes
  1. I think serving this in a pint--or quart if you're really thirsty-mason jar is awesome. Something about those jars just really makes a cold drink even more refreshing!
  2. I found (big surprise) that I needed to add a little sweetener to this recipe, so I just used some Agave nectar. Experiment with your favorite one.
Adapted from Ina Garten, Barefoot Contessa
Mormon Mavens https://www.mormonmavens.com/

Spooky Drippy Candles

drippy-candles-8
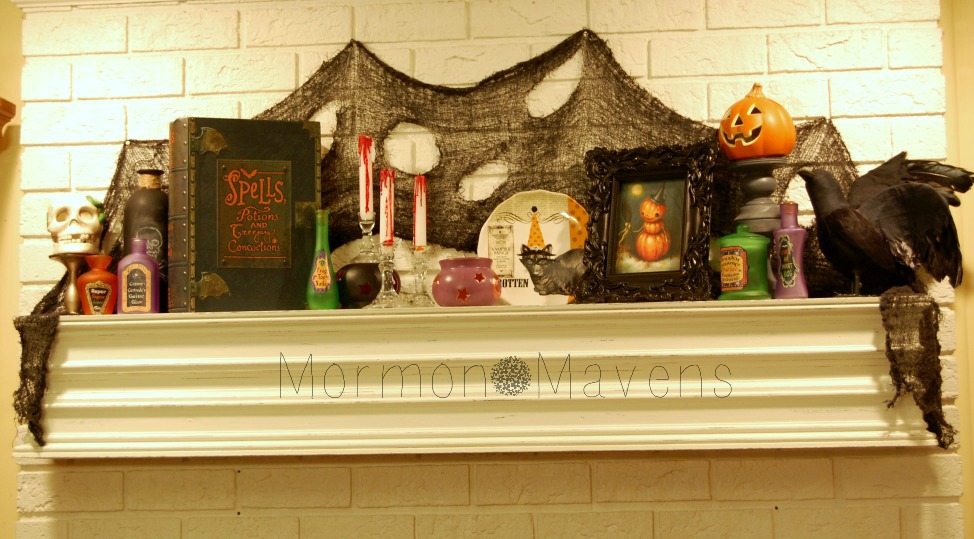
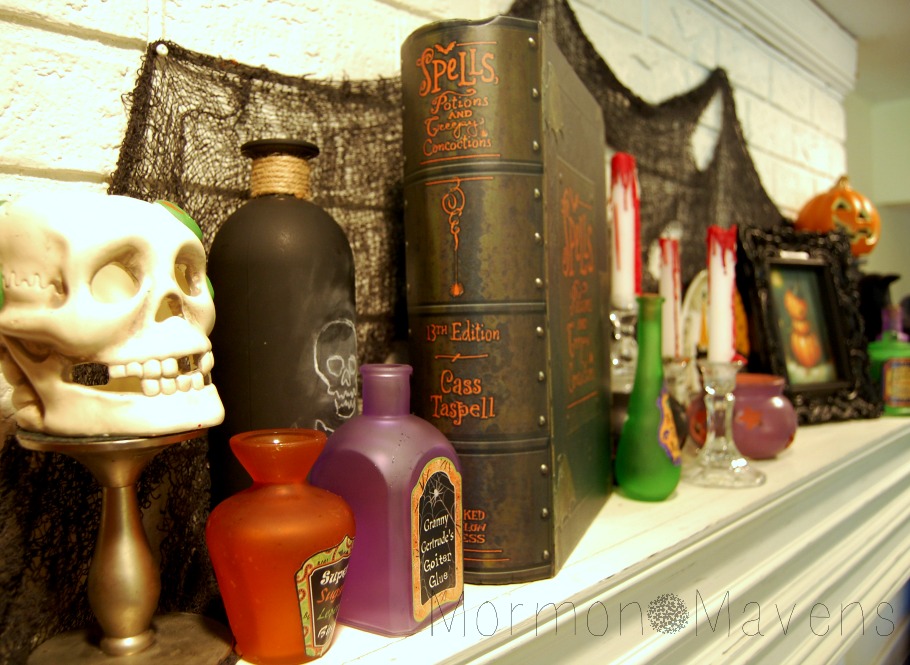
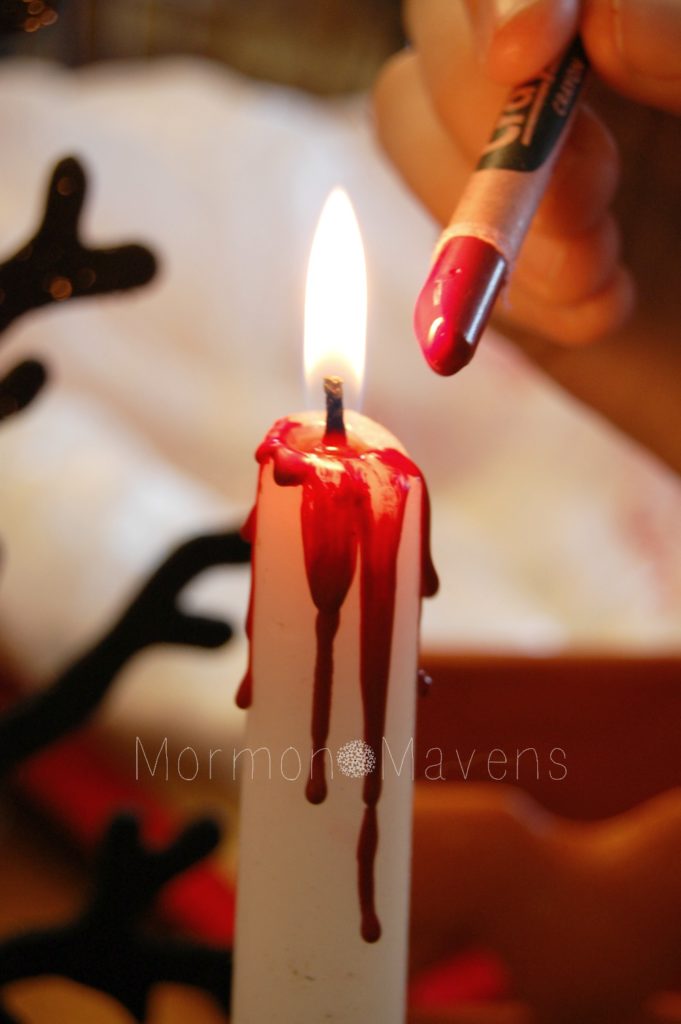
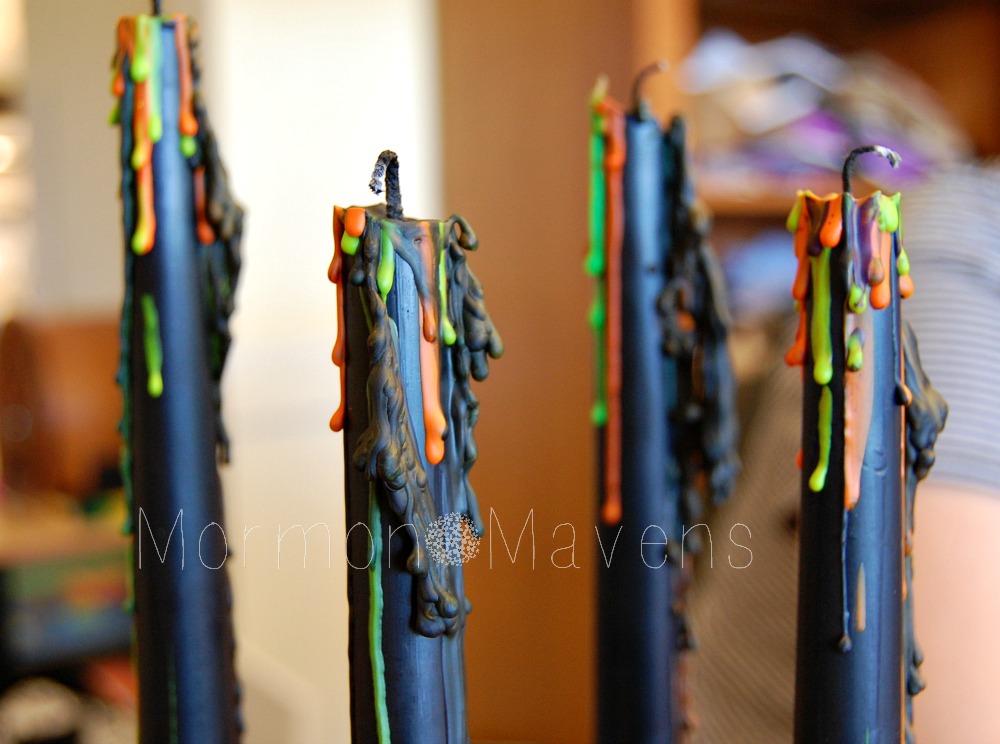
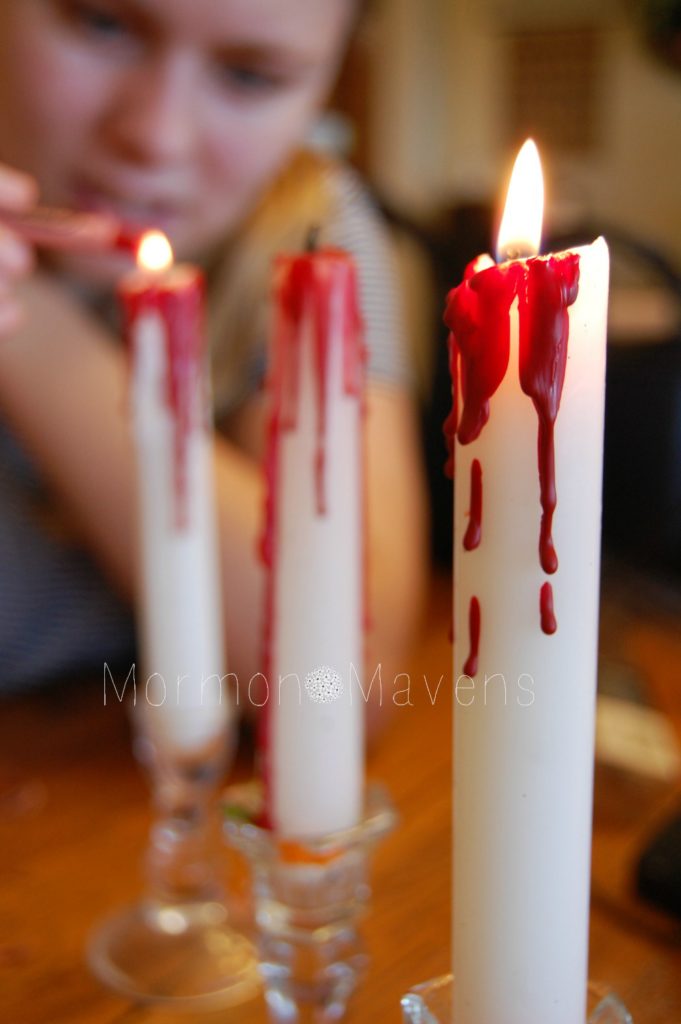
It all happened because I was thinking how boring my black candles were–I had bought them for my Halloween mantelscape and had foregone the much-more-expensive-but-way-more-cute black and orange striped candles.  What could I do to liven up these boring tapers?

drippy-candles-6

Crayons!

So I went to the crayon drawer and started hinting for orange, green, and purple (I love those colors together for Halloween!).  And I knew that they needed to be fairly light in color to show up on the dark candles.  My girls and I lit the black tapers, peeled back the paper on the crayon, and hoped for the best as we held the tip of the crayon near the candle flame and watched it melt, droop, and drip its way down the taper’s sides.

drippy-candles-1

Instant satisfaction!!!  

And we just couldn’t stop!  It was so much fun that after we did the black tapers, I grabbed a bright red crayon and melted it over some old white tapers.  SO FUN!  

drippy-candles-2

Now maybe red drippy candles is too creepy for you.  That’s fine.  But do you see the possibilities here?  What a fun way to decorate for next to nothing!  And the drippy look made my candles pop on my mantelscape!  LOVE IT!!!

drippy-candles-7

Have some fun with this one–grab some cheap tapers and your kids’ old crayons and just play!!!  It’s strangely addicting!!

drippy-candles-5

drippy-candles-4