Frosted Marshmallow Brownies

‘Tis the season for all those summer get-togethers and family reunions.  Running out of ideas for what to take? 

Whether you say “dish to pass” or “potluck”, sometimes it’s just hard to come up with something yummy and easy.  Here is a great idea we shared last summer.

And who can resist a recipe post that starts out with Captain Jack Sparrow?  Savvy?


 Yesterday, my kids asked for “you know, those marshmallow brownie things we used to make all the time” and I was like…

jack sparrow brownies

Seriously, I had completely forgotten.  It’s been years!

It’s a recipe out of my husband’s family’s cookbook.  The original recipe has a scratch brownie, but when I’ve got Thrive Life Brownie Mix lying around, why not use it?  It’s a “just add water” mix so I love that.  But you can use your favorite store mix or your favorite basic brownie recipe!  The fun part comes in what you put on top!

Frosted Marshmallow Brownies
Yields 16
A quick and easy brownie makeover!
Write a review
Print
Prep Time
5 min
Cook Time
35 min
Prep Time
5 min
Cook Time
35 min
Ingredients
  1. 3 3/4 c. THRIVE Fudge Brownie Mix
  2. 1/2 c. hot water
  3. 2 c. mini marshmallows
Frosting
  1. 1/4 c. butter, softened
  2. 1/3 c. unsweetened cocoa
  3. 2/3 c. powdered sugar (approximately)
  4. 1/4 c. milk
  5. 1 tsp. Vanilla Extract
Instructions
  1. Preheat oven to 350 degrees.
  2. Add the hot water to the brownie mix in a medium bowl. Stir just until the mix is fully moistened. Allow to sit for 5 minutes. (If not using Thrive mix, just prepare your favorite box mix or brownie recipe as directed.)
  3. Spread brownie batter into a greased 9x9-inch baking pan. Bake for about 35 minutes or until a toothpick inserted into the center comes out almost completely clean.
  4. Turn off the oven, pour the marshmallows out in an even layer on top of the brownies, and return the pan to the oven for 3-5 minutes. Remove and set aside to cool.
  5. Mix the frosting ingredients together, adding more powdered sugar if necessary to make the frosting spreadable. Spread the frosting over the cooled marshmallow layer. Cut into squares and enjoy!
Mormon Mavens https://www.mormonmavens.com/

Deviled Eggs


Happy 4th of July!! 

I know there are a bazillion recipes for deviled eggs out there, but I hope you try this one for your July 4th festivities or just whenever you want some of these tasty morsels!

Who doesn’t love all things Magnolia? This recipe is adapted from Joanna Gaines’ Magnolia Table cook book. It is the first recipe that I have tried from her and it did not disappoint. I made it for a Linger Longer at church this past Sunday and the platter emptied pretty quickly. Let me add that there were other deviled eggs on the table besides these.

One thing that you will appreciate is that there is BACON on these eggs. Yep. With brown sugar. So, WIN-WIN. Let us proceed…

Deviled Eggs
Serves 8
Write a review
Print
Prep Time
30 min
Cook Time
35 min
Prep Time
30 min
Cook Time
35 min
Ingredients
  1. 12 large eggs
  2. 1/2 lb. bacon
  3. 1/4 c. packed light brown sugar
  4. 1 T. distilled white vinegar
  5. Kosher salt
  6. 1/2 c. mayonnaise (I used Hellmann's because Joanna prefers it)
  7. 2 T. dill weed (if you accidentally pick up sweet instead of DILL relish)
  8. 1 t. dry mustard powder
Instructions
  1. Preheat oven to 375 degrees F and line a rimmed baking sheet with foil. My bacon stuck to the foil so you could also add a cooling rack and lay the bacon on that. I will be doing that next time.
  2. Spread brown sugar on a plate and press both sides of the bacon slices into this to coat them. Lay slices on foil/cooling rack in the pan. Bake until crispy 14-16 minutes. Cool on baking sheet.
  3. While the bacon is cooking, place eggs in a single layer in a large saucepan, cover with water to 2 inches above the eggs. Use whatever trick you know to help the eggs peel easily, like adding baking soda to the water. The recipe uses the vinegar and salt. Bring the water to a full rolling boil, cover the pan, then remove from heat and let stand 10 minutes. The eggs will continue to cook off the heat.
  4. While the eggs are "cooking", prepare a large bowl of ice and water. When the eggs are done, drain them and put them immediately into the ice water. This will stop the cooking process and prevent you from getting egg yolks that are green around the gills. So to speak. Let the eggs stand in the water until completely cooled.
  5. Peel the eggs, rinse, then dry them. Slice in half lengthwise. Gently scoop out the yolks into a medium bowl, setting the whites aside. I put them on a sheet of parchment paper.
  6. Add mayonnaise, dill weed, mustard powder and 1/4 t. salt to the egg yolks. Mix well, mashing the yolks with the back of a fork to completely incorporate them. Use a spoon to gently fill the egg whites. I used a jam spoon which seemed just the right size. You could also place the filling in a small zip-top plastic bag, cut the tip off of one corner and squeeze the filling like a pastry bag, if you like.
  7. Chop the reserved bacon and generously top eggs with it.
  8. Arrange the deviled eggs on a platter, cover lightly, and chill in the refrigerator for at least 1 hour, or up 24 hours before serving.
Notes
  1. If you check out the original recipe you will notice that you can also dust the eggs with paprika or minced fresh dill and chives. I might try that next time myself--because next time I will get DILL relish instead of sweet.
Adapted from Magnolia Table
Mormon Mavens https://www.mormonmavens.com/

Pizza Bowls


Hey, the kids are home for the summer !  Here’s a recipe–originally posted by Julie on November 21, 2016–that you can do together and it’s sure to please everyone at your house.  I’m thinking I might need to try this one soon…


You know those videos you see on Facebook?  The ones where they show amazing food?  Well, I save those.  And sometimes I actually make the recipes!  But this one…this one was different.

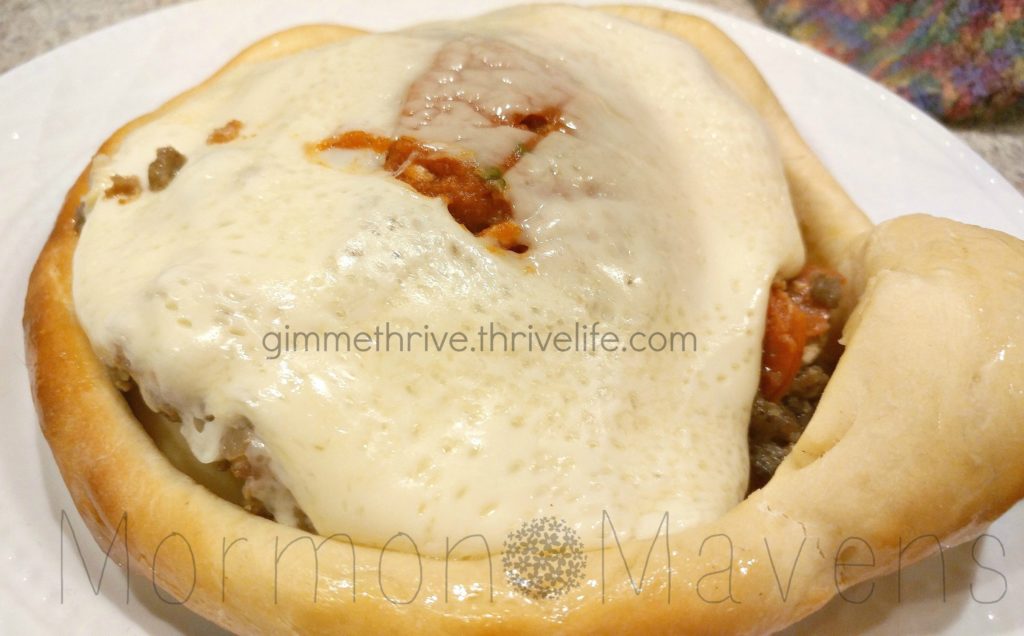
A Food Network dude was talking about one of his favorite places and that they served these Pizza Pot Pies.  I was drooling!  I mean, they looked amazing.  But hey, this place had some kind of Sicilian crust thing going on and, of course, a fancy restaurant oven.  I can’t make that at home, can I?

Challenge accepted.

I had to work with what I had.  So I took some poetic license with their concept.  With the crust.  With the oven.  With the name, even.

But the result was, well…..UH-MAZING!!!

These things are the bomb at my house–every single person in my family loves them.  And, they are so customizable!  Plus, they are fun to experiment with.

pizza-bowl-varieties

Adjust your cheese, sauce, and toppings to fit your mood, taste, or leftovers in the fridge!  here’s what I used to make the above 3 experiments:

  • Philly Cheesesteak:  leftover flank steak, provolone cheese, Thrive Bechamel sauce, Thrive red peppers, Thrive green peppers, Thrive onion slices
  • Chicken & Broccoli Alfredo:  mozzarella cheese, grated Parmesan, Thrive Seasoned Chicken Slices, Thrive Broccoli, Thrive Onion Slices
  • Meat Lovers:  mozzarella cheese, bacon, diced pepperoni, Thrive Sausage Crumbles, Thrive Ground Beef

I can see my oldest daughter wanting an experiment with pineapple and ham.  And I’d love to give a dessert pizza a try maybe with some ricotta and cream cheese, Nutella, and strawberries!

Pizza Bowls
Serves 4
Upside down pizza pot pie goodness baked in a bowl!
Write a review
Print
Prep Time
1 hr 20 min
Cook Time
15 min
Prep Time
1 hr 20 min
Cook Time
15 min
Ingredients
  1. 2 1/4 tsp. active dry yeast
  2. 1 cup plus 2 Tbsp. very warm water
  3. 3 3/4 cup Thrive Country White Dough Mix
  4. cheese of your choice (mozzarella, provolone, cheddar, etc.)
  5. sauce of your choice (spaghetti, pizza, Alfredo, Bechamel, etc.)
  6. toppings of your choice (pizza meats, veggies, etc.)
Instructions
  1. In the bowl of a stand mixer, combine the yeast and the 1 cup + 2 Tbsp. very warm water. With the dough hook on the mixer, slowly add in the dough mix until well-combined, then let the machine knead for 5 minutes.
  2. Remove the dough to an oiled bowl, turning dough over to coat. Cover bowl with a clean towel and allow to rest and rise for about 40 minutes or until doubled in bulk. Punch down and allow to rise again.
  3. Punch down and separate into 4 equal chunks. On a counter or floured board, roll or press out each chunk into a circle wide enough to cover the bowl and come down the sides of the bowl by at least an inch.
  4. Spray each bowl with nonstick cooking spray thoroughly. Also spray the outside rims a little. Layer 4-6 cheese slices in the bottom of each bowl.
  5. Mix the Tomato Sauce with the water until smooth. Pour 1/2 cup of sauce into each bowl.
  6. Add pizza toppings of your choice. It's okay to fill up the bowl to the top or even have it be mounded a little.
  7. (Note: you can use Thrive veggies and meats for toppings. Just refresh them first!)
  8. Take a circle of dough and carefully cover each filled bowl so that the dough goes over the edge and down the sides of the bowl by at least an inch.
  9. Place bowls on a large baking sheet making sure to leave space between them. Bake at 425 degrees for 15 minutes or until deep golden brown on top.
  10. Remove from oven and brush the crusts with melted butter.
  11. Remove a bowl from the baking sheet and place it on a dinner plate. Take another dinner plate and place it upside down over the pizza bowl. Using both hands--thumbs on top plate and fingers under bottom plate--firmly and carefully turn the plates over. Remove the top plate.
  12. Using a couple of spoons, carefully release the bowl from the crust/filling by lifting up on one side. If cheese has stuck to the bottom of the bowl, use the other spoon to scrape it out. Carefully remove the hot bowl and set aside.
  13. Enjoy! You'll want to eat this with a fork and knife!
Notes
  1. Because I sell Thrive, I have a LOT of Thrive. So I used our bread mix. But you can use your favorite bread dough mix or bread recipe. Just use what you'd use for 1 loaf.
  2. I made this using our family's cereal bowls, which are OVEN SAFE*****. But you can use any oven safe bowl/ramekin. I've even used kid sized real baking tins. I like using the ramekins we have because it makes a smaller portion which is just right for me.
Mormon Mavens https://www.mormonmavens.com/

Peach Cider Sorbet

My husband picked up some Peach Cider at South of the Border a couple of weeks ago, probably because we once had a Peach Cider Slushie at an Amish country store that I still think/talk/drool about.  I decided to try making sorbet out of it but couldn’t find a recipe specifically for peach.  So I looked over a few recipes I found on the internet and combined/tweaked/added to come up with this one.  It was a big hit with the family!  It tastes like fall, but since peaches are a summer fruit it’s best in summer.  Of course, you could always try frozen peaches.  Or you can try it with apple cider and apples, maybe add some whole cloves in with the cinnamon stick.  I’m sure that would be great!

Ingredients:
2 cups peach cider
2 large, ripe peaches (peeled, pitted, and cut into bite sized chunks)
1/4 cup white sugar
1 Tbsp. molasses
1 Tbsp. lemon juice
1 cinnamon stick
1/8 tsp. salt.

1.  Place all ingredients in a medium saucepan and bring to boil.  Reduce heat and simmer for 10 minutes.  Peaches should be soft.  Remove from heat and let the mixture cool for a bit.
2.  Remove the cinnamon stick and discard.  Transfer mixture to a blender and puree until smooth.  Strain mixture through a sieve into a bowl.  Allow to cool to room temp, then cover and refrigerate for at least 2 hours.
3.  Pour chilled mixture into ice cream machine and process until frozen and thick.  Transfer sorbet to a freezer container and freeze for at least 2 hours.

Serve and enjoy!


Originally posted on August 11, 2014.

Soft Caramel Dip


I love this yummy dip.  It reminds me of all things fall, so I’m posting it today in honor of our first day of school which also reminds me of fall (even though technically it’s still summer!).  I usually serve it with cut up apples and bananas, but you could experiment with other fruits as well as pretzels and various types of cookies (I bet Ginger Snaps would be awesome).  It’s normal for small bits of caramel to never quite get mixed in.  Think of those as hidden treasures.


Ingredients:
1 8-oz. pkg cream cheese, softened
1 cup sour cream
50 store-bought caramels, unwrapped

1.  In a mixer, blend the cream cheese and sour cream together until smooth.
2.  Melt caramels in a microwave safe bowl.
3.  Immediately pour caramel into creamed mixture and blend well until smooth.
4.  Eat right away or store in the fridge.  You may need to warm it a bit in the microwave if it is too stiff from refrigeration.

Source:  my recipe box (no clue where it came from, sorry!)

Originally posted on August 22, 2011.

Mom’s Potato Salad

 
  I know Easter just happened, but I wanted to share this recipe again because it’s an Easter tradition and I am still enjoying the leftovers!
 
Hey, you know Julie posted a potato salad recipe back here and explained that we grew up in a different potato salad culture.  I, too, am a potato salad snob.  Mom’s recipe trumps all others in my world.  I realize your world may include eggs, or you might like to smash up the spuds.  Whatever floats your boat. 
 
I was feeling nostalgic this Easter and decided to pull out Mom’s recipe, much to the delight of my family.  I had no idea they liked it so much!  Guess I will have to make it more often.  So, Moms’ recipe in Grandma’s retro Pyrex bowl.  Sweet memories.
 
Ingredients:
 
5 lbs. potatoes, boiled in salted water & peeled & cubed (love the cubes–it’s a texture thing)
1 lg. green bell pepper, chopped
1 small onion chopped
1 tsp. celery seed
3 small jars diced pimiento, drained
1 1/4 cup Miracle Whip (no, not mayo, please.  not for this.)
4 tsp. salt
1/2 tsp. pepper
1 T. apple cider vinegar
1 tsp. prepared mustard
 
1.  Peel the potatoes, place in large pot and cover with water.  Bring water to boiling and cook until just tender.  No mushy spuds here!  Let cool, then cut into bite-size cubes.  Place in a large serving bowl.
 
2.  Add the green pepper and pimientos to the cooled spuds (I say spuds a lot.  My first two years in college were spent in Idaho.)
 
3.  Combine the rest of the ingredients.  Mix well.  This is your dressing.  Add to the…wait for it….spuds and friends.  Toss together gently with rubber spatula to make sure the dressing is evenly distributed.


This recipe originally posted on May 8, 2014.

Source: Pat Brew Recipes.

Sausage Okra Gumbo


Today I am sharing a family favorite recipe that gets rave reviews no matter when I serve it.  Just had it the other night–8 of us for dinner and I doubled the recipe and had one serving left.  Yeah, that good.  I use Kielbasa, but feel free to used whatever type of smoked sausage you would like to.  Turkey Kielbasa is also very good. 
 
Mom always made this with Kielbasa.  Don’t you love saying that word?  Kielbasa, kielbasa, kielbasa…

Ingredients:
1 1/2 lbs. Polska Kielbasa ( I just use 2 packages.  You can’t have too much sausage in gumbo, can you?)
2-3 T. butter
3 T. flour
2 cups chicken broth
18-oz. frozen gumbo vegetables*
14-oz. can of tomatoes, chopped, with juice
1 1/2 t. salt (you may want to adjust down, depending on how salty your meat choice is)
1/4 t. garlic powder
1/4 t. ground red pepper 
1 T. Old Bay Seafood Seasoning

3 cups hot, cooked rice

1.  Saute cut sausage for a few minutes in a Dutch oven or large pot.  Even though these are precooked, I think it improves the overall taste to brown them up just a little bit and it also helps your roux.  Remove and set aside.
 
2.  Melt the butter in the Dutch oven.  Add flour and cook, stirring constantly, until mixture is deep brown, about the color of an old penny (this is known as making a roux).
 
3.  Add broth, vegetables, tomatoes, seasonings, and sausages.  Bring to a boil; reduce heat, cover and simmer for 25 minutes.
 
4.  Remove from heat.
 
5.  Ladle gumbo into bowls and top with a scoop of rice.  Some people think you should put a bunch of rice in the bowl and then add the gumbo on top.  Personally, I like less of a rice ratio to my gumbo.  A little scoop of rice on top is perfect for me.


* You can use a combination of okra, corn, onions, celery and sweet red pepper instead of the frozen vegetables. These days that combo is hard to find in the frozen food section.
 

Source:  Pat Brew, Brew Family Cook Book, 1st Edition.

Originally posted on January 24, 2014.

Chocolate Fondue


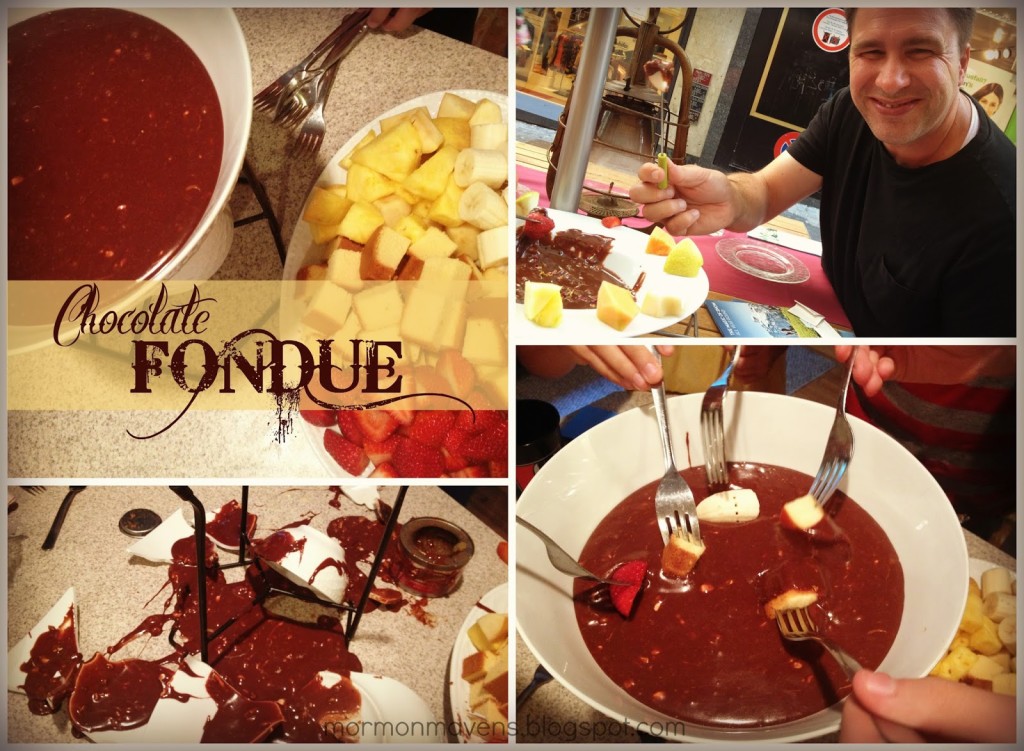
I recently returned from a wonderful river cruise in Europe with my husband and my parents.  We had a wonderful time!  Our first stop before boarding the boat was Lucerne, Switzerland.  Chocolate everywhere!  My kind of place.  We had lunch one day at a little restaurant on a side street….a fondue house.  We grabbed a table outside and checked out the menu.  We had every intention of having cheese fondue but when we saw the prices (holy cheese!) we quickly decided on the cheapest fondue item for our meal:  chocolate fondue (and that was still really expensive).  

 
It. was. uh. mazing.  (That’s my hubby in the pic above, enjoying a tasty chocolate lunch in the heart of Lucerne.)  Then we found out it was nothing more than melted chocolate bars and cream.  What?!?  I knew as soon as we got home I had to try this with the kids.  So we did.  And it tasted exactly the same!  Well, until our makeshift fondue pot exploded.  Yeah, that wasn’t as tasty.  The next time we made it we didn’t worry about having it on a flame.  It didn’t stay in the bowl long enough to harden up anyway….we ate it too fast!
 
 
Ingredients:
6 small Toblerone bars
heavy cream, about 1/2 cup to start
 
1.  Unwrap the bars of chocolate, break them up, and place the pieces in a saucepan with the cream.  
2.  Stir while it melts and remove from heat when the mixture is smooth.  Add more cream to get your preferred consistency for dipping.
3.  Serve with cut up fruit, pretzels, cubed pound cake, etc.  My personal favorites are strawberries and fresh pineapple.
 
You can use any combination of Toblerone flavors.  We used half-yellow packaged bar, half blue-packaged bar (I believe those are the technical terms).  My local grocery store carries those as well as a dark chocolate and a white chocolate.  Mix and match to your heart’s content!
 
Originally posted on September 30, 2013.

Grandma’s Biscuits


I really love these biscuits….they’re great with butter and jam, butter and honey, or just butter!  (Can you tell I like butter?)  And they remind my of my Grandma.


Ingredients:
2 1/4 tsp. dry active yeast
1 cup warm water
2 cups buttermilk
3/4 cup vegetable oil
1/4 cup sugar
2 Tbsp. baking powder
1/4 tsp. baking soda
1 1/2 tsp. salt
7 cups all-purpose flour

1.  Heat oven to 450 degrees.  Combine yeast and water and stir till dissolved.
2.  Add remaining ingredients and stir until well blended.
3.  Pat/roll out 3/4″ thick and cut with biscuit cutter OR place in greased bowl and place in fridge until needed (will keep a week in the fridge).
4.  Bake for 15-20 minutes.

Makes about 30, depending on your cutter

Notes:

  • If you buy yeast in the little envelopes, then use one envelope for this recipe.
  • If you don’t have buttermilk, put 2 Tbsp. apple cider vinegar in a 2-cup measure.  Fill to the 2-cup line with milk and allow to sit for 5 minutes.  
  • I like my biscuits tall and thick.  If you like yours thinner, roll or pat them out to the thickness you like.

Source:  my Grandma Davis

Originally posted on May 27, 2013.

Pizza Dip


When I found this recipe on–where else?–Pinterest, I figured it would be pretty good.  I didn’t know it would be AWESOME.  I made the original dip but also made a second dip with different toppings.  Both were a hit. But I have some bad news. If you make this for an event or party, you will have no leftovers to enjoy.


Ingredients:
4 ounces cream cheese, softened
1/4 cup sour cream
1/4 cup mayonnaise
1/2 cup shredded mozzarella cheese
1/4 cup grated Parmesan cheese
1 cup pizza or spaghetti sauce
1/2 cup shredded mozzarella cheese
1/4 cup grated Parmesan cheese
pizza toppings of your choice

1.  Mix the cream cheese, sour cream, mayonnaise, 1/2 cup mozzarella, and 1/4 cup parmesan together in a bowl. Spread this into a shallow dish, like pie plate.
2.  Spread the pizza or spaghetti sauce on top. Sprinkle on the remaining cheeses and whatever toppings you like (I chose mini pepperoni slices for one and pineapple tidbits and Canadian bacon for the other).
3.  Bake at 350 degrees for about 20 minutes, or until it all looks deliciously melted and slightly bubbling along the edges.
4.  Serve with crackers of your choice, bread slices, bread sticks, etc.

For serving:  I got baguettes and sliced them diagonally, about 1/2″ thick.  I drizzled them with a little olive oil, sprinkled them with salt and pepper, and baked them for about 8 minutes in a 425 degree oven.
nomorepizzadip.jpg


Originally posted on April 29, 2013.