Niki
Thanksgiving Egg Gravy
This is a family recipe from my Great-Grandmother Nanny past down to her daughter, my Grandmother Josephine, past down to her daughter my mom Jacqueline, past down to her daughter..Me. My Grandmother Josephine was born and raised on a farm in the countryside of North Carolina. Her father was a tobacco farmer and her mother tended to the children, the farm and cooked breakfast, lunch and dinner! (from scratch of course!) This recipe was part of my favorite meal of the year! I looked forward to this all year long. I love food and appreciated the work that went into making this. I was allowed to help when I was around the age of 10. My mom and grandmother would cook all day long. They had to cook a lot of food because all of my Grandmother Josephine’s siblings and their children and their children’s children would end up at her house to eat every Thanksgiving. So she fed roughly 30 people at one time. She even had pies, and cakes. Looking back now, I don’t know how she did it.! We ate in shifts with her best china, silver and crystal. (I loved that and wasn’t allowed to wash them until I was in high school!) The men went first, then the kids, then the moms. Funny how I didn’t think about that then. But, it’s pretty typical for a mom to eat last, huh? The “shifts” would eat, the dishes were washed and then the next shift began. The picture above is from this weekend. My husband can’t travel home with us for Thanksgiving. So, we cooked an early Thanksgiving meal for him. This was yummy. In the picture, (not my best china obviously) you can see the Egg Gravy, the Turkey, and the Dressing. (The dressing is stuffing patted out in a cookie sheet and cut into squares. Good Stuff.) But the Egg Gravy is what we are talking about now. It is really easy and so good. And you know, its taste is not “eggy”. Its just good stuff. Real comfort food and I love it. I really do. I love it. Not just the taste of it, but my heart loves this treasured memory of my grandmother’s recipe.
1 32oz carton of Chicken Broth
1 32oz carton of Chicken Stock, OR use your drippings from your turkey!
1 dozen Eggs, hard boiled (you don’t have to use this many eggs. but we like them so we use a dozen)
3-4 Tbs. Flour
salt
pepper
Hard boil the eggs. Peel them and slice them. In a big stock pot add the chicken broth and the chicken stock. Cook over med-high heat. Go ahead and add the flour before it gets to hot and you can’t break up the lumps. Add 3TBS in and whisk until all lumps are dissolved. If you want the gravy thicker add more flour. then bring it to a boil lower the heat to med-low and add the eggs. Cook for about 30 minutes. Stir frequently so it doesn’t stick to the bottom of the pot. Then serve over your dressing and turkey. It’s a southern delicacy! Happy Thanksgiving!
Rustic Corn Chowder
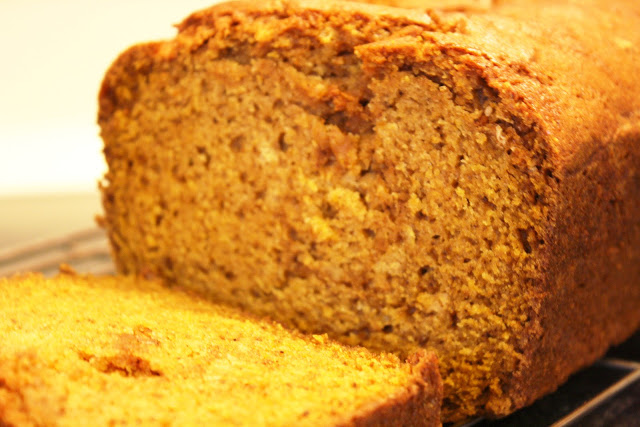
Pumpkinger Bread
I know that I did a post a few months back on how much I love pineapple. But, let me tell you about how much I love Pumpkin and Fall in general! I mean I love this time of year! Any recipe with pumpkin, sweet potatoe, allspice, cinnamon, chocolate, cloves, ginger bread…oh, man! I could go on, and on, and on, but I want. Just know that if I post a recipe on this blog and it has any of the above mentioned…its good. Really good.
This recipe was found on pinterest! I tucked it away for this fall season and pulled it out today to make and take over to my new neighbors! (By-the-way, they are a very nice family.) Anyhoo, this recipe makes me happy for another reason other than the pumpkin and the spices, it make two loaves! You gotta love that. Because, sometimes in baking you can’t just double a recipe. You have to make it twice! And that gets old. So, I loved that this makes two BIG loaves the first go round!
We made some cream cheese icing to smear on it and …sorry, there wasn’t any left to photograph. But it was yummy too!
3 cups white granulated sugar
1 cup vegetable oil
4 large eggs
2/3 cup water
1 (15oz) can pumpkin puree
2 tsp. ground ginger (which is why i named this “pumpkinger” bread)
1 tsp. ground allspice
1 tsp. ground cinnamon
1 teaspoon ground cloves
3 1/2 cups all-purpose flour
2 tsp. baking soda
1 1/2 tsp salt
1/2 tsp. baking powder
Preheat your oven to 350 degrees. Lightly grease two 9×5 inch loaf pan. ( I generously sprayed Pam and it worked great!)
Mix your wet ingredients first. Beat together the following until smooth: sugar, oil, and eggs. Then add the water. Blend well. Add the pumpkin puree, and blend well. Then to the wet ingredients add the spices. The ginger, allspice, cinnamon, and clove.
In a seperate bowl mix together your dry ingredients. The flour, baking soda, salt, and baking powder. Add dry ingredients to pumpkin mixture and blend well. Divide the batter between the two loaf pans and bake!
Bake for about 1 hour or until your toothpick inserted comes out clean. I had to bake mine for about 1 hour and 15 minutes.
Recipe adapted from pinterest.
Slow Cooker Chicken and Cheese Biscuits
My kids really loved this! This is a pinterest recipe that I have saved for a long while just waiting for the right time to try out. It was really Yummy! The only thing I didn’t like about this recipe was the Thyme. I am not a big thyme (seasoning) fan. When I make this again, I will probably leave that ingredient out. But!, it was very yummy and a good comfort food recipe. I simplified it a bit and left a couple of original ingredients out to make my family happy. I loved using my slow cooker, it made this easy!
Chicken Stew:
2 cups chopped red potatoes
1 cup chopped carrots
1/2 cup chopped onion
1 cup chopped celery
2 cloves garlic, minced
1/2 tsp dried sage
1/2 tsp dried thyme
1 tsp salt
1/2 tsp black pepper
2 TBSP quick -cooking Tapioca
1 lb chicken, boneless & skinless, cut into pieces (for quicker cooking)
1 cup chicken broth
1 cup frozen peas
1 oz cream cheese, cut in pieces
cheesy biscuits
Biscuits:
1 2/3 cup biscuit mix
1/2 cup shredded cheddar cheese
1/2 cup milk
In a slow cooker, combine the following: potatoes, carrots, onion,celery, garlic, thyme, sage, salt, and pepper. Sprinkle tapioca over the mixture. Lay the chicken pieces over the mixture and pour the chicken broth over all of it. Place the lid on and set the timer for about 3 1/2 hours on high.
About 15 minutes before the timer goes off, add the frozen peas and cream cheese. Stir a bit. The chicken breaks apart and almost shreds it is tender! Replace the lid and continue cooking.
In a mixing bowl add the following ingredients for the biscuits: 1 2/3 cups biscuit mix, cheese, milk. Stir well until the dough forms. Then drop by heaping TBSP fulls into a greased cupcake pan! (this was easier for me than rolling out dough.) Cook in a 450 degree preheated oven for about 10 minutes! Really watch these, they burn easily. (so says my first batch!)
Serve this when the biscuits come out of the oven! Spoon the Chicken Stew over the biscuits. The kids loved this!
Adapted from pinterest
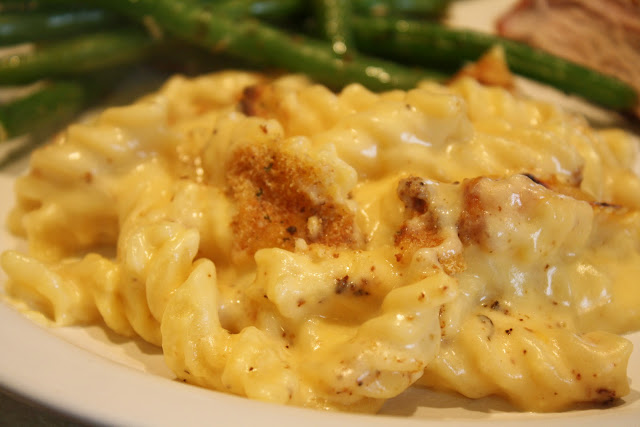
My Best Mac & Cheese
How many recipes have you tried for mac & cheese? Seriously, I have tried too many. Look no further! This is the one! Totally delicous! My kids totally asked for 2nds and 3rds! There are 4 differents cheeses in this and seasonings that you already have handy. You are going to make this your go to recipe for homemade mac & cheese. I promise!
This recipe makes a 13″x9″ casserole dish full!
2 TBSP. butter, melted
1/2 cup all-purpose flour
1/4 tsp. ground black pepper
4 cups milk
1 cup grated parmesan cheese
1 cup shredded sharp cheddar cheese
1- 1/2 cup cubed velveeta cheese
1/2 cup cubed cream cheese
1-1/2 boxes of Rotini pasta, cooked
onion powder
italian bread crumbs, or your favorite
Pam
Spray your casserole dish with pam, and set it aside. Preheat your oven to 350 degrees.
Cook your pasta and drain. Set it aside.
In a good sized pot melt the butter over medium heat. Add in the following: flour, pepper and milk. Slowly add the milk using a whisk until mixture is smooth. Bring this to boil over medium heat; cook for one minute, stirring constantly so your sauce doesn’t stick! Immediatly reduce heat; add cheeses, stirring in until melted. Remove from the heat and add in the pasta. Stir until the pasta is coated well and pour into the casserole dish.
(If youhave a bigger dish it might be a good idea to use it. My 13x 9 overflowed! But man, was it good!)
Sprinkle over the onion powder over the top, generously, but don’t go crazy! The sprinkle the bread crumbs over the top. You can add as much or as little as you want.
Bake for 30 minutes or until bubbly.
Recipe seriously adapted from Gooseberry Patch.
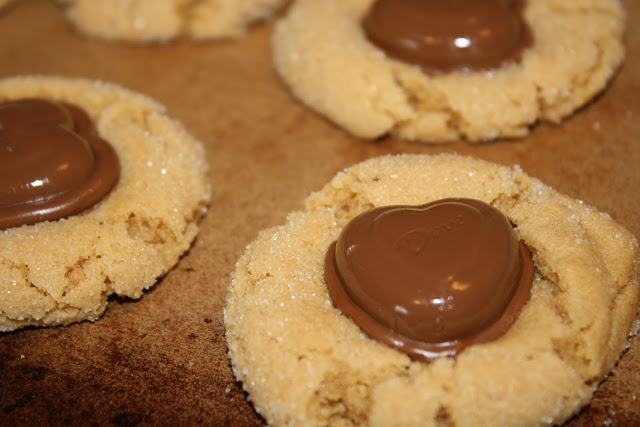
“I Love You” Cookies
School starts here on August 27th! We are all excited! I have two kiddos that don’t enjoy school lunches at all, and the other two pack a lunch when there is something yummy from home they would rather have! I always send love notes, and special treats but,this year I wanted to do something special for the first day of school. These are soo yummy! Peanut butter cookies and a dove heart ontop! Easy peasy! You can make the cookie from scratch or buy the cookie mix for an even easier time of it!
1 package of peanut butter cookie mix
1 package of Dove milk chocolate hearts
white granulated sugar
Follow the peanut butter cookie instructions. After you have formed the cookie roll it in some sugar and place on the cookie sheet or stone…whatever you have for baking. Then bake according to directions. It will take about 8 -10 minutes. Don’t let them get to brown.
When the cookies come out, press the chocolate hearts into the center and the cookie will spread out a bit. Let them stay on the cookie sheet for a while cooling off. The heart will melt a bit, as you can see in the picture, but it will cool and stick to the cookie just fine.
After they have cooled completly, remove them from the pan and place them on a rack to let the chocolate set a bit more. It should be comepletly back to normal before you pack them up.
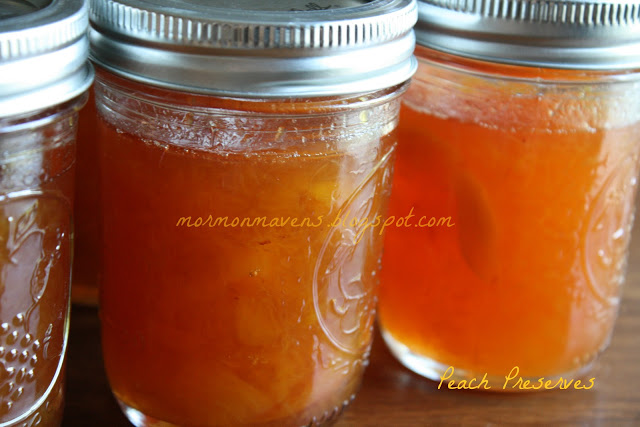
Peach Preserves
We moved two weeks ago into a new home on the Eastern Shore of Maryland. The previous owner was an outdoor lover and put lots of time and care into her beautiful yard. When we were moving into the home I glanced out the kitchen window and saw our new peach tree was OVERLOADED with peaches! Into my wanna be domestic mind came one thought, “Oh! I get to make peach preserves!” Well, two weeks later as the peaches started to fall off the tree and the neighbors started coming over and asking if they could have some, I remembered I wanted to try my hand at making some preserves. So, I stopped unpacking and arranging the house and set to making preserves. Which, I have NEVER done before! Long story short, it wasn’t hard! It went really great! (Aside from the fact that I had the heat turned up too high at one point and it popped all over my arm while I tried to stir the concoction! That burned like crazy! But, I’m okay now.) This recipe is scrumptious! And we have probably gained a few lbs this week because we can’t stop eating it! That probably has something to do with all the sugar in this, but I keep telling myself its the fresh peaches…they are so healthy for you! This is my recipe. Its a combination of at least 3 or 4 I have read in preparation for this. And believe it or not, I didn’t add as much sugar as some of the recipes suggested!
12 cups peaches, fresh whole peaches, peeled and chopped, about 20 peaches size of tennis ball
3 TBSP. lemon juice, freshly squeezed, no seeds please
8 cups white granulated sugar, for every 3 lbs of peaches use 3-4 cups of sugar
1 box of pectin
12- 1/2 pint sterilized canning jars and lids, and I also used 2 pint sized jars for immediate use.
tongs, to remove the jars from the canning process in the hot pot of water
wide mouth funnel, but I didn’t have one and all went well
The first thing I did was set a big pot of water on the stove to boil. Sterilize everything! Then set to dry on a sterile rack.
Then boil some more water and get all the peaches washed while waiting for the water to boil. I filled the sink with the peaches and then filled it with water. Washed them off really well again as I was draining the sink and rinsing it out. Place all the peaches in a huge bowl and then one by one cut an “x” across the bottom of the peaches and placed them into the pot. Add about 6-8 peaches at a time and let them boil for about 1-2 minutes. Then take them out and place them into another large bowl. Add more peaches to the pot of boiling water.
The purpose of this is to loosen the peach skin so you can peel it right off! It works pretty well. Although, you might not find it necessary if you just want to dig in and start peeling away with your knife. But, I think the boiling method helps you save more of the peach flesh when peeling.
After you have seeded and peeled and chopped all the peaches,you should do a bit of clean up and get out the sugar. Add 8 cups of white granulated sugar to the peaches in the bowl and stir really well. Let it sit for about 30 minutes to an hour. Stir periodically to get the settled sugar off the bottom.
Add the peach and sugar mixture to a big stock pot and stir in the pectin. Bring the mixture to a boil then lower it as needed to keep yourself from getting burned as you stir constantly to keep it from sticking. Boil and reduce this while stirring for about 30 minutes, maybe longer if it needs to thicken more. Cut off the heat. Funnel the peach preserves into the jars and tighten the lids.
Bring another pot of water to boil that will be deep enough for your jars to sit in. Water should reach the lids. Add about 5 jars at a time and boil for about 10 min per group. You should hear the lids popping. That is the suction being created! Remove and set aside on a rack to cool. I even heard the popping after the jars had been removed! It was like an applause for a job well done!!!!
We immediately spooned some hot peach preserves over ice cream and thought we had died and gone to heaven. This stuff is divine!
Family Favorite Chicken Salad
When it comes to chicken salad, my family can’t get enough! That includes my extended family. It’s a go to meal for all of us. An entertain the company meal, even! So, several years ago one of my girls had a preschool teacher that introduced us to her chicken salad. And this is the chicken salad that I always make. But, I will warn you, if you have a hard time taste testing your recipes, or playing around with them, this probably isn’t for you. It always tastes the same to me. But, its one of those recipes that I just make up as I go. So, I will try to give you a general idea and then you have to experiment! It will be fun! And your family will love this!
5 or more chicken breasts, boiled, and chopped into bite sized pieces.
3-4 big stalks of celery, chopped
1 med. sized onion, chopped
Note: But, be careful not to add all of the onion at first. you don’t want to over power the celery!
2-3 big red delicious apples, chopped
2-3 big granny smith apples
Note: You use the apples to stretch the salad. If you have a lot of people to feed up the apples! Up the veggies even!
2 cups Red seedless grapes, halved (obviously you can add more)
1 cup walnuts, or pecans, optional
Duke’s Mayo
Kraft Creamy Poppy seed Dressing (this is the secret ingredient)
Crescent rolls, crackers, yeast rolls, lettuce, etc. Anything and everything you would like to serve with this!
After you have boiled and chopped the chicken add all ingredients to a super large bowl and mix. In a separate bowl pour in the entire bottle of the poppy seed dressing and add about 3/4 c of mayo and stir until mixed well and the dressing has thickened up. You made need to add more mayo. But, be careful not to over do the mayo, you will lose the poppy seed flavor if you add too much. Chill and serve! Delicious!
Sometimes I find myself without poppy seed dressing and so I will make up a mixture of mayo and sugar and vinegar. This will taste yummy too!
Recipe adapted from Sherene Winkle.
Banana Cake with Vanilla Icing
Oh. My. Gosh! This is delicious! The icing is what makes it taste sooo good. The cake itself tastes almost like a banana bread, but much sweeter and smoother. It would be yummy by itself, but with the icing…yum! The icing is just addicting! I found this recipe on pinterest and changed a few things that worked better for me. You’ve gotta try this!
Cake:
2/3 c. white granulated sugar
1/2 c. sour cream (use the good stuff!)
1 egg
2 TBSP. butter, softened (use the good stuff)
2 mashed ripe bananas
1 tsp. vanilla extract
1 c. a/p flour
1/4 tsp. salt
1/2 tsp. baking soda
Icing:
2 TBSP butter, softened
1/4 c. heavy cream
1/2 tsp. vanilla
1-1/4 c. confectioner’s sugar
Preheat oven to 375 degrees. (glass pans heat to 350)
Cream together the first 4 ingredients. Add the mashed bananas and the vanilla. Add in the last 3 cake ingredients and mix slowly. No lumps from flour…banana lump is okay, but you really should mash those well before you incorporate them into the mix. Pour into a greased 8×8 pan. Bake at 375 degrees for 20-25 minutes or until golden brown and a toothpick comes out clean! Cool completely before icing this.
To make the icing: Cream together the butter and the confectioner sugar until smooth. Slowly add the cream in…(this is what makes it so good!) Add in the vanilla extract and mix until smooth. Put in the fridge if your waiting for the cake to cool because this has cream in it. But if your cake is cooled, then ice away!
No joke…this is soo good!
*I doubled this the very first time I made it! Cooked it in a 9×13 pan and it worked well.

